Colloidal Silver Generator
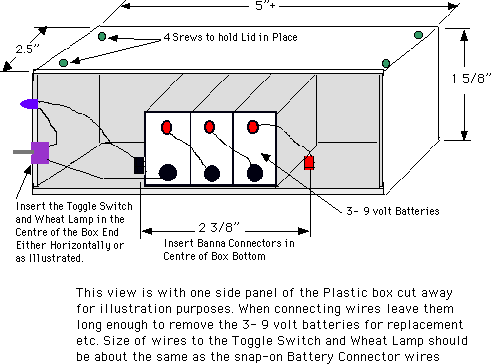
GENERAL CONSTRUCTION. Illustration 1 Illustration 2
The equipment consists a box containing three replaceable 9 volt batteries in series with an on-off switch and a 24 volt, 40 milliamp "grain of-wheat" lamp, which serves as a an ideal ballast, current drain indicator, current limiter, and battery condition check.
Two #14 gauge (AWG) .9999 flne silver electrodes about 5" long and a square of plastic pot scrubber complete the kit.
MAKING COLLOIDAL SILVER.
The generator is designed to suit a wide mouth one quart or two quart Mason canning jar.
Fill the jar up to about one inch from the top with (a)tap water if low in dissolved solids (TDS), or (b) distilled waber if your local TDS are greater than 50 ppm.
I recommend against bottled waters, which are sometimes mineral-enriched to 120 ppm. In the Greater Vancouver area, we have been assured by the GVRD that surface water from the three reservoirs, collected from surface run-off, has a reading of one (1) ppm TDS, so IS ideal.
Clean any oxidation off the two electrodes with the pot scrubber, and insert into the two banana jacks under the unit, and place over the water jar. Switch the unit on, ensuring that the light does not come on (this will only happen if resistance across the electrodes is too low due to either shorting out or to exceptionally high dissolved solids).
You will see oxygen bubbles form at the negative electrode, and a fine mist of colloidal silver will sinter off the positive electrode. Stir occasionally with a non-metallic stirrer, such as a swizzle stick. After about twenty or so minutes (dependant on water quality) the water will have a definite gray metallic sheen, and you will have made colloidal silver of 3 to 5 ppm, each particle being 1.26 Angstroms (about 200 atoms) in size.
If you leave the unit on too long, the mixture will first turn yellow (about 10 ppm, still usable), then pink, then red, and finally black, which indicates that silver oxide particles have formed, and the product is useless and must be thrown away.
The 3 to 5 ppm level is small enough to be ideal for the body's absorption.
STORAGE.
Place your colloidal silver in brown or dark green bottles (with non-metallic screw or snap tops), and store only at room temperature in a dark cupboard. Heat, cold, light and metallic contact will all cause oxidation, and must be avoided. Care in storing will ensure that the colloids stay in almost indefinite suspension, because the particles are positively charged, thus repelling each other. Shake well before using.
MAINlENANCE.
After each use, wipe the black deposits off both electrodes with a paper towel, and polish with the provided scrubber before storing The battery condition can always be checked by briefly shorting an electrode across the jacks with the unit switched on. When the light becomes weak, replace the batteries, taking care not to pull on the wiring, which has been supplied generously long, so as to make it easier to handle. Eventually, the Sliver electrode wires will need to be replaced - make sure the silver purity specified above is used.

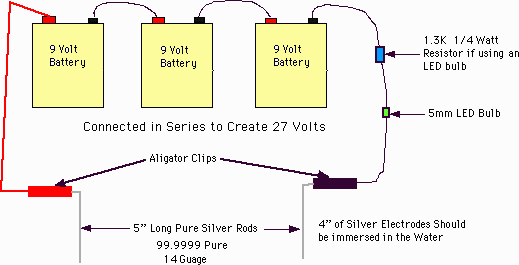
The Image below illustrates a Generator using an LED light instead of the "Grain of Wheat" lamp shown above.

Tape the 3 batteries together with electrical tape. The two wire leads from the Alligator clips to the batteries should be about 12" to 16" long. With the two Silver electrodes bent as shown they will just hang into the wide mouth jar. Note that 4" of the electrodes should be immersed in the water. This applies to both illustrations. The rods should not touch each other. You can test the batteries by touching the two rods together. When the LED becomes dim, replace the batteries.
In this second image, the LED bulb should light when the rods are put into the water.