


A.C.'S HOW TO REPLACE YOUR VW HEATER CHANNELS SITE
Have you been looking all over the Web for that elusive page on how to replace heater chanells? Well, look no further, you have found the right place!! This site will walk you through the procedure from beginning to end, so you will have no trouble at all doing it yourself. Many people seem to be be in the dark about heater chanell replacement because none of the published repair guides have any info about the procedure. Well, let me tell you, I am here to fix that.
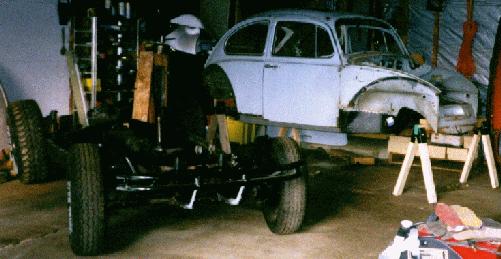
Here on the left is what most people start out with with their Volkswagen project. Don't be intimidated, it is good clean fun, replacing these babies.
First off; are you replacing for structure alone, or are you doing it with heat? There's no difference aside from the price of channels.( There's an economic heat channel "No heat" that's half the price of normal heat channels.) To do a thorough job do a "full body off" and get that puppy up on saw horses about 36" + or - (close) off the ground, make sure you take your time- support it better than good cause you'll be crawling back and forth underneath to perform this procedure. The picture at left is a "worst case" but in Wisconsin as a bugger you see the good in the dead... heat channels are in reality VW's only outer support off the pans.
Second, tools you need; A 4 1/2" grinder( Dewalt makes a good one and it's got a safety so it doesn't take off when you drop it or set it down). You'll also need several packs of wheels( get some of thick and thin see what works best!). A welder or some one willing to weld cheap, at around $300 you can get a good wire feed (flux core wire) welder and save youself from getting screwed. A small chisel and a good hammer ( buy a good one ). A pair of thick welding gloves; two pair one for you and one for your assistant, unless they're brave.Last but never forgotten safety glasses or goggles( you want to see this after you're done.
Third time and patience; If you're on this page you either can't afford to have someone do it or you fancy yourself an up and coming VW surgeon (well if you've done the body off whats two day's or a week off the body matter!) This is a Huge undertaking for an amature, but within your realm if you love your new bug as much as I think you do. Take some measurements while you're in the patient planning mode. Bolt holes on the old channels, if they exist. In the worst case, the edges of the channels across the inside of the car. Anything you can do now so that when you cut them out and replace them (one at a time) you'll have a reference and be able to say close enough. The closer you get these puppies in the install the better you'll feel when you set the car on the pan again. Usually the brazilian repair pieces; channels, panels, etc. are off but I'm talking esthetics here. (you'll have to fill and engineer on the fly, but you've come this far so your ready for that RIGHT?)
Forth unless your a dynamo take a break this is huge... your about to raise the dead. Bugs that would have been on the heap are on the road because of this procedure.
Fifth get a mask or bandana when you start cutting. Otherwise you'll taste it. Remember one at a time, and " NEVER OPEN the DOORS" of the bug until the channel is welded in." This is very important" Keep the doors of that puppy closed, you risk major door alignment problems if you don't heed my warnings here. The channel has major tie in points; up at the fire wall in front (bigger bolts go into the channel here), the front door pillar (there's a tube inside for you heaters), the rear door pillar (more detailed section, lots of angles), and the back of the rear Quarters(these usually don't line up and need a little finessing) What your looking to do is remove the old channel but grind daintily around these areas, these are your tie ins were you will be re-attatching the new channels. (VW spot welded at the factory so) Once you get most of the old channel out a chisel and hammer cleans up the tie ins. (After light grinding they glow.) I am hoping you see these areas thru photos and as you gut this back you'll see what I'm talking about. You've gutted back the channel, now get out your reference measurements and turn around and look at the other channel you haven't removed yet (right) you're doing them one at a time. Your main objective here is to get the new channel into position and tack weld where you can, just get it to stay put so you can do some magic repair. When I did mine I had to reconstruct each tie in point and over lay a patch (see photos). The bottom of the channel should be close to the other one, If it's there other wise use the new one as your new reference if your in a "worse case". You don't want to end up with a lopsided bug so pay attention to any reference you can- You Are The Sculpture !
Sixth or so take a huge soda, beer, or whatever else your vice is break.(but if your break impairs your skills of concetration or makes you a hazard to yourself with tools, call it a day). Hopefully your looking at a tacked in channel, enough to hold together or a completed side (depends on your state; are you a Dynamo or slow and easy win's the race?) Even If it's tacked in technically your half done thats Great! Remember the worst case, look what you have now, Remember the worst case. Now move to the other side when your convinced the first one is secure. Unless your on a worst case the second one is always easier. Once both sides are gutted and the new ones are tacked in; take your time, you can either reinforce tie ins and bondo ( the slacker method, not recomended but hey it's your car) or you can be a vw sculpter and use steel and that grinder and patch in all areas that are tacked.
Finally clean up with wire brush, sand paper, what ever your preference is and prime those puppies. Now it looks like factory or at least on your first heat channel repair, better than the old ones. The one thing to remember no matter you're skill level or time that you have alotted you can do any thing you put your mind too somebody put it together once and unless I'm wrong here the guy's at the factory never put the whole car together by "themselves" in a day. time is irellevant, make it last forever in your newly repaired, previously dying bug. It's not the destination that you remember as much as the Journey getting there. Good luck you Buggers your pal, A.C.
Email me at ABORIGINAL@prodigy.net
AC has helped replace heater chanells...