
macramé on line
The On-line Magazine Exclusively Dedicated to Macramé
Using a square knot chain, tie the 4 main anchor lines exactly 16".

Tie on one of the 9" rings to the main anchor lines. Level as usual.

Tie on 96 light blue lines @ 3 yards each, and 52 dark blue lines @ 3 yards each, with side half hitches, except as noted, i.e. one half hitch to each side of larks head tie on. Starting at the main anchor lines, moving from left to right, tie on in each section: 1 light blue, 1 dark blue, 3 light blue, 1 dark blue, 3 light blue, 1 dark blue, 1 light blue, 2 dark blue (no side half hitches), 1 light blue, 1dark blue, 3 light blue, 1 dark blue, 3 light blue, 1 dark blue, 1 light blue, 2 dark blue ( no side half hitches), 1 light blue, 1 dark blue, 3 light blue, 1 dark blue, 3 light blue, 1 dark blue, light blue.
This step is a little tricky as you will have to reach into hanging lines to tie square knots, and calculate how many to tie. Tie a square knot to each of the 4 main anchor lines. Tie a square knot with the eighth and sixteenth sections (The sections of dark blue with 2 lines tied on without side half hitches). Grasp all the lines from the square knots you have just tied in one hand. Place your flower pot into the basket created. Drop your hands holding the lines until the flower pot is level with ring 6. Remove the pot while continuing to hold the gathered lines in one hand. Measure the length of the lines from ring 6 to the point at which your hand grasps the basket. Note this distance.
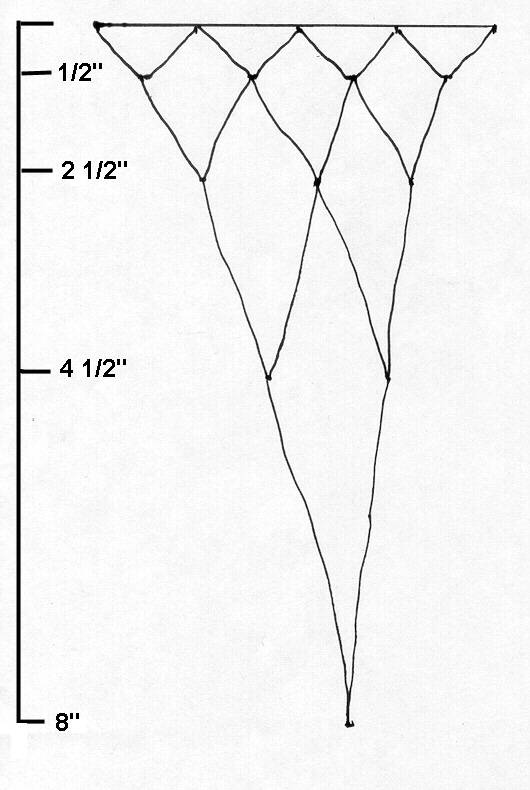
From the chart at the left, determine which level will match the noted distance. Count the number of rows less than this distance. Tie the prescribed number of rows determined, at the length depicted, in alternating square knots, e.g. if the distance you measure is 5 inches, then there are 3 rows to be tied in square knots, one at 1/2", one at 2 1/2", and one at 4 1/2". As you tie each row, knot in such a way that the overall diameter of the created circle decreases, i.e. the basket should get small and smaller with each row. After you have tied all of the rows, grasp all of the lines into a bunch. Place the basket back into the basket. Insure that it still fits within, and the top of the pot is level with ring 6. Adjust as necessary. With the last remaining 1 yard of dark blue line, clove hitch the bunch down approximately 1 inch. This is accomplished by placing one end of the blue line in the hand with the gathered bunch, down about ½ yard, encircling the bunch with the other end of the line, and, utilizing the entire bunch as an anchor line, clove hitch the bunch down about 1 inch (or longer). Tie 2 alternating half hitches with this dark blue line, and any other line to stabilize and finish the clove hitches. Allow the loose lines to dangle freely.

The bottom exterior layer is a clove hitch diamond fill pattern.

Begin at the first dark blue section (A) after any main anchor line, moving from left to right. Six light blue lines will follow these two dark blue lines B1-D2, followed by 2 dark blue line E1, E2. These 10 lines will form the first half of the upper perimeter of the first clove hitch diamond

Use the right dark blue line as the anchor (A1), and the left dark blue line as the decorator line (A2). Clove hitch knot the two line together. Repeat the process for lines E1 and E2.

Next, clove hitch B1, C1, and D1 to the anchor line A1, tossing their counter parts, B2, C2, and D2, over ring 6 as you encounter them.

The lines over ring 6 are now brought back across to the front. Clove hitch lines D2, C2 and B2, in this order, to anchor line E2. Finally, line A1 is used as the anchor line and line E2 is used as the decorator line for the next clove hitch.

Lines F1, G1, and H1 are now clove hitched to anchor line E1, while tossing lines F1, G2, and H2 over ring 6.

Decorator line I2 is now clove hitch to anchor line I1. Lines F2, G2, and H2 are brought back over ring 6 to the front, and clove hitch to anchor line I2.

All the lines are now in place to knot the first clove hitch diamond pattern.

Between J and K is the dark blue section tied for the flower pot basket. Because of this necessity, and a desired effect which will be explained below, 2 light blue lines are missing which are required for the next clove hitch diamond. Therefore, 2 light lines need to be added to complete the next clove hitch diamond. To accomplish this goal is a bit tricky, but with a little practice a new add on technique, which is most useful, will be learned.

First, clove hitch lines J1 and J2 to I1.

Next, take one of the remaining 8 light blue lines of 3 yards each, and fold in half. At the half way point, grasp the line with your left hand’s thumb and first finger. With the same hand, at the same point, grasp line I1 at a comfortable work distance. Place line I1 between your lips, and pull taunt. While grasping I1 and the half way point of the add on light blue line, clove hitch the loose line to I1 with your right hand. When finished, one end of the added on light blue line will be directed to the left, below the clove hitch, and the other end will be directed to the right, above the clove hitch.

Slide the knot up to the clove hitches of J1 and J2.

Clove hitch lines L1 and L2, utilizing L1 as the anchor line and L2 as the decorator line.
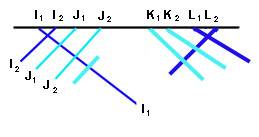
Clove hitch line K1 and K2 to line L2.

Now clove hitch the loose light blue line facing right to L2, pulling the distance between the crossed dark blue lines to a minimum.

Clove hitch dark blue lines I1 to L2.

You now have all the necessary ingredient to tie the second clove hitch diamond.
Continue around ring 6 in like manner to complete the first row of clove hitch diamonds. Use a clove hitch diamond pattern fill for approximately 12 rows, or about 4 ½". (The clove hitch diamonds, when tied, will be wider than they are tall, and not perfectly square. See explanation below.)
Visit our sister sites at:


![]()
![]()