The Framework
1) Start with the Main Support Post (fig. #1 & fig. #2). I constructed mine with 2x4’s, the main post is 4'. The height of the post is variable depending on where you attach the prop to your roof. The closer to the top, the shorter the post can be. The main post and 2 angle supports are "sandwiched" between 2 bottom rails, all of which are secured together with screws.
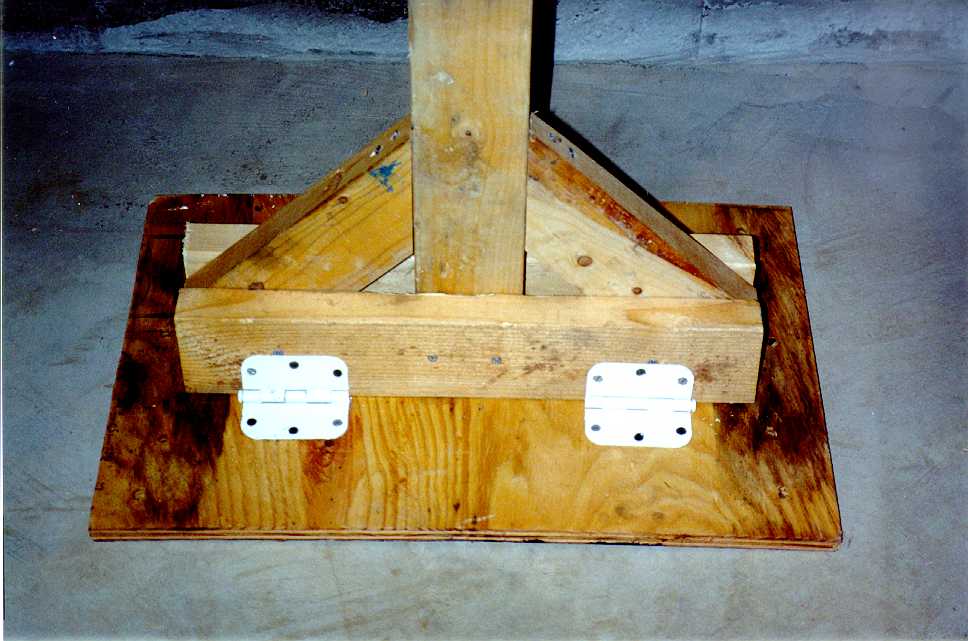
2) Secure the Main Support Post to a Plywood Base by attaching hinges from one of the bottom rails to the base (fig. #3 & fig. #4). The hinges should be on the side of the post that will be facing up toward the top of the roof. The hinges are necessary to allow for the Main Support Post to adjust to the angle of the roof (more on adjusting the post angle below).
3) To create the body framework for the prop, start by attaching an Upper Leg Frame near the top of the Main Post. Since the prop will be covered from the waist down with a long skirt, there's no need for full legs. Construct the Upper Leg Frame from 1x3’s in a |_| shape (fig. #5 and fig. #6) and attach it so that the frame is on a slight upward angle. This is so the prop will have the appearance of having its knees raised up. I also secured a small brace in between the leg frame near the ends to keep the sides from bending in.
4) Continue constructing the body framework by attaching 2 1x3’s to the top of the Main Support Post (fig. #7). This will form the prop’s "backbone" and should be on an angle to give the appearance that it is leaning forward. Across the "backbone", attach a plywood Backboard cut into a "torso" shape (fig. #8 and fig. #9). This will provide a base to wrap the foam rubber onto when filling out the prop, plus it sets the upper body shape. In these photos, I have a small motor attached at the top of the "backbone" that will turn the props head from side to side. Otherwise, simply secure a piece of PVC tubing in between the ends of the 1x3's onto which you can attach a styrofoam wig head.
The Figure
5) To fill out the prop, wrap the framework in foam rubber, which you can find in rolls at most discount stores. You can staple the foam directly to the frame and also secure it with strips of duct tape (fig. #10 and fig. #11).
6) Secure the broom to the Main Support Post at an upward angle just below the Upper Leg Frame (fig. #12). At this point, you may want to paint the Main Post and Plywood Base black before finishing the figure.
7) The props arms need to remain flexible and are made with rolled up pieces of foam rubber which are then inserted into the sleeves of the props clothing (fig. #13). The hands are then stapled to the handle of the broom.
8) The prop is completed with a long skirt covering the Upper Leg Frame and a Cape. A mask and hat are attached to the styrofoam wig head. I would recommend using long nails pushed through the mask and hat directly into the wig head since the prop will be subjected to wind (fig. #14).
Lighting
9) A piece of strapping with a flood light attachment secured to it can be screwed onto the base of the Main Post to light the prop from below (fig. #15).
Attaching the Base to the Roof
(note: these figures are still some of the orginals that I first posted with the plans for this prop. I haven't replaced them yet with photos, so the figure numbers referenced are off)
10) At this point you can decide how you want to attach the Plywood Base to the roof. You can screw the base directly into the roof, however, you will have to remove it and reattach it each year. To avoid having multiple screw holes in your roof, first screw in 2 wood slats (fig. #3). On each slat, have 2 bolts facing upwards with the head of the bolt under the slat against the roof. Drill 4 holes in the Plywood Base to allow the bolts to pass through and secure it down with nuts and washers (fig. #4). This method will make attaching and removing the base easier. The wooden slats can remain on the roof year round.
Adjusting the Post Angle
11) To adjust the angle of the Main Support Post, ensure that you have attached it to the Plywood Base with the hinges facing up toward the top of the roof (fig. #5). Lean the post forward until it is straight and use wood shims under the bottom rails for support (fig. #6). The shims need to be nailed or screwed into the base. A support rod is also attached from the front of the Main Support Post to the Plywood Base.