
This page last updated Saturday, May 31, 2003 06:23 AM
If you ever
wanted to remove/replace the rather large air filters (ears)
on your VN750, take a look at
these pictures that Trent took.
Immediately following this,
you'll find his update to the original posting.
From: Trent <tmills@ghg.net>
Date: Tue, 19 Oct 1999 19:28:14 -0500
Subject: pics of ear removal
Just a few pics of what I did Sunday.
Currently 2 shims under needle, 150 main jet, 42 pilot. I will up it to 158 main this weekend.
Carburetor bowl

Completed look (without seat)

Throttle cable connections

Both carburetors removed

This is where all the carb work gets done

Note the 2 washer/shims on the needle

Carburetor diaphragm

Carburetors mounted

Carburetor vacuum line fitted with filter
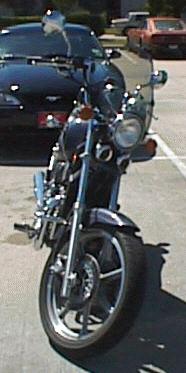
Front view with stock air filters removed

Close-up look with tank on
Later,
Trent - VROC 2071
From: "Trent" <tmills@ghg.net>
To: vulcan@vroc.org
Date: Wed, 13 Oct 1999 08:17:32 -0400
Subject: Re: 750 Ear removal, preliminary
"Shaft" <mlhg@ix.netcom.com> wrote:
>I noticed in the original (you sent me privately) and in this
set that while
>you stated that the UNI UP121 filter was needed you did not
state where it
>went or what it was for :)
>
>Course I am going to assume you used it as a crankcase
breather........
>
>--
>Greg "Shaft" Shaffer
>96 1500D1 Classic
>00 Mean Green ZRX1100
>VROC #1197
>Athens GA
Wellllll, I told you it was a rough draft!
I used the Uni as the filter to the carb vacuum
equalizer hose
that goes from in between the carbs to the right side air filter.
I put the Uni breather on and tucked the hose on top of the rear
head under the gas tank.
I bought a K&N filter for the crankcase breather but it
was too
wide to fit at the front of the engine. At this point I was
frustrated
so I just taped up the intake holes to the manifold over the tank
and I figured I would deal with the crankcase breather later.
There
are a lot of crankcase breather filters out there that may fit
( 1 - 1.5" wide ) or I may reroute it to go under the gas
tank
and use the K&N I have.
Later,
Trent
VROC 2071, 1999 VN750
Trent then followed up the above info with this update.
From: "Trent" <tmills@ghg.net>
Date: Sun, 9 Apr 2000 14:29:38 -0500
Subject: 750 Ear shave, Update
Vulcan 750 Air Cleaner Removal
My bike is a 1999 VN750. The only changes I had made previously were to install a set of Vance and Hines Slashcut exhaust pipes and coasters. I live at sea level in Houston, TX. The main jets can be changed with the carbs on the bike. The pilot jets require the carbs to be removed. Removing the carbs is about a two hour job and if you know a good mechanic you may just want to pay them to put the pilots and main jets in. Sherm's may be able to get all of these parts, I happened to buy some from Chaparral.
Stock was: 133 main jets, pilot 38
Parts list (3/13/00):
Qty Part # Distributor
2
K&N RC-2340 Air cleaners Chaparral, $22 each
2
Main jets, size
162
Sherm's, $4 each you may want to buy several sizes above and
below the 162 to try for your bike
2
Pilot jets, size
40
Sherm's, make sure you get the ones that have threads on a
"step down", not the ones with the same size shoulder
threaded, $4 each
4
Needle
shims
Sherm's, $1 each
1
Vacuum feed plug,
7/32"
Auto parts store, $3
2
Coasters if you don't have them
Adam [adam@neo-ent.com], about $40, you can use
marbles
2
Crankcase breather
assy.
#14-20900, $15 ea., EMGO, Sherm's
4
3.5" (?) hose
clamps
For intake manifolds, Stainless, auto store
5
1/4"-5/8" hose
clamps
For vacuum hoses, stainless, auto store
1'
5/16" Fuel
line
Auto store
1
90 degree elbow,
1/4"
Hardware store
1'
1/4" copper
tubing
Hardware store
2
about 5/8" long bolts,
washers Stainless,
metric get them at hardware store
Special Tools
Sears Reversible Rachet Offset Screwdriver Set ( only needed
for changing main jets with carbs on bike)
I also recommend a pair of 8.5" straight Hemostats for
playing with hose clamps and getting dropped bolts.
A small tubing cutter is helpful.
1. I put the bike on
the center stand to work on. Pull the seat and the gas tank.
2. Remove the air
filters, housings and rubber connector hoses to the fresh air
plenum under the tank. I put the air cleaner mounting bolts back
on the bike.
3. Install coasters if
you haven't already.
4. Remove the left side
exhaust fresh air inlet hose from the fresh air valve.
Remove the right side exhaust fresh air inlet hose from the
fresh air valve. Remove the right side carburetor
vacuum hose from the right side carburetor and the fresh air
valve. Plug the right side carburetor vacuum lead with a vacuum
plug. Remove the fresh air inlet hose from the fresh air plenum
under the tank and the fresh air inlet valve.
5. Remove the fresh air
valve.
6. Remove the air
inlets to the carbs from the fresh air manifold under the tank.
7. You now have two
choices:
A. install the Main jets with the carbs on the bike and go to
someone to remove the carbs and install the pilot jets and shims
(if needed). It should run good enough to get you a short
distance, it will be lean at the low and mid range. Hint: use the
vacuum hose from the right side carb that you removed to start
the main jet. Just stick the main jet in the hose with the
threads out and screw it in.
B. If you remove the carbs (take the cables out of their bracket
before you try to slide the carbs out) and install both the
pilots, the main jets and shims (if needed) then replace
the carbs.
8. While the
carbs are out, you can get your mechanic to remove the mixture
plugs or you can use a 7/64" drill, drill the mixture screw
plugs on both carbs, start a wood screw into the hole and pull
the plugs out. Be careful, don't drill too far in!
9. Install the carbs.
10. To get the carb vent or
equalization feed to fit without kinking I had to do some
rigging. I cut about 1/4" off the EMGO filter (you could use
a hack saw or Dremel tool). I also cut one of the
"step up" shoulders off of the 90 degrees elbow. I then
used two small hose clamps and 7/8" of the 5/16 fuel line to
attach the cut end of the elbow to the EMGO filter. Cut 1"
of the copper tubing and put this into the existing shoulder of
the elbow. Put the other end of the copper tube into the carb
vent/equalizer. Bolt the Emgo filter to the top bolt of
where the old right side air cleaner went using a longer bolt..
11. Cut 1" of the 1/4" copper
tubing. Cut 5" of the 5/16" fuel line and put the
copper tubing in one end until the tube is flush with the end of
the fuel line. Disconnect the end of the crankcase vent hose from
the air plenum. Put the end of the 5/16" fuel line with the
copper tube in the crankcase vent and clamp (the copper tube will
keep the fuel line from collapsing). Put the other end of the
5/16" fuel line on the EMGO filter and clamp it. Bolt the
Emgo filter to the top bolt of where the old left side air
cleaner went using a longer bolt..
12. Install the K&N air filters.
13. Put the gas tank and the seat on.
14. Turn both idle mixture screws out 3.5
turns.
15. I recommend having the carbs synced,
they should not have to pull them to do it.
14. Ride!
You may need to adjust the shims and main jets to your riding style. I use the stock plugs and 89 octane gas.
Notes:
1. Used crank breather filter, vacuum hose
adapter, mounted in old air filter location, filter paper facing
air flow. Running great, Plug color looks pretty good,
maybe a little lean in the front cylinder. 2 turns out on the
idle mixture. 165 back, 170 front. I have a slight flat spot in
midrange, maybe it needs shims?
2. 2 shims under each needle., 161 back, 165
front, 40 pilot runs great low end, seems flat high end. Seems
like I go straight from white plugs to plugs with black on them
3. Switched back to 161 rear and 165 front,
runs great!. Front plugs are a little dark, rear plugs are a
little light. Drop front to 163/2?
4. Switched front to 162
And, of course, the final look... Very nice job!!!


