| Using the "Pen Tool" to create special Effects! Photoshop_Home - Fred's_Photo |
Some instruction on the use of the "Pen Tool". I have demonstrated it here as to how I use it in my business to create special Effects! |
|
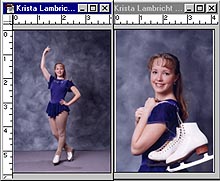 |
Here is something that I do almost daily, and that is creating composites for figure skaters and dance photographs. I sometimes use as many as 25 photographs to go on one calendar or poster. There are different ways of putting the second image together, however for this worksheet I have decided to use the "Pen Tool" As per example we will be using the two photographs on the left. |
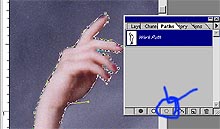 |
Next use the Pen Tool and go as close to the subject as possible. By zooming in close to the subject you can really get very particular. Here is what to do.. 1. Start anywhere on the photograph and work your way around. 2. By clicking with the mouse and at the same time dragging the Pen you will get a Handle on the line. You can then grab the Handle and make it go in circles. Holding down the "Ctrl" Key and grabbing the Handle with the "Pen Tool" does that. You can also click on the square and move it while holding the "Ctrl" key and moving it with the mouse. All this may take a little practice at first, but becomes easy with time and practice. 3. Once you have gone all the way around the image you will notice that on the last click an extra cymbal will appear letting you know that you have successfully gone all around. Then click on the "Load Path as a Selection" and it will make the selection active, as if an army of ants are walking all around. |
 |
Now is where the fun comes in. use the "Move Tool" and simply grab the section and drag it onto the other image. Note the example on the left. |
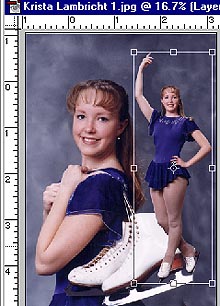 |
Now you will have two "Layers", in this case the close-up image with the skates over her shoulder and the full-length image on layer 2. At this time I did two things; 1. I moved the bottom image to the left, (giving me a larger area on the right,) and using the "Clone Tool" I filled in the background on the right and 2. I made the second image larger. That is done by using the "Edit - Free Transform Point" or using the shortcut "Crtl + T". Then and this is important, every time you transform an image, hold the "Shift Key" while dragging with the mouse to make the image smaller or larger. Or you will get a distorted image. Please note: usually in between the arm I would also get rid of the image, but since the background blinds in I just left it there. Also if this was to be larger photograph, you may want to go and blend the two images with the "Smudge Tool" |
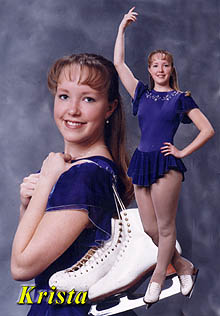 |
And there you have it - a collage of two images blended together. This can be very useful for promoting your style of photography, whether you do the sports or senior photographs, offer your client something your competition cannot or will not do. Then I finished it off by the use of the girl's name. Photographically Yours Fred Meulemeester |
All rights to this page reserved by Fred Meulemeester.