


![]()
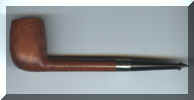
Meet the Pipe
![]()
Materials
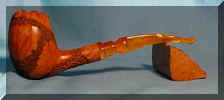
The pipe is a small furnace and must be made of materials that will withstand some pretty high temperatures. Ordinary materials burn out easily from the heat. However, there are several materials that are suitable for the creation of a pipe. |
Briar wood is the most common material. It is a bush that grows in next to no soil and is a hardy plant. The wood is quite dense and lends itself to carving. Usually the 80 to 100 year old burls are the best for pipe making. The grain of this wood is also appealing to the eye. |
Meerschaum (the German word meaning Sea Foam) is a very porous material that is found in underground deposits in Turkey and Africa. After drying and processing it can be carved into intricate designs. It is white to ivory in color and, when treated with bees wax and handled properly while smoking, will color darker the more it is smoked. |
Pipes have been made successfully from clay, cherry wood, corn cobs, olive wood, porcelain, gourd, and maple wood. There are other materials used at times, but the listed ones are the most common today. |
Before beginning, stock up on plenty of pipe cleaners, a pipe tool, and wooden matches or a butane lighter. These items will be discussed in the accessories section below. |
![]()
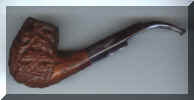
Shapes
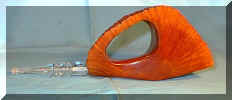
The list of shapes is almost endless. The freehands are the most artistic and expensive. There are standard shapes for machine made pipes. A chart of these shapes can be found at any good pipe shop or on some of the sites in the links page in this section. |
![]()
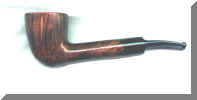
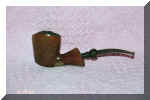
Parts

The parts of the standard pipe are listed below with a short description. |
||||||||||||||||||||
|
![]()
Packing The Pipe
| Packing the pipe is the start of the smoking procedure. If done correctly, a pleasant smoke will be had. If done poorly, trouble will follow for the entire smoke. |
The tobacco should be placed into the bowl in stages in order to preserve the proper draw through the entire smoke. The first stage is to put the tobacco loosely into the bowl until it is filled. Then gently pack the tobacco down with the finger. This is known as the child's hand. Next the pipe is filled with tobacco to the top once more. The tobacco is then packed down with the finger more firmly. This is known as the woman's hand. Finally the last part of tobacco is placed in quite firmly until the tobacco is to the top of the bowl or very near the top. This is known as the man's hand. When this is done the tobacco should have a springiness to it. Remember, there should be a steady and even flow of air going through the tobacco with an easy draw on the pipe. You should not have to suck on the pipe to get the air through it like you were sucking on a straw trying to get a milk shake to come through it. |
Draw through the pipe and make sure that there is an even and free flow of air. Sometimes a small piece of tobacco will move and plug the air hole. You can do one of two things if that happens. First, run a pipe cleaner through the air hole from the stem and see if this will move the offending bit of tobacco. If this does not work, dump the tobacco out of the pipe and start over. This is a pain in the rear, but well worth the extra effort. |
![]()
Lighting The Pipe
Many materials are available to light the pipe. Some of these will be discussed in the accessories section. The most common of these are wooden matches and butane pipe lighters that direct the flame into the bowl without burning the rim of the pipe. |
Hold the flame to the tobacco and draw gently and evenly while moving the flame in a circle over the entire surface of the tobacco. Do this until the surface of the tobacco is burnt and a sufficient amount of smoke can be drawn into the mouth. Don't inhale the smoke. A pipe is enjoyed more fully without inhaling. Some tobacco will rise and curl over the top of the bowl. Don't worry. This will be dealt with. Take several more gentle even puffs after the tobacco is lit and then stop. This is the stage where most novice smokers ruin their tongue for the remainder of the smoke. A general rule that I ran across years ago said that you should not take more than ten pulls on the pipe to obtain this charring light. If you must pull more than ten times to get this light, then you have packed the tobacco too tightly. Empty and pack the pipe again. Again this is a pain in the rear, but you do want to enjoy the pipe without feeling that the cat is sharpening its claws on the surface of your tongue while you smoke the rest of the pipe. |
Allow the pipe to go out or nearly out and then use a tamper to gently (the term gently cannot be emphasized enough at this point of the smoke) push the tobacco and curled ash back into the bowl. You should now have an even surface on the top of the tobacco just below the rim of the bowl. This is known as the charring light. Now you are ready to re-light the pipe for some serious smoking. The second light will last you longer. While gently drawing on the pipe, move the lit match in a circular motion over the surface of the tobacco. Be careful not to burn or char the rim of the bowl. The ten puff rule applies here also. If you are having a hard time getting the tobacco to light and retain the light, you tamped too hard. Wait until the tobacco cools and empty the pipe. You are now ready to begin packing the pipe again. Practice makes perfect. You will not get it right the first time. None of us did. Experience is the key here. Patience is the keyword. |
![]()
Smoking The Pipe
Smoking the pipe may seem awkward at first. It gets better with time. All the little details that go into smoking the pipe become second nature with practice. Pipe smoking is one of the most relaxing activities that I have experienced. It is a comfort to feel the warmth of the bowl and the texture of the wood in my hand. The smoke is delightfully tasteful and rolls over the tongue like thick cream. The pipe itself is beautiful to look at. I derive great satisfaction from knowing that I can enjoy this when others can't, won't, or just plain don't. |
You must remember to draw smoothly and gently on the pipe. Cigarette smokers have the worst time getting used to this. There is a phenomenon called tongue bite (an extremely unpleasant burning sensation on the tongue) that occurs sometimes. One of the causes is drawing on the pipe too hard. Tongue bite is not normal. It can be avoided by careful attention to smoking technique and the proper humidification of the tobacco. |
If the pipe starts to go out, do not draw harder to try re-stoking the fire. Let the pipe go out, gently tamp the ashes down and re-light. Better to re-light often than to burn the tongue. You can tell if you are smoking too fast when the pipe gets too hot to be held comfortably in the hand or the tongue gets a warm bitey sensation. Stop, put the pipe down and let it cool before re-lighting. The ashes can either be left in the pipe for the entire smoke or they can be loosened periodically, swirled in the bowl to leave a fine coating of ash on the inside and then deposited in an ashtray. The fine coating left in the bowl helps to build a deposit of carbon in the bowl known as the cake. |
The cake helps absorb extra heat to protect the wood and tongue from getting burned too much and it absorbs extra moisture from the tobacco as it burns. It is desirable to have a certain amount of cake in the bowl of a wood pipe. Be careful not to disturb it when it is first forming. The cake should not be any thicker than the width of a nickel. The cake and the wood expand and contract at different rates during the heating and cooling of the pipe. Too much cake has the potential to cause damage to the wood if one is not careful. Remove the excess cake and smooth the remaining cake with a reamer. Reaming should be done carefully and with the proper sized reamer. A graduated set can be purchased at most good tobacconists. If none is on hand, I am sure the tobacconist will order a set for you. Be careful to align the reamer properly and bore slowly down the bowl in a straight line. Check periodically to see that you are maintaining this straight line and that you are not getting into the wood on the sides or penetrating the bottom of the bowl. DO NOT ream all the way to the wood. If you are not comfortable with reaming the pipe, have your tobacconist do it for you. He may be willing to teach you how to do this. Ask him/her. The worst they can say is no. |
Moisture will form from the combustion of the tobacco and the saliva from the mouth running into the pipe during the smoke. At times it will build to the point of gurgling while you are drawing the smoke or it may even come back into the mouth as if the stem were a straw. This can be taken care of by running a fresh pipe cleaner through the stem and to the bottom of the bowl. The pipe cleaner will absorb most of the moisture and take it out when you remove the cleaner. When you first start to smoke a pipe, you will notice that your mouth builds up saliva in a hurry. This is natural. Your mouth will adjust later and not produce all this saliva. It will get used to the idea that you are not trying to feed it when you place the stem into it. |
Smoke the tobacco all the way to the bottom of the bowl. This will allow you to enjoy all of the tobacco and to form the cake evenly from the top to the bottom of the pipe. Some tobaccos leave a portion that is not burnable in the bottom of the pipe. This is known as dottle. Dottle is to be disposed of and not put on the mantle of the fireplace and saved to make a pipeful for the next morning as Sherlock Holmes used to do. |
When all the tobacco has been smoked, gently loosen the remaining ash and dottle and dispose of it. Do not strike the pipe against a hard surface to do this. The pipe may break at the most vulnerable points. These are where the stem joins the shank and where the shank joins the bowl. You will also mark the rim of the bowl. Grasp the pipe by the heel and knock gently against the hand or a soft object such as a cork knocker. This will be described in the accessory section. Run a pipe cleaner down the stem and into the bowl. Some say to remove this when storing and some say to leave it in. That is a personal preference. Place the pipe in a bowl down, stem up position to dry. |
![]()
Rotating
Reasonably good pipes are not the cheapest things in the world. Plan to pay between $30 and $50 for one of decent enough quality to start out on. You cannot smoke the same pipe over and over again and expect to get a decent smoke out of it. After smoking a pipe it should be allowed to rest and dry completely before putting it to use again. Plan on obtaining at least three pipes to start off with. Rotate these so that each one has at least two days to recuperate between uses. Leave the used pipe in the open air to dry. Don't put it back in its sleeve or it will take much longer to dry out for the next use. Storing in a proper pipe rack not only helps the pipe to dry, but allows you to admire the beauty of it while it is resting. Sort of like watching the kids when they are asleep. |
You should clean your pipes with pipe cleaners after each use and store them in a position so that the bowl is lower than the stem. Leaving the pipe cleaner in the pipe is optional. At two to four week intervals the pipe should be cleaned thoroughly by taking it apart and cleaning around the mortise and the end of the stem. Take the stem off by gently twisting to the left and applying a slight pulling pressure to it. NEVER remove the stem from a pipe while it is still warm! You are working with the most vulnerable section of the pipe, so be careful. |
Military mounts can be removed while the pipe is still warm. These are found mostly on Petersons and some Savinellis. I have notices lately that other manufacturers are going back to the military mounts. These were designed so that the pipe could be taken apart to fit in the pocket more easily. Please run a pipe cleaner through the stem and shank before putting it in your pocket. Tobacco juice does not look good when displayed on your clothing. |
Enjoy your pipes and have patience when starting out. You will get used to all this and the mechanics will not get in the way of a Wonderful Smoke! |
![]()
Accessories
There are many accessories that can make life easier for the pipe smoker. Some of them are luxuries and some of them are necessities. I have presented as many as I could think of. |
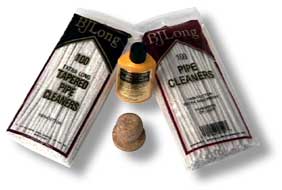 Pipe
Cleaners = Long pieces of wire with fuzzy cloth running the entire length. Some even have
small bristles of wire mixed into the fuzz as an extra scraping agent to help remove the
stubborn tars. Keep plenty of these on hand. Carry them with you when you are out. Pipe
Cleaners = Long pieces of wire with fuzzy cloth running the entire length. Some even have
small bristles of wire mixed into the fuzz as an extra scraping agent to help remove the
stubborn tars. Keep plenty of these on hand. Carry them with you when you are out. |
 Pipe Sweeteners = Liquids that are used to help loosen or
dissolve stubborn tar deposits in the pipe. They also leave a residual odor or sweetness
to the pipe. I use Vodka myself. They all contain a form of alcohol. Do Not get these on
the outside finish of the pipe or stem. Pipe Sweeteners = Liquids that are used to help loosen or
dissolve stubborn tar deposits in the pipe. They also leave a residual odor or sweetness
to the pipe. I use Vodka myself. They all contain a form of alcohol. Do Not get these on
the outside finish of the pipe or stem. |
 Tobacco Pouches = Small containers of different air-tight
materials used to carry small amounts of tobacco with you for refills while you are away
from your main stash of tobacco. Take your
pick. There are many styles and types to choose from. Tobacco Pouches = Small containers of different air-tight
materials used to carry small amounts of tobacco with you for refills while you are away
from your main stash of tobacco. Take your
pick. There are many styles and types to choose from. |
 Humidors = Air-tight containers used for storing tobacco at
home. These help to keep the tobacco fresh and moist while it is waiting to be smoked.
Have at least one in the house or office. There are tobacco packages that, once opened,
cannot be resealed. Humidors = Air-tight containers used for storing tobacco at
home. These help to keep the tobacco fresh and moist while it is waiting to be smoked.
Have at least one in the house or office. There are tobacco packages that, once opened,
cannot be resealed. |
 Humidifiers = Small
metal buttons filled with an absorbable material that you soak in water and place in your
pouch or humidor to impart the proper amount of moisture to the tobacco. Do Not put slices
of fruit or potatoes in your tobacco. They get moldy and will grow this in the tobacco. Humidifiers = Small
metal buttons filled with an absorbable material that you soak in water and place in your
pouch or humidor to impart the proper amount of moisture to the tobacco. Do Not put slices
of fruit or potatoes in your tobacco. They get moldy and will grow this in the tobacco. |
 Pipe Racks = These are devices made to hold any number of
pipes in the proper position on the shelf. There are many designs and materials to choose
from. They are usually expensive. Pipe Racks = These are devices made to hold any number of
pipes in the proper position on the shelf. There are many designs and materials to choose
from. They are usually expensive. |
Reamers = Cutting tools used for paring the cake in the bowl to an acceptable thickness. There are several types and sizes. Choose them for the bowl sizes that you have. |
| I hope this information has proven useful to you and that it will help you derive greater pleasure from your pipe. Happy Smoking! Please visit the links page for source of more material. |
Here is your chance to send me feedback on this site. I would like to hear from you. |
![]()
![]()
