Putting a front end on HellTrike
![]()

SA-1
Put the tire size you are going to use on the trike. I like to use 205/75/15’s. They are about 26&3/4” tall, so they gear up your top end for nice highway cruising. Re-level the frame. Put a block of wood under the front tire to prevent it from rolling, and lean it on the frame. For the 33&1/2” forks I hang a plumb line from the center of the steering head pipe, and put the end of a 24” ruler at that point. Next, run the plumb line from the center of the wheel axle. I roll the front end until the center of the bolt is at the 19” mark. For the 31&1/2 “ forks, I run it back to 17”. Do as you wish, but this is how I do it.
![]()

SA-2
I draw several parallel lines along the frame with a level for perspective. Then draw several lines parallel to the head. The cut line being about 4&3/8” from the crotch. Several lines help you keep perspective.
![]()

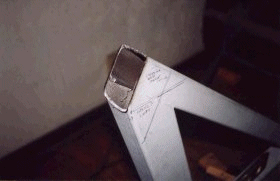
SA-3
Cut on the diagonal line. Realign the front end as you did before and make sure your cut parallels the steering head pipe when it is in position. If it doesn’t, draw a corrective line and grind it to a straight edge. Use a square to check side to side deviations. See {SA-6}
![]()
SA-4
Now you will see three exposed surfaces when viewing the neck from the front. Cut back the inside section about 1”. This will keep it out of your way when you fit the steering head to the top and bottom of the neck.
![]()

SA-5
Find a container to use for tracing that closely matches the diameter of the steering head pipe, by measuring the head at the joining surface.
![]()

SA-6
Trace and cut the pattern, continually checking side to side integrity, as well as laying the steering head against it to check for depth. Cut it back until the sides of the neck fit flush with the head, making sure the neck wall thickness is the same side to side.
![]()

SA-7
The head should fit flush dead center with “0” air gap at the sides top and bottom. IF your frame is slightly cockeyed, you can make quite a left to right change just by taking a little off the walls. { Thinning the top left and bottom right will pitch the front wheel several inches to the right of center.}
![]()
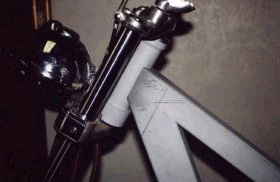
SA-8
Re assemble the front end and re check everything for fit and proper alignment just like you did in step 1.
![]()

SA-9
If everything checks out, tack weld it on both sides, both top and bottom. I use about 3/4” welds. Weld it as it sits with the front end in position. I slid mine all the way up for my purposes only. If you wish, weld it solid, going from side to side using 3/4” passes. I didn’t weld it all the way at this time, because I may decide on another angle or front end before I’m through. I change my mind a lot, and may even have to use this front end for another project. This site is to help you, it is for your benefit, not mine. I already have too many trikes.
![]()

SA-10
When you are finished it should look like this. Notice .. no gaps. The front end drops about 1&3/4 “ under load. { My 33&1/2” forks do } With the tranny and engine in it, the rear end drops about 1&1/2 “. With a little heifer in the back seat, it will sit relatively level going down the road, and without her, it will still appear quite level, even to a good eye.
![]()
![]()
![]()
![]()