Gidday! I've been making soap for a few years now, and recently I've been experimenting with Hot Process Soapmaking. It's a lot of fun, and it's faster than cold process soap in that it (usually!) doesn't require a cure time.
With Hot Process soap, you are doing two things in the pot - completely finishing the saponification process, *and* boiling off the excess water.
You may choose to use a little less water than your recipe dictates if you are doing Hot Process soap - however it is wise to be sure that you have sufficient to completely dissolve the lye prior to pouring into the oils.
IMPORTANT NOTE: This webpage assumes you are sufficiently experienced with cold process soapmaking and the safety issues associated with that addiction; in particular, do not attempt hot process soapmaking without adequate clothing, ventilation, eye/face/skin protection, readily available supplies of copious amounts of cold running water, and a good 2-3 hours uninterrupted by children, well-meaning spouses, or pets.
For newcomers to soap: Soapmaking is not rocket science. And it's a lot of -extremely addictive- fun. But it can be very dangerous if you get the highly caustic lye *anywhere* on your skin. It burns. Sensible safety precautions are absolutely essential. Have I frightened you off yet?
I'm not going to go into the finer details of cold process soapmaking at this stage. Anyone who has a nice site with cp instructions, please let me know (apologies, I haven't got enough time to search you out!) and I'll include a link here.
Note also that I'm using an all-veggie recipe (It's what I call the 'Ozzie Supermarket Shelf' Recipe, as you can get everything you need at Coles or Action!!) Anyone interested in the recipe, let me know, eh!
If you're wanting to put together your own recipe, there are a number of sites around that will let you do that; I personally use Therese Lott's Excel Sap Calculator, which is just *brilliant* and very easy to use. Once again, let me know if you want a link to a lye calculator on your site here.
Please also excuse the state of these pages
- I'm primarily out to (finally!) get the pictures up and running - so,
I'm after information rather than graphic brilliance right now. But please
do let me know if you can't read the instructions, or if you have any other
problems (including problems in *following* the instructions!!!)
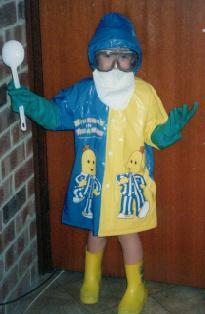
Here's my son Daniel. (Well did you think I could take a picture of myself all dressed up in soapmaking gear?). If you're not dressed like this, or a reasonable approximation thereof, you're not ready to make soap. (And no, they don't make Bananas in Pyjamas plastic coats in adult size. Yet.)
Did you spot the deliberate mistake? Daniel's
not wearing long trousers. Our excuse: it was the middle of an Ozzie summer
and over 40degreesC outside - he didn't want to wear long pants when he
wasn't going to get a go of making soap.... But don't *you* try this at
home folks - bare skin is a no-no where lye is concerned!

Here's the oils, ready to go. Make sure
the liquid oils are in the pot before you start heating - it's safer and
you don't get burned patches appearing on the bottom of the pan that later
transfer themselves to your soap.

This is the way we pour the lye into the water (note: **LYE into WATER** please - otherwise you could get an explosion - this mixture heats up incredibly!!)
Yes, I can see I have a dirty pot here.
At the time I took the photograph, I couldn't. Another safety requirement
for soapmaking - GOOD LIGHTING. There could have been *anything* in that
pot, eh.

Pouring lye water into the melted oils.
This picture shows the pour far slower than I really do it. I slowed the
pour so that I could take the picture with the other hand before I ran
out of lyewater! With cold process the temperatures of the oils and lyewater
might matter, as might the rate of pour. With hot process, you pour lye
as soon as the oils are melted, regardless of what temperatures you have
for each component.

This is Trace. Gidday Trace. In hot process
soapmaking, trace is sometimes present for a fraction of time - maybe 10
seconds or so - and sometimes you don't get to see it at all, as the mix
wooshes through trace to separation.

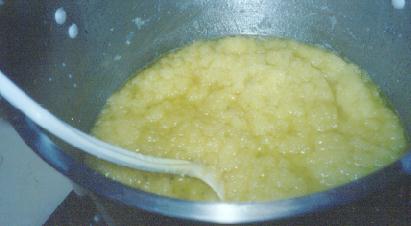
This is separation. See the curds of soap, resting on the bottom of the pot, covered by the oil, and floating on the very surface is that scummy stuff - well, that's the bit we want, folks - that's finished soap. In order to translate the curds and oil into finished soap, you need to heat the pot. GENTLY. And keep stirring ALL the time.
The first time I did this, the heat was
too high, and I didn't know enough to stir all the time. Result: Volcanoes
of caustic mix jumping higher than my head, and etching of the base of
the pot by the caustic solution. NOT something you want to have happen
to you. So stir. ALL the time the pot is on the heat, eh.

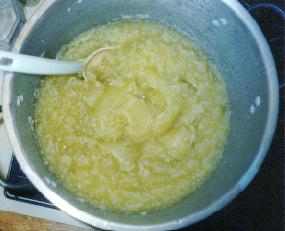
Ok the mix is now boiling merrily along.
DON'T STOP HEATING. Keep the gentle heat and the stirring going. You need
to keep going for approximately 20 minutes from boiling point, to start
with.

Those huge boiling bubbles that appeared
when the mix first hit boiling point, have gradually reduced in size until
the whole top of the pan is filled with frothy 'champagne' bubbles. The
darker yellow swirls you can see are finished soap, and when the whole
batch is finished, that's what it will look like in the pot. Consistency
of old petroleum jelly... but I'm getting ahead of myself. Next photo....

Here's a close up of the champagne bubbles.
Right in the centre of the pot you can see there are still some larger
bubbles happening; soon as these settle down to one or two spots
only, then you can stop (relief!!) for a while.

Here we go. The pot is full of champagne
bubbles, with some finished soap on top and the heat is turned OFF. You
can leave the pot for about 10 minutes - but don't go too far away - you'll
see why later on!

Looks like a cake baking, doesn't it! The
exothermic (giving off heat) reaction of saponification is continuing the
process all by itself, even though there's no heat being applied to the
pot. What you can see in the middle is the champagne bubbles reaching the
top surface of the mix, and the darker, cooling areas of finished soap
separate in the middle and slide down the sides of the pot. The whole thing
will keep turning quite nicely like this all by itself for a few minutes.

Here's a close up of that process. The
heat is off, and the pot is turning the soap by itself. This is the stage
that it starts to smell good.

The heat's been off for about 10 minutes
now, the champagne bubbles are no longer breaking through the surface as
the soap is turning in the pot.

By breaking the surface of the soap, you
can see that the champagne bubbles are continuing to work. You've got three
layers here; the champagne bubbles, and on top of that the darker finished
soap, and on top of that the whiter cooled finished soap. That top colour
is the colour your finished, cooled and cut soap will be. (Exciting, isn't
it!!)

When the pot looks like this, it's time
to reheat. Just as a matter of interest, I have left a pot for a couple
of hours to go completely cold when I had to race out one time - I simply
reheated it up through boiling to the champagne bubble stage again and
all was fine..... It's my fond belief (never wrong yet!!) that no soap
is ruined unless you've burned it in the pot (and that is utterly disgusting
and I wouldn't wish burned soap on my worst enemy!!)

Here's a close up of the soap ready to
reheat. Once again, a gentle heat, and stir all the time the heat is on.
Make sure you stir into all the corners and across all the base of the
pot, to avoid volcanoes.

Champagne bubbles starting to form, second
time around.

It's a good idea to turn off the heat now,
and once again, don't walk too far away, because......

If you carry on heating the soap, sometimes
it doesn't know when to stop rising after you turn the heat off.......

And it can try climbing out of the pot. If this happens, stir it down, incorporating air as you stir - the air will cool the mix little by little, until you get the soap 'turning' as it did previously.
Once again, wait until the champagne bubbles
no longer break the surface of the soap before re-heating again. Repeat
this 'heat and stir-champagne bubble-turn off heat' cycle until, all of
a sudden, something else happens.

Suddenly, as you heat and stir, instead
of champagne bubbles, the mix will all at once 'meld together' as is shown
in the picture above. It's like a gel, almost.....
Here's a close up. At this stage the soap
is nearly done (YAAAAY!!) and you just need to heat a little more to drive
off some more of the water, and complete the saponification process.

This is ready to pour - er, glop - into
the mold. It hasn't been coloured or fragranced (more on that below). If
you want to superfat, now is the time to do it - a few ml of Jojoba can
add a marvellous 'silkiness' to the gloppy gel in your pot!
If you heat much beyond this point, you
can get a situation where the soap dries out too much and does not want
to stick to itself in the mold, but crumbles instead. If this happens to
you, try a little extra oil (for example I've sometimes added 50ml of Almond
oil in a 1.7Kg oil batch if the final product seemed too dry)

This is the way we glop the soap, glop
the soap, glop the soap...... it's almost like a rebatch, but it's a delightful
light colour, with no lumps of unmelted soap in it - the lighter bits are
just cooler than the darker bits, and that disappears after the soap is
cooled and cut.

And there you go - the cleanest soap pot you're likely to see in a while! Note that the surface of the soap isn't very pretty - this can be shaved off when cutting, and made into soapballs etc. I've pictured a particularly 'dry' batch here to show you how the soap doesn't want to stick to itself if it gets too cold, which is what happened to the surface whilst I was fiddling with the camera. By the time I smooshed it all down into the mold, it was a bit late for a few lumps of soap.
Now, if you've completed saponification, the soap will be ready to use soon as it's cooled and cut (try the tongue test - but be careful! If your tongue starts tingling 1/2 cm away from the soap - give it a week to cure and try again!) If you haven't boiled off a sufficient amount of water, the soap will be 'wet' to cut, and will shrink somewhat when drying (If it's wet, don't pack in shrinkwrap straight away - not a pretty sight four weeks later!!)
The jury's still out on fragrancing, but at this stage (thanks to some buddies from the Soap List!) I've experimented with fragrancing at around 100degreesC - any cooler and the soap wants to fracture rather than hold together, the fragrance doesn't mix in properly, and the soap needs to be packed into the mold under pressure in order to avoid crumbling.
Colourants: I've used Ellen's Essentials and The Pigment Lady's colourants for soap, with good success. One day I'll be selling my own range, here in Australia!
If you want to contact me, you can email me at my company,
And if you're a soap and/or toiletries maker and interested in selling your products, you might like to check out our new publication, 'The Saponifier'
Whatever the level of your soaping addiction, have a lot of fun, be safe, and if these instructions are helpful, let's be hearing from you!
Catcha!