Manual Transmission & Clutch:
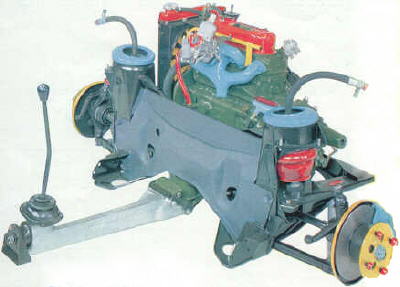
| The 1275cc A-series engine & transmission |
|
|
| The heart of these great cars! |
Although these components are dealt with seperately
in the manuals, I'm going to group them all together since they are all part of the same assembly.
Since everyone
has their own ideas about how to build and work on engines, I'm simply going to share my methods and discuss some of the "drive-ability"
issues that I've resolved. Hopefully, some of my experiences in owning, driving and working on the car since 1983 will help
you with a problem you're having now, or may come across in the future.
Gasket Sealers & Glues:
-There are dozens of different products available for use on engine and transmission
gaskets. People's opinions on which to use and when vary widely, and some don't believe in using glues or sealers
at all.
I'm a believer in gasket glue/gasket sealer, and I always use some sort of sealer on
everything except headgaskets. For years I used RTV type silicone sealers, but have gradually gotten away from
them. I've found that they invariably allow the gasket or seal to leak. Plus, I don't like how the silicone squishes
out into the engine or transmission, even when only using a thin film.
All Transmission Gaskets:
A few years ago I learned about "Permatex Aviation Form-A-Gasket Sealant Liquid."
(NAPA Part No. 765-1211) This comes in a white plastic jar with and applicator brush built into the
lid. I haven't used anything else since. I haven't had an oil leak from a gasket that I've installed using
this product. Even on old gaskets that I've re-used, I haven't had a leak. On paper, cork or rubber type
gaskets, intake gaskets, etc., I highly recommend this stuff.
Transmission Rebuild Parts List:
The list below is not meant to be the last word, nor the all inclusive parts list. This list
is just the "specialty" items that I install and I can highly recommend them all.
I build for low-end torque, high speed freeway (75-80mph sustained).
Transmission:
-Centered oil pickup tube
-Long reach magnetic drain plug
-3.1 final
drive gear set
-Rebuild the whole differential since you'll have it apart:
- New fiber washers a must.
- New bronze washers...the later "A+" ones have a tab that keeps them from spinning.
- New bushings for the outputs where they pass through the differential cage.
-New bushings in the differential flange covers at both sides of the differential
housing in the transmission. Have the bushings pressed in by a machine shop and then machined so your output
flanges are a "snug push fit by hand," they'll loosen right up once driven.
-New hardened layshaft and needle bearings for the lay gear.
-New 3rd motion shaft bearing.....a must!
-New Rover syncros in the trans!! Do all 4 and it will shift like a dream.
Skimp here and you'll have a miserable shifting transmission that will either grind/crunch going in and out of gears, especially
2nd and 3rd, or will be difficult to shift at all.
-Rebuild the entire clutch system:
- New clutch disc
- New "standard" clutch diaphram
- New pressure plate
- New throwout bearing
- New throwout plunger
- New clutch arm
- New clutch arm actuating rod
- New clutch slave cylinder
- Rebuild the clutch master cylinder
- New clutch slave cylinder flex hose
- Use DOT 5 Silicone brake fluid in the system!
-If the flywheel's contact surface with the clutch has blue "burned" spots on it,
then get it surfaced by a competent machine shop. To keep the clutch actuation proper, you need to have them surface
the mount "ears" of your new clutch pressure plate the same as the amount they take off the flywheel.
-Measure all the shimmed tolerances in the transmission for the laygear, primary
gear, and intermediate gear and build to the tightest tolerance with new thrust washers!
Removing the Engine & Transmission:
Here's the method I use to remove the engine and transmission,
as a unit and out the top of the car. I try to work in a circular motion around the engine bay, starting
at the top and working toward the bottom, then I go underneath:
- Remove battery and tray (tray bolts are inside
inner fender).
- Remove ground strap from clutch housing to inner
fender.
- Remove clutch slave cylinder from top of housing
(2 bolts).
- Remove starter.
- Remove generator, coil is usually mounted here
too.
- Remove distributor cap and wires.
- Remove 3 bolts & nuts that hold the front engine
mount to subframe.
- Remove the single nut on the back of the front
motor mount.
- Label and disconnect the engine's wiring harness.
- Disconnect heater hoses.
- Disconnect heater cable.
- Remove air filter housing.
- Remove carburetor.
- Remove radiator, hoses and fan.
- Disconnect exhaust manifold or header from the
exhaust system and remove it.
- Disconnect and remove inner U-joints.
- Remove bolts & nuts for clutch housing mount
to subrame.
- Remove 1 nut on back of rear engine mount where
it goes through the subframe.
- Remove the 4 top bolts at the Remote shifter/sandwich
mount.
Thread a bolt into the side of the block just below the heater tap (you
engine hoist chain will go here. Use the rear bolt hole, not the front one that you currently have an engine steady bar bolted
to. Put the other end of the chain over the Generator's lower adjustment pivot bolt. This should balance the engine
nicely for removal.
I don't take the hood off, just put your hoist down close to the engine and as it rises, push the
hood up on the slack in the hood prop.
Some people like to leave the radiators on. I remove them because I don't
want to risk damaging them.
Preventing Leaks from the Transmission:
These engines and transmissions have plenty of opportunity for oil leaks from:
- The final drive output flange seals
- The rear crankshaft seal up in the drop gear housing
- The front crankshaft seal in the timing cover
- The half round rubber seal between the top of the transmission and the #1 main bearing cap just behind
the timing cover
- The valve cover gasket
Here's the method I use to help prevent, or at least postpone
a leak from the final drive seals where the out put flanges come out of the rear of the transmission:
I've had good success having the output flange shafts turned down by a
machine shop so they are
smooth again. Then with new bushings in the diff. side
covers, I have those machined for a "snug hand press
fit" (as mentioned above). Finally, I pop the spring out of the back of the double lip oil seals, take the spring apart
at it's joint, nip about 1/8" off of the big end, and put the spring back together. This makes the spring tighter and
holds the oil seal's lip tighter to the
output flange. Also, I lube the lip of oil seals with the oil they're going
to be
running in. I don't use grease because grease will pack into the little oil
return grooves in the seal
and keep it from spinning the oil back into the case
like it's designed to do.
Transmission Final Drive Ratios:
-The Americas came with 2 different final drive ratios: 3.65:1 in the Manual Transmission
and 3.76:1 in the Automatic Transmission.
I personally recommend switching to a lower ratio final drive gear set to make the cars more "driveable"
for both freeway/highway driving, and for longevity of both the engine and transmission. When
I rebuilt my eng/trans. the first time back in 1984, I installed a 3.1 final drive gear set. At the time, they were
$199.00 at Mini Mania. They are now $250.00, and in my opinion, well worth the moderate expense.
Coupled with a set 155/80/12 radial tires (the stock size was a 5.95" X 12" bias-ply) this makes
the car fantastic on the highway and allows cruising speeds in the 75mph range to be easily and comfortably maintained.
If you are considering a final drive gear change, the theoretical chart below should be of some help.
Information in the chart was generated by an online program called "GearCalc" which seems fairly accurate and allows quite
a bit of input from the user.
Final drive gears can be changed fairly easily and without taking the transmission apart or even
seperating it from the engine. The eng/trans does have to be removed from the car as a unit, but only the "tail" and
speedometer drive end of the transmission have to be removed.
Engine RPM's based on a 60mph cruising speed and a
155/80 12 tire size*:
*Note: 155/80/12 tires are approximately 21.76" in diameter
and make 925 revolutions per mile.
Differential Ratio: 3.76:1 3.65:1 3.44:1
3.2:1 3.11:1 2.95:1 2.76:1
Engine RPM:
3,447 3,346 3,186
2,934 2,882 2,799
2,555
MPH per 1,000rpm 17.4 17.9 18.8
20.45 20.82 22.0
23.5
Based on this information, you can calculate what your engine RPM's will be at any given
speed. For example:
With 3.1 gears and speed of 75mph the RPM's will be
75mph = 3,600rpm
20.82mph per 1,000rpm
Clutch:
Clutch problems and the resulting shifting problems can really haunt
these cars. Although the system is hydraulic, the majority of the action is done by mechanical means. So, in diagnosing
a clutch or difficult shifting problem, both the hydraulic and mechanical components must be looked at in great detail.
First
and foremost though, is a properly adjusted clutch. Unfortunately, you can't get a proper adjustment with worn parts.
However, you can get close, and even realize some improvement in function.
There are only 2 adjustments to make, and both are located on the
clutch cover just below the battery. The first adjustment is to set the "resting" position of the clutch arm itself.
By "resting" position, I mean; when the clutch arm is just sitting there, and your foot isn't on the clutch pedal. To
make this adjustment, use a pair of pliars and pop the spring off of the top of the clutch arm. Having the spring removed
isn't essential, it just makes this process easier. I've done this adjustment both with and without the spring removed.
Either way is accurate and successful. Next, grab the clutch arm and pull it away from the clutch cover until you feel
it bottom out against the clutch internals. This movement only takes fingertip pressure because during this adjustment
you aren't actuating the clutch, all you're doing is adjusting the arm's resting position. Note that there is a
1/4" bolt with 7/16" head on it, screwed into the clutch cover and the clutch arm rests against it. Loosen that
lock nut, and then with the clutch arm held out....fingertip pressure!......adjust that bolt so there is .020"(20 thousanths of
an inch) gap between the arm and the bolt head. If you want, you can set it to .015" and that will make the clutch disengage
sooner in the travel of the clutch pedal.
With this adjustment completed, put the spring back on the top
of the clutch arm. What you've just done is adjusted the resting point for the clutch arm. This does
2 things:
- It keeps the throwout bearing from being ridden against the
clutch diaphram when the clutch pedal is up.
- It adjusts the "freeplay" in the clutch pedal and the point at which
the clutch will begin to disengage as you step down on the clutch pedal.
Time for the second clutch adjustment. This adjustment is
somewhat difficult in the car, and is most accurate if you don't have a lot of mechanical slop. Have a helper
depress the clutch pedal all the way to the floor. With the clutch held in this position, the clutch arm is fully
pushed away from the engine by the clutch slave cylinder. Where the clutch arm enters the clutch cover, there are
2 large nuts; a lock nut and a "throwout stop nut" that has a flange on the clutch cover side. Loosen the lock nut and
back it out away from the stop nut. Now, with your helper still holding the clutch pedal hard against the floor,
spin the "throwout stop nut" up against the clutch cover with just fingertip pressure. Once it touches the
clutch cover, stop! Now have your helper release the clutch pedal. Here's the important part: rotate
the stop nut TOWARD the clutch cover, one additional flat of the nut. Now keep it like that and tighten the
lock nut against it without loosing your position.
This adjustment is critical to the life of the crankshaft.
It keeps you from being able to shove the crankshaft out the front of the engine when you step on the clutch pedal.
The reason this adjustment is so affected by mechanical slop is that
if you have a bunch of wear, then stepping down fully on the clutch pedal only moves the arm a small amount. You may
have so much wear that the arm doesn't even fully disengage the clutch. So, if you make this adjustment to the
stop nut with a bunch of wear present, you are actually limiting the amount of travel that the clutch diaphram really
needs to function properly.
My advice is this:
- Fix the mechanic slop in the actuating parts first, then
do your clutch arm adjustments.
- If you're building a new engine, perform these adjustments with the
engine on the floor. They're very easy to do, and you can actuate the clutch lever (and confirm that the clutch is working
properly) with your feet against the clutch cover while pulling on the clutch arm.
| Wear in the pedal linkage |
|
|
| This translates to about 1 inch of wasted pedal travel |
Wear in the clutch pedal linkage:
-If you find a bunch of wear in the clevis pin at the clutch pedal
where it connects to the clutch master cylinder, try just replacing the clevis pin first. If you're still not happy with the
fit, you can try a couple more things that will work.
-Go to the next size up clevis pin. You'll probably have to
remove and drill out the clutch pedal and master cylinder arms so that it fits correct. I've done this and it works great.
-Find a partially threaded bolt that has a smooth shank area near the bolt head. Select a metric or SAE bolt that
has a shank diameter that will be a better fit than the original clevis pin. (If the closest size shank is still a bit
too big in diameter, you can carefully re-size it on a bench grinder and this will keep you from having to pull and re-drill
the clutch pedal and master cylinder arms.) Use a hack saw to cut the bolt shank down to the right length, then cut
a shallow grove around the end of the shank farthest from the bolt head. Once this newly made "clevis pin" is push in place,
you can use a new "E" clip slipped into the newly cut groove to secure the shank in place as you would have used a cotter
pin through the original clevis pin. I have also used this method successfully.
-Make sure that before re-assembly,
you coat the pin with some good quality, thick grease. I think just using oil or spray lube doesn't protect these parts from
wear good enough. The less wear here, the better.
Wear in the clutch actuating arm:
-Check for wear in the actuating arm on the clutch housing.
Any slop in the clevis pin at the top of the arm where the rod actuated by the clutch slave cylinder connects, needs to be
fixed. Any slop in the clevis pin that holds the bottom of the arm in the clutch cover, needs to be fixed.
Use the methods above if you don't want to buy a new arm, or have the arm's holes welded up and re-drilled.
-Another major place of wear is on the ball shaped tip of the actuating
arm where it fits into the plunger that pushes the throw-out bearing into the clutch pressure plate. When I recently
checked mine, the ball shape was worn almost completely flat. Rather than spend $60 on a new arm, I had the ball end
welded fatter with a MIG (wire feed) welder. Then I ground it back to the correct shape to fit snuggly into the plunger.
Eliminating this slop took a half inch of travel out of the top of the actuating arm!
Clutch arm returns slow after actuation:
-If your clutch
arm returns slow after actuation or won't return at all, you have a collapsed clutch flex hose at the slave cylinder.
Replace the hose and bleed the system thoroughly.
Gear Shifting & Shifter:
- If you've got shifter/shifting problems, there are several causes.
-
A bad sandwich mount will definately be one of them. This is the mount that goes
betweent the back of the differential housing of the transmission and the front of the remote shift. These mounts
split along the lower front edge of the remote housing due to the fact that the engine torques and pivots, oil gets on
the mount and attacks the rubber, and the engine mounts fail causing the engine to "fall" down a bit and hence straining the
sandwich mount
-
It's very common to have loose connections in the shift linkage. So, make sure the splined
connections at the back of the engine and just below the shift lever are tight. The pinch clamp bolts get loose, allowing
the splined connectors to slide about a 1/4" or so back and forth. This translates to about 3" of slope up at the shifter
and the loss of leverage causes hard shifting and sometimes grinding of the gears.
-
A broken or missing nylon cup at the bottom end of the gearshift lever will also cause a tremendous
amount of play in the shifter.
-
Another culprit is wear in the ball ends of the shifter components. The ball ends wear
flat, from lack of, and/or old grease, then you get slop there too.
-
Finally, a poorly adjusted clutch and the same type of wear in the clutch mechanical
linkage causes alot of shifting problems too. See the "Clutch" section above for information on adjusting and repairing
the clutch.
Approach problems in shifting in a systematic way:
- Check, adjust, and repair the clutch system as needed
- Check and replace as needed, all the engine, transmission and shifter mounts. It's best
to do all of the mounts at the same time in order to get the best results. Use a 1980's vintage Jaguar XJ-6 engine mount
for the mount at the rear of the remote housing. These are far stronger and will last years. There is a photo
of one installed on the "Reproduction Parts" page.
- During the mount replacement process, check all the splined connections, nylon cup at the end
of the shifter, and ball ends of the shift rods. Clean, repair, replace and re-grease as needed. Worn ball ends
can be MIG welded up and then ground with a die-grinder or bench grinder back into shape.
One note of caution on the sandwhich mount installation. It is held in place by
8 special shouldered bolts, 4 per sided. These love to strip out the aluminum threads in the tail housing of the transmission
and in the remote housing. If that happens, no big deal. Have simply helicoil them and they'll be far better than
new. During the going-back-together stage, it's important to start all 8 bolts and get them spun in with your fingers.
That way you have a lot less chance of stripping the aluminum threads. And, make sure you use the special shouldered
bolts. The shoulders hold the sandwich mount and keep the assembly from rocking back and forth with engine torque.
There is a solid sandwich mount available from Seven Enterprises and Mini Mania here in
California. This replaces the rubber bonded original style mount with a solid steel band. This will really
hold the assemblies securely and eliminate alot of wasted movement during shifting.
I have successfully repaired my sandwich mount in the car by having a local muffler shop
weld 2 small straps of steel to the front corners of the mount. This took only a couple minutes and required no disassembly.
It really improved the "feel" of the shifter movement too.
|