| The
Restoration Journal -
|
|
|
| Phase
5 - Body |
|
|
| 2009-01 |
|
The
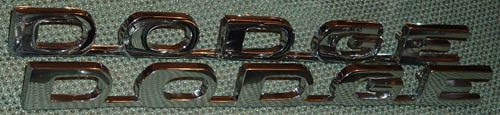
UPS man delivered a nice care package from Chicago’s very own Andy
Mikonis this week. Andy was able to get all my emblems and both set of
mirror stems chrome plated for me – check out the photos below.
Everything look very nice and will match all the other plating I had done
down in St. Pete.
Andy also sent
along a 23 channel CB Radio. I have been mulling over putting a CB Radio
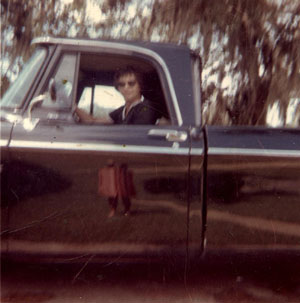
back in it. One of my earliest childhood memories in this truck was the
family road trips and listening to the truckers and learning the lingo.
This radio sure fits the era I am shoot for so I may have to find a place
for it next to the AC unit. If I do pull the trigger on the CB then the
next time I am down at my parents I will need to locate the old Fuzz Buster.
Ol’ Hobe had all the cool 70’s toys in this runner…
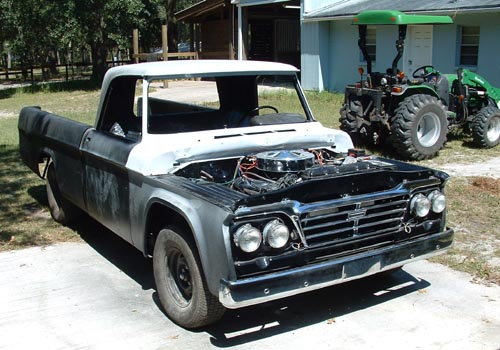
Still plugging away on the truck… I have most of the wiring figured
out and all the lights work with the exception of the tag lights. I am
working on a solution for that now since my original housings are just
shot. I don’t think they have ever been off that bumper until I
pulled them to have the bumper plated.
Sent Butch Romig the heater core to have it worked over by the master.
The radiator is still holding water even under pressure!


|
| 2009-01 |
|
since
September i have been busy on several fronts splitting my time on projects
that are fairweather safe and stuff i can do when the weather is not so
fair.
Hood - i have been
struggling with a decision on which hood to use. i have fixed most of
the rust on the original but there is a TON of body work left to do to
it that is probably beyond my skill level and event then will still look
bad. i bought another hood from Jeff Thomas that has much less rust but
has the dreaded drip rail dents. i was working on a trade for yet a third
hood but that deal appears to have not worked out. anyway i decided to
try my hand at bumping the dents on the second hood and to my surprise
i was able to get 90% of it out and not have it "oil can". i
am now in the process of repairing the little bit of rust on it and will
strip the paint when the weather is good.
electrical - i have
most of the electrical things sorted out - all that is left is the radio,
running lights and taillights. everything else is working including the
glove box light and cigar lighter!
Tires - i pulled the
trigger and bought a full set of tires for the truck - my air holders
were looking questionable. i bought a set of thin white walls on 70's
width to give the truck its sleeper looks again.i painted the old cop
wheels a light creamy tan. the tires were hard to find in the size i wanted
- 235-70-15 but Town Tire here in gainesville was able to accomodate my
needs. photos below. i plan on using the orginal style hub cap - 50s plymouth.
the white walls even met with approval from Kelleen!

|
| 2008-07
thru 09 - lots o' stuff |
|
July,
August and September have been busy months on the old truck project. First
of all I would like to say thanks for my co-workers Charlie and Mike for
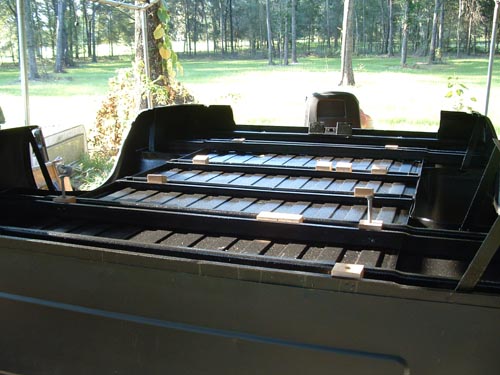
their help in flipping my new truck bed over (twice). It allowed me to
finish stripping all the under coating and paint off and then let me prime
and line the bottom of it. It also allowed me to finish fit the maple
blocks in their proper location. I could not have done all that without
their help.
In addition to prepping the bed I mounted the headlights and wired up
that circuit. This was pretty challenging for me as it was a marriage
of the existing wires and the Ron Francis kit wires. I did not like their
suggestion of going straight to the back of the bulbs with the wires so
I spliced in one connection for each side using old harnesses I have from
two sets of lights. It worked well and everything looks very clean.
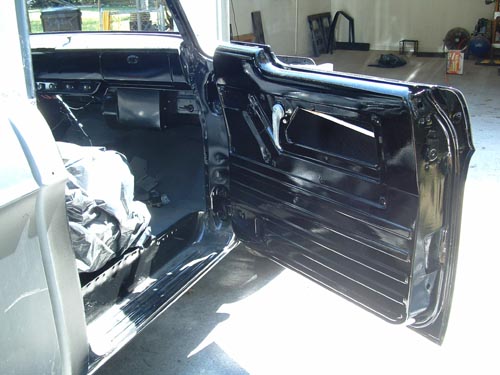
I also painted in the inner door shells and hinges along with the fasteners
for the doors. My neighbor John Reese helped me hang the doors. It was
quite tedious and he was a real asset to have his hands for this part.
The chrome bumpers, grill, valve covers and air cleaner came back from
the chrome shop here in Florida. Thanks goes out to my old buddy Matt
Simmons for picking up the chrome and dealing with the flighty nature
of the people saying it was all done and it was not. they did an ok job
on the polishing but did not treat the backsides – I primed and
painted them using Rustoleum semi gloss black.
All and all I am making great progress but as you can see I am just now
getting started on the exterior body work. The engine runs strong and
usually starts up on the first try after pumping the pedal twice. The
carb needs a rebuild but for $50 off ebay and just sticking it on it sure
runs well :o) I fixed a couple exhaust leaks along the way and had a couple
serious tranny leaks I repaired while it was up on stands. Thanks to Matt
Cook and his shifter cable I am back in business with better parts.


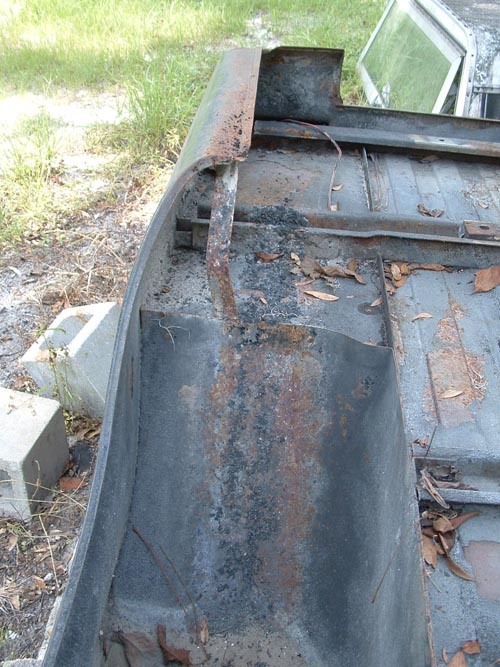
When salvaging
some struts off the rusted original bed to splice into the "new"
one I was looking at the underside of the old one. I was remarking to
myself how there were all sorts of buildup of dirt, oil, undercoating,
tar and other unidentifiable substances from years of driving. It is thick
stuff. I bet all this stuff could tell a story...
When I was looking in the wheel wells I noticed a much darker almost black
but somewhat softer undercoating. On further examination I noticed this
stuff extended well past the wheel wells and back towards the rear roll
pan... then it dawned on me it was melted tire rubber!
There is equal amounts on both sides - that sure grip rear works well...
I guess we put our fair share of tires through hell with that truck :o).
|
| 2008-06-15
- The Seat |
|
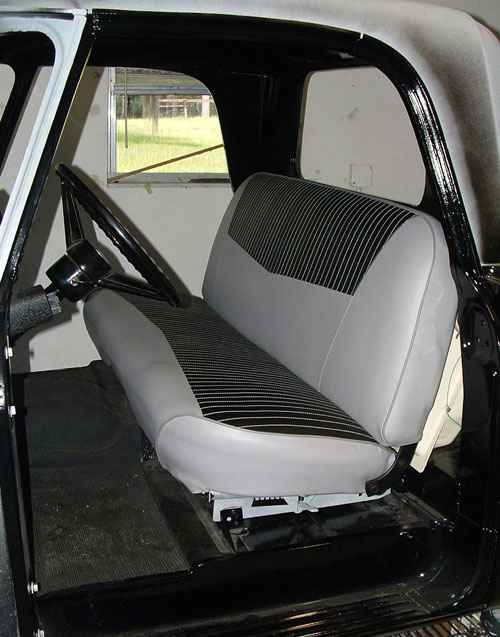
i
got the seat back last week and put it in this weekend – my neighbor
Richard Miles helped me put it in.
it turned out really nice. i am almost afraid to sit on it now. i guess
when i get a few grease marks on it it will feel more normal...
i ran the engine again this weekend affect effecting repairs on the water
pump and hooked up the gauges - everything works! tach, amp gauge converted
to voltmeter, temp gauge, and fuel gauge - they all work! yee haw! i tuned
it a little more to smooth out the idle - i probably need to rebuild the
carb to get it perfect.
Kelleen helped me bleed the brakes so i was able to drive it afterwards
- the rear tires spin easily with no bed on it. The left side exhaust
manifold is leaking at the pipe so I will need to figure out what is going
on with that.
|
| 2008-06-08
- It's ALIVE! |
|
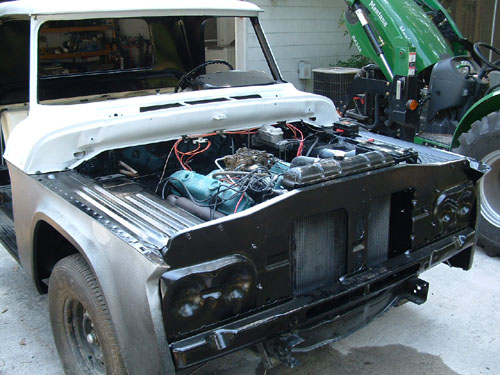
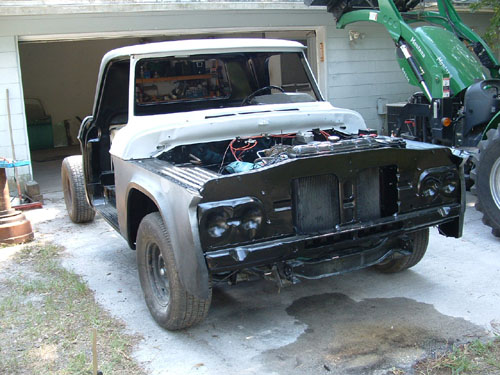
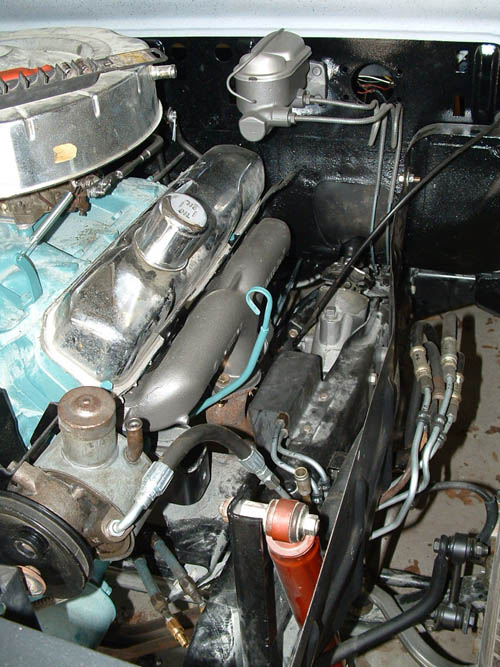
I
was able to get the 440 wired and fired it up yesterday.
along with assembling to the front clip (minus the hood) i installed the
radiator and hooked up the transmission cooler lines and wired the start/run
circuits. it starts thru the key and even the neutral safety switch works.
i even wired in the fuel pump and crash senor/relay.
to say it freaking rocks to hear the sound of that engine and the angry
but elegant lope to the cam brings a heartfelt tear to my eye. the transmission
engages "D" and "R" as expected. i need to bleed out
the brakes and then take it for a careful spin around the yard... it still
does not have the seat installed yet...
the water pump is leaking and i need to wire up the gauges before i go
too far but this past week was a rounding success.
please excuse the painted valve covers as i dropped the chrome parts off
for plating.


|
| 5/2008
- Tach Sender |
|
One
of my many thoughts on this truck is I want a vintage look under the hood
and I did not want to put the modern mopar electronics under the hood.
I bought a pertronix ignition system for the old dual point distributor
so all that was left was how to hide the electronic voltage regulator.
I bought a Ron Francis wire harness and the kit came with a Ford regulator.
Since it was part of the kit I was simply going to hide it under the dash
but when cleaning up the Sun Tach sender I had a brainstorm. It looked
like the Ford regulator may actually fit inside the sender box. I had
upgraded the tach to modern electronics while keeping the vintage vibe
so the sender would be on the fender as a dummy anyway. So I dove both
feet in started measuring and broke out the dremel. The results are surprising.
I had to trim the corners of the regulator and cut a slot in the side
of the sender as well as “gut” the electronics out of the
sender. It seems like the camouflage will work quite well. I’ll
still run the original tach sender wires and the new regulator wires will
be obscured by the hood hinge.


|
| 1-2008
thru 4/2008 - mechanicals |
|
So
much has happened over the past four months that I don’t know where
to start.
I have decided that I will restore the truck to “owner modified”.
There is so much my dad, Hobe, has done to the truck that to remove all
of that in favor of some “factory restoration” would remove
the “soul” from this truck. I know I could be criticized for
not going “original” with this considering the extent and
length to which i am going with this project but I am building this for
me to drive and share with my family. We all have various stories that
are either shared or independent events surrounding this truck that it
would be in my mind “incorrect” to correct these deviations
from stock. I am also doing stuff in the vein that old Hobe would do something
– improve its functionality and dependability. He added the ‘70
front axle with bigger brakes and sway bar to improve the stopping power
and handling. He also added the ‘68 rear axle so it would be easier
to service the brakes over the tapered axle of the original. He added
AC so it would be more comfortable. He also put in a four-core radiator
and an external transmission cooler. I plan on retaining these things
or enhancing them slightly to keep more of a late 60s early 70s vibe to
the truck. I ditched the 8 track that old Hobe cut the dash in favor of
an original AM radio. In a concession to safety I put in a double pot
master cylinder and disc brakes up front. When funds permit I will send
in my extra AM radio to have it converted to modern electronics AM/FM
with inputs for some sort of audio device.
Concepts aside here are updates on my latest progress.
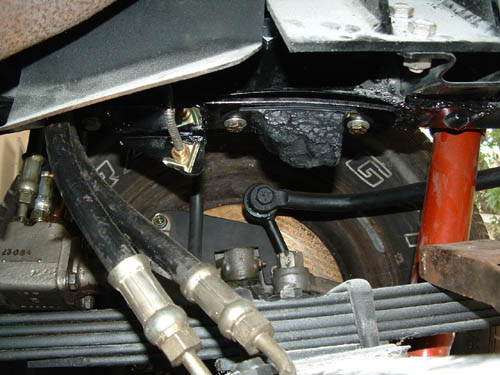
Brakes:
The brakes are complete and just need to be bled.
I had to fabricate brackets to mount the hoses for the disc. I could have
used the original hole in the frame but the hoses would have twisted slightly
in each hole when the wheel turn left or right as the holes down't match
the hoses. I was not willing to let the brake lines get stressed over
that. So I fabricate little brackets that are under slung on the frame
and then filed a grove so the hose would “lock in” and fit
perfectly without allowing any twisting. It took a while.
I adapted a 1986 D Series proportioning valve and hid it between the second
and third frame cross members. I had to fabricate a bracket to mount it
on and more importantly I used existing holes – no new holes drilled
into the frame. One deviation from stock: I ran the right front brake
line across the fourth cross member instead of the factory location on
second member. The second member is the removable spanner that accommodates
the 727 transmission. I did this in the event the transmission would need
future service – this way the brake line would not be in the way
when the spanner would be removed. Using the fourth member was the logical
choice since it was riveted into place and the third member supports the
transmission mount and is removed to effect removal of the tranny.
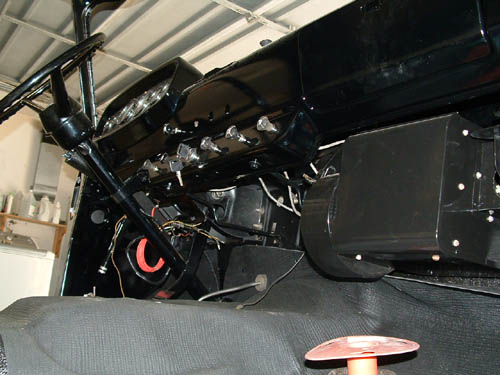
Cab:
Progression on the cab has been slow. I have placed the knobs and switches
in each hole. This way they are out of the way and in a “safe”
place. I also located a rubber floor mat that fits perfectly. The texture
is not correct but it sure looks nice. I sent the original seat out to
be reupholstered by Robert Philpot here in Gainesville. Dan Goldhardt
sent his material down to have a duplicate made as well. Thanks to Chris
Alexander for his leftover fabric!
I rebuilt and painted the heater box. I still need to find a control valve
for a model 86 heater and send out the core to get it repaired. Butch
Romig did an excellent job on the radiator so I will send the core to
him when funds and priorities free up.
Steering:
I used the power steering system I bought from Ki Martin but the lines
would not work on my truck. Luckily Ki used hydraulic lines for tractors
so I bought the burrs and bent my own metal lines. I had to have two hoses
made and I think I shaved a few years off my mental capacity working on
this monstrosity. What I have is not perfect but it should be very functional.
I may revisit the lines later as I am not satisfied with the end results.
Either way my total cash outlay for the system is about $300 which includes
all new hoses the rebuilt ram and control valve from Ki. I realize this
is not original but this reflects my concept of sticking with what my
dad would do to the truck.
Fuel System:
Since I am planning on running a hidden ac compressor I can not use a
mechanical fuel pump. In it place I need to run an electric pump that
is compatible with the old AFB carb. I found a Mr. Gasket pump for a good
price and decided on the best location. Additionally I had a liner put
in my gas tank. For some reason old Hobe painted the tank an off white
so I went back with color rather than try to restore to original. I ran
all new lines for the fuel system. This was not nearly as painful as the
steering lines or brake lines but close. I found the carb on ebay –
this is what my dad always described as the style he replace the boggy
original with. Should be kinda neat to hear an old AFB on the truck again.
Carb Spacer:
I was having trouble locating the orignal relacement .25 inch phenoloic
spacer for the AFB. As a last resort I made one out of aluminum sheet
metal. It is not perfect but at least when I find the right one the linkage
will line up and work with little compromise.
Proportioning Valve.

Brake Line Mount - anyone have a frame bumper like this in better condition?
Heater box and knobs...
Drive shaft with new
u-joints

Engine is close to
being ready to fire!

NOS mufflers - old
pipes will be replaced later on. Note the rear hangers will be removed
when the tail pipes are installed.

Fuel pump - Note: no
new holes drilled. i made a braket to accomodate placement.

Power Steering lines
and brake setup... need one more hose for return.
This is Tom's fix for
the dog-bone ends of sway-bar.

Power Steering lines
- note brake hose braket.

|
| 8-2007
thru 12/2007 - the cab |
|
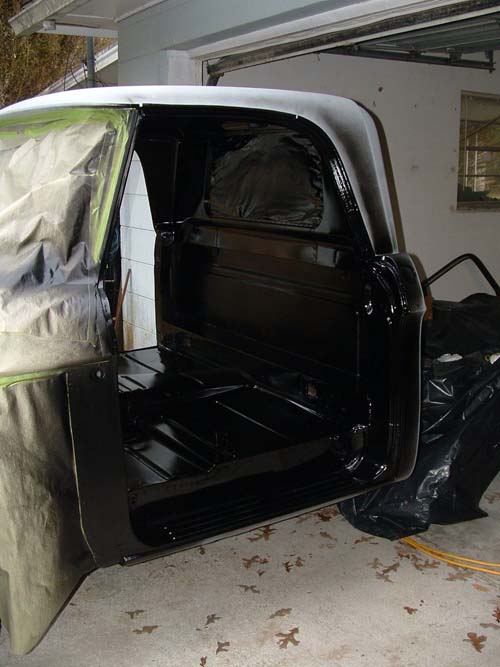
Quite
a bit has happened since my last post. I have been working on the truck
with every spare minute I have in an effort to drive the truck to the
2008 Mopar Nationals in Ohio. My wife has been very supportive and would
very much like to see the truck completed as well. In the following photos
you will notice the many of the various thing I have accomplished. This
biggest thing is getting the firewall, underside and inside of the cab
painted. This has allowed me to start hanging parts on the cab such as
the dash, sterring column and wheel, Ron Francis fuse block and start
sorting out the brakes. I also bought a hidden AC compressor kit from
Bouchillion Peformance. Their instruction suck and the washers they supplied
were the wrong size but everything else fit. Note that the alternator
and water pump pulley will be either cleaned and painted or replaced.
Here are the big changes in a nutshell:
Pulley kit installed and power steering pump rebuilt
Body work on cab
Paint the firewall, underside and inside of the cab
Started sorting out the brakes
Bought another hood – thanks Jeff (for the hood), and Matt, Scott
and Kerry for the sweptline railroad!


|
| 7-7-2007
- Fenders Primed |
|
primed
the fenders and core support this week. i am starting to really get a
feel for the painting of the panels. the primer is very forgiving and
i have only created a couple minor runs in spots that won't be seen. i
may leave them since they look like many of the runs i have seen here
and there on the truck.
Next up:
- when the weather is bad i'll cut out rust on the hood and fix with patch
panels.
- finish stripping and paint door shells.
- the tailgate and bed (that's a whole project by itself!)


|
| 7-1-2007
- Body |
|
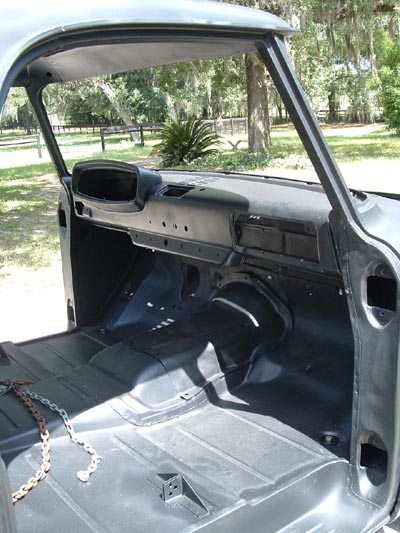
worked
on priming a few parts for the truck - the cab is primed and placed on
the frame. the Dash, trans tunnel cover and cowl guard are in place and
primed. they are not bolted down but merely resting in place to hold them
while i work on the core support, fenders and door shells. it is slowly
starting to take shape! now i get to start knocking out dings and dents
and mudding the dings that won't knock out.
side note: i sent the gauges off to redline gauge works. the AMP gauge
will be converted to a Volt meter and the Sun Tach will be updated to
modern electronics. all the needles will be painted to match. with luck
i may even have a new bezel put on the speedo.


|
| 5-2007
- Body |
|
took
a week off from work to do a few things around the house and work on the
truck.
first things first - i spent all the money i have been saving and had
all the body panels stripped using a company in Orlando FL called Master
Blasters. they used plastic media and did a great job. the owner, Wayne,
suggested i use Ospho to treat the rust and then prime it. in the following
pics you will not that the truck panels are laid bare and have a coating
of Ospho all over them - nasty stuff! note the old "Republic Steel"
paint stamp on the inner fender...
the parts are located at my friend Mike Nelson's shop. he's helping me
prepare each part for paint and we will epoxy prime each one in flat black
- VERY COOL!


the next thing is
we bought a tractor with the help of Kelleen's parents. it is a Montana
brand Rseries 4344. it uses a Mitsubishi 4 cylinder diesel and comes equipped
with 4WD, 16x16 gear drive and shuttle shift, front end loaded and a host
of other goodies. this should help save an imense amount of time on weekends
when mowing season starts up and will free up more time to work on the
truck!.

|
| 2-2007
- Engine |
|
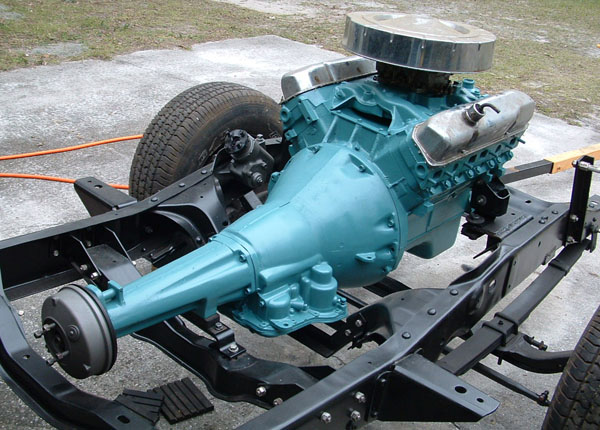
still
plugging away on the resto project.
the big news is i now have the engine together, painted and mounted on
the frame - see pics below.
the air cleaner and valve covers are just sitting on top and will be rechromed
when i do the grill, bumpers and mirror bases.
this milestone is a big deal for me since i have been salivating for a
while to rebuild the 440 my brother George gave me. it did not need much
more than new gaskets but i did have a machine shop clean up the block,
hone the cylinders and knock in some brass freeze plugs.
i have started a fund to take all the body panels to orlando to have them
media blasted. the time and labor i have invested to date to mechanically
strip the core support and cab have taken a toll on my patience level.
i am determined to get though it but i feel i can better use my time sanding
on dents and shaping panels rather than raw stripping. i have half the
money saved so far so hopefully sometime in march i can drag all the panels
down to be stripped!

|
| 3-2006
- start on body work, misc update |
|
i
started stripping the paint a grim from the cab these past months. i have
the under floor section stripped and painted with rust encapulator as a
primer. it looks awesome and seems very durable.
i also have the fender i bought from Terry Holcomb de-undercoated. i used
a wood chisel and a putty scapper to chip is all away. i'll start stripping
the paint once i can get more encapsulator on hand. because my time on the
project is divided i will start using spray bombs to paint with since i
pretty much wasted a whole gallon of the paint from it just sitting. i think
in the end the spray bombs will save me money until i can get it all "in
prime". once it is all in prime i can do larger areas with bulk paint.
with the help of terry winkler and his brother Kerry i was able to located
and purchase a bare 426 block from a really nice person name John Deitle.
part of the sale also include a chrome air cleaner and valve covers. John
lives in MO and Terry picked it up for me. Kerry will drop off the block
on his way back from a visit with Terry so shipping is quite reasonable!
this will shift my priorities some and the 440 my brother donated will give
up its rotating assembly. i'll have to purchase some pistons and have the
block line bored but i think this is a better way to go in the end and now
it will have a 426 in it again for the first time since 1968! hopefully
this one will last longer than the first one.
i will keep plugging along with the project and scrapping undercoating for
the next few weeks. the block should be here the first of april and i promise
to post pics of that event! |
| |
|
|
| Phase
4- Frame |
|
|
| 12-2005
- More frame assembly |
|
Not
much new to report... but here's an update on everything...
i am still plating bolts and assembling frame brackets and cross members.
it is slow going but the results are turning out nicely - photos to come
soon...
i bought a frame reinforcment that goes between the engine frame stubs.
this will go a long way to help prevent future frame cracks in this location
since it ties both side together. i also bought a rust free right front
fender, a left front chrome trim piece for the hood to ensure i have a straight
one in case the dent does not come out on the original part and some frame
bumpers for the springs.
once the frame is fully assembled i am either going to rebuild the transmission
or start stripping the new cab of all the grease and grime. i am having
trouble deciding what is the best approach. since i have not done a 727
before i may tackle it later and work towards getting the body components
roughed in now that i have all the key parts. this way i can rought everything
in and get it all primed and all panels straight. then take it all apart
again and cut in the panels with paint. knowing eveything fits.
i am excited about everything that has happened this year - from seeing
Terry Winkler's truck come together, seeing it in person in Columbus Ohio
and then see it appearing in the Feb '06 MoparAction and in the Jan '06
Mopar Collector's Guide to getting the frame where it is now. much to do
and enjoying every minute of it! |
| 01-2005
thru 11-2005 - Clean and paint frame |
|
sorry
for the long delay in updating this journal. i have run out of server space
so the photos i can post are some what limited for now. i will make some
time this winter and redo this whole section of the site for more room on
the server.
Details of the past year:
- I have been busy working on the farm - cleaning up all the downed tree,
fence work, new out building, mowing, etc.
- i have cleaned, painted and detailed the whole frame and most of the crossmembers
and suspension components.
- My work on the CSS Registry has added several new trucks and i went to
the Mopar Nats in August to see Terry Winkler's 64 D100 HPP truck - talk
about inspiration! I also met Matt Mugno, Dan Goldhardt and several other
Sweptline enthuiasts. it was a great time!
Process to cleaning and painting the frame:
- first thing i did was pressure wash the frame and suspension. there was
40 years of grease, grime, dirt, lime rock, sand and gunk.
- after that i scrubbed it with simple green and then i pressure washed
it two more times.
- then i finished taking the suspension and all crossmembers off and got
it down to a completly bare frame with not a single nut or bolt on it. to
move it around i used furniture dollys and blocks of wood to set it up higher.
- after it was mostly degreased i sandblasted the frame. that got most of
the petrified undercoating and paint off. i also did all the parts the same
way except i used a bench grinder with a wire wheel attachment - it made
easy work of paint and grease and did not hurt the natural finish of the
metal.
- on the frame after it was sandblasted i used my 3/8 drill and a couple
different wire wheels and went to work on the whole thing to get the soft
undercoating the blaster could not get. i got it to bright metal with all
this work using the drill.
- then came the tedious part. with a tooth brush sized wire brush, a screw
driver, a putty knife and a larger wire brush i scoured every knook and
cranny for more grease grime and undercoating.
- once that was done i wiped it all down with laquer thinner and then did
it again.
- once it was sufficiently prepped i sprayed it with Eastwood Rust encapsulator.
- i top coated it with Eastwood chassis black. i left most of the suspension
components the flat black rust encapsulator for a variety of finishes in
an effort to emulate factory finishes.
- the original bolts are all tin/zinc plated using a kit from eastwood.
- i installed new bronze bushing in the spindles.
- i installed the front disc brake kit i purchased from AAJ Brakes.
All in all i am feeling very positive about the hurdle i just crossed with
the project. there are several more suspension parts that need to be painted
and its fasteners plated or painted. once those are done i will start on
redoing the Engine and Transmision.
Images below....


|
| |
|
|
| Phase
3 - Body work |
|
|
| 11-04
- 12-04 - cab work |
 |
lots
has happened since my last update. i have been cleaning up the yard from
seven total trees down. i have also done some work on the truck>
rearranged the shop, the home garage and outdoor work area. i can now keep
the truck in the home garage and store my parts piles in the work shop.
i corrected the striker areas on the new cab
i fixed the cowl rust areas
i made a trailer to finish prepping, stripping the cab and easily move around
- it is now stored in the outdoor work area under cover until the frame
is ready for it.
i pressure washed the frame.
i stared sand blasting the frame. |
| 09-26-04
- Hurricane Jeanne |
|
we
had another visit from an uninvited guest this week - a hurricane named
Jeanne dumped only 10 inches of rain this time and we lost our power before
she left. we also had 2 trees down and countless linbs on the ground. storms
go away! |
| 09-06-04
- Hurricane Francis |
 |
we
had a visit from an uninvited guest from the tropics this week - a hurricane
named francis dumped 16 inches of rain and we lost our power before she
left. we also had 3 trees down and countless linbs on the ground. the 2003
ram we recently bought suffered a dent in the tailgate but the 64 truck
did fine. |
| week
of 07-25-04 - fix - dash & tailgate
- disc kit rec'd |
 |
i
found the proper screws for the tailgate and repaired the fasteners in
the bed to accomodate the new ones. still need to line it up but at least
i can move it around and remove it easily.
my parents installed
an am/fm 8 track radio in the truck. i wanted an original radio so i made
a patch out of an old dash and welded it in. i am very pleased with my
welding skills!.
i ordered a disc brake
kit from AAJ - really nice setup. i need to buy some aspen rotors and
then i can install the whole set up. |
| week
of 06-28-04 - new doors from CA |
 |
found
a pair of doors on ebay. Dan in Tarpon had a truck being shipped from
CA so shipping was FREE! my dad also came up the following weekend and
saw my progress for the first time. he was shocked and proud. he helped
me weld up some holes in the bed and fit the strikers for the doors.
my siprits are lifting now that i have pushed passed the issues i was
feeling with the cab.
bought a really nice
pair of CUSTOM emblems for the doors |
| week
of 03-28-04 - old doors mounted on
cab |
 |
this
week i mounted the old door on the cab and checked them for fit. everything
looks good. i need to figure out how to set up the strikers for the old
style doors to this new style cab. the old doors are way to rusty to work
with and decided to buy some from ebay. |
| Phase
2 - Clean and repair frame and cab |
|
|
| week
of 03-01-04 - Cab Modifications and
Dry fit of big parts |
 |
i
am in-between jobs this week so i took advantage of the time off and worked
on my truck - i got a huge amount of work done on it. in the photos you
will notice the spliced parts are painted with bloxide weldable primer
(silver). i cleaned and stripped all the "new" sheet metal pieces.
the tunnel cover and hump are from my rusted out D100 cab. the bed has
only minor surface rust. all the black parts are from my truck - not much
of the old truck left!
i have some mixed emotions right now. i have put a huge amount of time,
money and energy into this new cab and i keep hitting "road blocks"
with it everytime i look at it. i am able to work through them but it
is starting to wear me down.
after splicing in the pieces to fit the cab to my D100 i noticed the steering
column mount that is part of the cab was a little more in-board on the
new cab as compared to the old cab. i pulled out my tape measure and sure
enough - it is 2 FULL INCHES inboard. this was VERY discouraging. this
made me want to stop and dry fit all the big parts on the frame. the steering
column is off center in relation to the dash pod and the brake pedal now
sits very close to the gas pedal.
i am going to have to modify the column mount and drill some holes in
it to center the column. i will probably have to make some minor mods
to the column bracket and straighten the brake pedal to get the proper
gas/brake pedal alignments. this also brings to question the valve cover
to master cylinder alignments that i will have to deal with later - at
this point i don't think it will make much difference.
it was very exciting to see it come together - even if it is only temporary.
this has me leaving the week of hard work on a high note - i am very proud
of my welding/fabrication skills in getting this D300 cab to fit my frame
rails. it is really nice to have solid metal to weld onto. i think everything
will work out fine but it is no less discouraging to see all these little
things when i really wanted something i could just bolt on and go.
maybe i am being too
much of a perfectionist - i can't decide! i am sure all my negative feelings
will subside when it is Black and Beautiful and i turn the key and go.
|
| 02-20-04
- time off - parts collecting |
 |
I
have taken the past few weeks off from the truck to work on some fences
and find another job. my day job has been going in a different direction
and it was time for a change.
Terry Holcomb was kind enough to sell me the metal i need to modify the
new cab to fit my D100 chassis. that will be in the next update.
In the meantime this update shows some of the interesting parts i have
acquired over the years:
The first set of photos is of the HD gauges i have. there are three sets:
Foreground is from my D100 with the HP package (note the 6000 rpm tach
and chrome trim rings)
Middle set is from a Custom Cab non-CSS truck with a 318 poly (note the
5000 rpm tach and chrome trim)
The Background set is from a regular cab utiline D200 with a 318 Poly
(Note the 5000 rpm tach and plain silver -not chrome trim)
Another pair of photos show a Holley Three Barrel carb. Very odd looking
thing but lots of fun!
the blue van is something i saw in my travels |
| 01-01-04
- frame repair - power steering hose
layout |
 |
Sorry
for the month long delay in updates. i have been busy with both home improvements,
my demanding day job, and the truck project.
I borrowed my friend Mike Nelson's car trailer and transported the frame
to my parents on Dec 28th. I had a few problems towing with my 98 dakota
so this left me with very little time for visiting with the family - i could
not tow any faster than 60 mph and had to make a couple cool-off stops along
the way so the trip took an extra hour each way. My dad was involved in
an accident earlier in the month so he was still recovering from the shock
- good to see he was ok.
I was able to use my dad's stick welder to repair the crack on the passenger
side.
Before i drug the trailer down to St. Pete I borrowed some of Mike's time
and he pressure washed the frame.
Even after a thorough pressure wash it is still very grimy (nearly 40 years
of grime on that frame!). I started scrubbing it with a degreaser and a
wire brush. In doing so I discovered two more cracks on the driver's side
where an earlier crack was repaired.
To repair these complicated new cracks i decided that a good approach would
be to make a couple of gussets out of angle iron and some flat stock. I
made them in such a way that when welded with my mig the edges of the weld
would still be in-board of any frame rail edges. this way i could minimize
any stress risers and still add strength to the area. basically i tied the
engine cross member to the bottom edge of the frame to spread the load out
across the bottom. I think the big problem is the springs load the frame
about a foot and a half on each side of the motor's cross members and those
cross members contact the bottom edge with a small footprint and two rivet
holes. the torque and weight of the big block motor sits right on the point
where the frame bumpers have weakened a critical stress point of the frame.
I am sure that this area will always be a problem so i will have to keep
an eye on it.
Fat Man Fabrications makes a Mustang II independent front suspension set
up for hot rods that may be a good solution for this area - however - i
want to stick to using only bolt-on type mods and the fat man set up is
a weld in deal. So my plan for now is fix as described (see photos) and
keep a watchful eye on these problem areas. if they com back then re-evaluate
and see what the options are at that time. |
| Phase
1 - Disassembly |
|
|
| 12-04-03
- update |
 |
i
am prepping the frame for transport down to my parents to weld the small
crack in the frame.
i have stripped the chassis wires out and i have also noted how rotten they
are - see photo for route through frame.
i have also taken a short break from the truck to update the CSS registry
and add a "What is a CSS?" page.
I have had a number of questions on what is SERT and what HPP and CSS mean.
i have also been doing some home improvements - gotta have a life outside
my dodge :) |
| 11-16-03
- cab is off the frame! |
 |
with
the help of my friend Cardin and my brother Hobie we were able to remove
the front and rear windows - all without breaking them!
also with Cardin's help we removed the doors and placed them on the new
cab for safe storage and to check fit.
we also removed the rusty cab from the frame. the old worn out 440 motor
is all apart and ready for removal from the frame.
next up - time to clean the frame and weld a small crack. |
| 11-2-03
- 11-7-03 - misc work |
 |
more
work on different fronts:
- i went to Don Garlitt's annual mopar show. i found a real nice grille
and sold a pair of b-body manifolds - thanks to mike and friend's booth
o' parts
- i finished disassembling the "new" cab.
- i worked on finishing
the disassembly of the "old" cab.
- i removed:
--- the chrome drip rail - it was all that was holding the roof together!
very rusty under it but it is in excellent shape.
--- brake pedal - NOTE: the use of a return spring (see photos)
- i started disassembling
the motor. special NOTES:
--- note the carb/kickdown linkage - custom made by dodge factory when
my dad complained about it at time of delivery.
--- power steering bracket
- i finally invested
in a engine lift and removed the bed from the frame. the frame is in great
shape and should turn out nice when cleaned and painted.
|
| 10-21-03
- new cab is here |
 |
the
new cab is here. i am very impressed with britt and his quality service.
the cab is nice a solid. no rust in the critical areas. two small rust holes
under the dash in the corner of the cowl - easy fix. there are some slight
differences between the two -
- note the photos that compare the two column holes - the new one is about
4" lower
- the center tunnel has a bigger hole in the new one. i will have to cut
the old one out and use part of it.
- the door strikers are different and have larger area for them to sit in.
all of these are very minor and should be easy fixes for a pro so we will
see how well i do :-) |
| 10-19-03
- dash and column out - seat and wipers
out |
 |
the
cab is now nearly ready for removal. i removed the steering column, dash,
all wires, heater unit, seat, gas tank, visors, rear view mirror and push
buttons. left for removal and storage is the glass, cab bolts and isolators,
doors, parking brake lever, drip rail chrome and misc small parts.
I had to cut some wires in the dash harness as it was snaked through holes
here and would not allow me to release the column from the cab. i hated
to do it but i had to. i hope the "new" cab has wires in good
shape that i can borrow from...
the push button control has a reverse switch that got fried or shorted
some how but the other mechanisms are fine.
notice all the leaves in the cowl - this is what did the cab in. my parents
home in st. pete has oak trees and this truck was parked under them for
years.
i also included photos of the shelves i built to store all my parts while
i work on the truck. they are very heavy duty and easy to build. |
| 10-15-03
- interior disassembly and new cab
on its way |
 |
the
photos don't show much but this week i worked hard on marking and unplugging
wires under the dash. i also started on removing the column. the wire harness
will need some serious TLC before going back in. there are a number of wires
that were melted as well as hard soldered to each other complicating removal.
i will repair and replace where i can. the photos note how the top driver
side wire colors were oriented.
as an aside - i noted earlier that i ordered a cab from Britt in Cool, CA.
BAX global is handling the shipment of the part. they seem to be great and
i talked to keith in sacramento - nice and helpful. i tried using a friend
of a friend but it would have cost the same amount and increase the duration
of time before i would see the part. it should be here the week of the 20th.
Mike nelson is receiving it at his shop and we will clean it up before bringing
it home. |
| 10-03-03
- bed bolts and start on interior
disassembly |
 |
I
worked on removing the tailgate hinges. they are rusted solid and i stripped
the heads using my impact driver. i got some advice from the dodgesweptline.org
web board that i am going to try on the left side and i have a woodworking
tool to make sure the ratchet doesn't walk out after heating - it should
create a positive engagement of the fastener. i was also able to figure
out that the inner assembly for the hinge is a bolt-in unit that probably
carries a part number. i will do some research on finding another but between
the two beds i have i am certain i can fabricate something. the old tail
gate is very straight but very rusty. i am torn on what to do as the "new"
parts are solid but have a slight bend in them around the tailgate area.
the old parts have razor sharp lines but are so rusty that i am sure they
are not salvageable - i am leaning towards the "new" parts and
doing my best to clean up the lines.
the bed is ready to be lifted off the frame. the right front carriage bolt
spun in the bed so i used my trusty nut splitter and was able to save the
bolt. something to note here - the wood for this bolt was
rotted and nearly gone. i will surely need to inspect the frame for rust.
from underneath it looked fine and did not seem to suffer any ill effects.
this was probably the cause of a solid clunk in hard right turns the truck
would make in it prime. i would imagine the bed would shift slightly on
its perch. the new bed has wood blocks that are in very good condition.
i also started disassembling the dash. i labeled all the wires behind the
gauges, bagged all the screws, and removed the glove box door. the alternator
wires were taped together - i think this was my dad's short term solution
when the gauge shorted when i was driving to sebring back many years ago
when i was in high school - i always wondered what he did for that problem
and now i know! my spare H.D. gauge set will surely come in handy when i
go back together. |
| 10-02-03
- new cab on order |
|
i
have bit the bullet and sent a money order to "Britt in Cool"
for a rust free cab. Britt seems like a stand-up guy and i will let you
know when i see the cab. my cab is nearly gone from rust and my skills in
saving it are probably limited at best. the floors are shot along with the
steps, the drip rail and worst of all the cowl. i am certain i can fix the
floors and steps but the cowl and roof are probably beyond repair. i got
some advice from some friends "in the know" and they both feel
that no matter what i do, any rust i fix will surely come back. since i
am going to the frame on this project i better do it right or not do it
at all. Britt is prepping the cab for transport this weekend and will ship
it out next week. this purchase represents the last of the money from the
sale of the 65 340 Valiant project car (thanks Phil - i spent it all in
four places!). |
| 09-23-03
- rear end area disassembly
work in progress |
 |
I
worked on removing the rear tail lights - pain in the arse! i was able to
pull the right side out but i did not realize there were built-in spring
tabs that held the bezels in place. the right side bezel's tabs broke off
and distorted the bezel slightly. it looks like an easy repair but i guess
Dodge did not intend for people to take these out - ever! i have made a
tool to remove the left side bezel but i will need to enlist some help as
it is somewhat difficult to get to both sides of the light while laying
under the bed with one arm up inside the rear light panel.
to maintain productivity i removed the rear bumper and started removing
the home made hitch. the bumper is off and the hitch will follow soon. |
| 09-11-03
- left fender, core support
and inner fender removed |
 |
I
pulled the left fender and core support off today. my dad had a 4 core radiator
custom built for the truck and it will need some work before going back
on. the fend is pretty much junk - the rust is as bad as the right side
fender but the left side has a pretty severe dent in it. the parts Andy
found has a near perfect left fender with on minor dent in it.
Special Note for reassembly - the inner fender would not
come out unless the core support and fender and/or power steering is removed.
the inner fender and battery tray are in good shape and will be reused.
the core support had holes drilled in it to enhance cooling - i may or may
not reuse this. the other one has some rust but the latch bracket mount
bolt point has a ripped area in it. |
| 08-25-03
- Load new bed on trailer to start
repair |
 |
My
friend Michael Nelson loaned me a little flatbed trailer to use so that
i can move the "new" bed around easily. He also had a rack from
a dakota pickup that i used to lift the bed off the ground so the lower
portions of the bed won't get damaged when not on the trailer. i also made
up a trailer hitch for my garden tractor to move the trailer around easily.
i jacked the bed up and slid the rack under it and used two by fours and
lag bolts to mount it to the rack. i then jacked that assembly up and slid
the trailer under it and used my come-a-long to winch it up onto the trailer.
it took a awhile to do but i was quite impressed that my little tractor
could pull it around. |
08-20-03
- Repair bottom of right fender
|
 |
I
created a patch panel for the lower portion. it turned out ok but i needed
to do it in two pieces to get the angle and curves i needed. i am using
a book by jim richardson for reference. a very good book for beginner body
people. all the welds and imperfections will be easily covered by a thin
amount of filler. |
08-06-03
- Repair top of right fender
|
 |
i
welded up the top portion of the right fender. i had to make a patch panel
and used my eastwood shrinker/stretcher to get the curve just right and
my drill mounted nibbler to cut the piece into shape. i used an eastwood
vice mounted metal brake to get the 90 degree bends in it. i am very pleased
with the tools i bought from the sale of my little Valiant. i bought a Lincoln
WeldPak 135 from Lowes home improvement and i am using flux core wire -
it turned out nice. i think if i can find the money and use gas with regular
wire i would have had better results but i am very satisfied with the results
so far. the metal on this truck is THICK! very forgiving for a rank amateur
welder :) i used my angle grinder to knock down all the welds. |
08-05-03
- Right fender off
|
 |
moved
the fender into the workshop. i also practiced welding some more in preparation
of patching the "old" fender. i am confident i will either do
a good job or really mess it up. the metal is so thick on this truck i used
a hack saw to cut the rust out of the fender! |
| 08-03-03
- Remove right fender |
 |
i
pulled the right front fender off today. had to buy a nut splitter to get
the lower fender strut off with out hurting the strut or the unique philips
head bolt. came off with out a hitch. i have decided to polish my welding
skills on this fender as the "new" one from ebay is dented up
fairly well. if i screw up this fender by welding it i can fall back to
the "new" one and try my hand at dent removal. |
| 07-15-03
- Begin |
 |
this
is a fun day - the day i dive in. i spent the day documenting the truck
with my company's digital camera and i decided i need one of my own. i removed
the front grille and headlight housings. i am feeling excited but apprehensive
- this is a big task ahead but i am confident i can do it! |