Please either print this page or copy and paste to a text editor like MSWord. This page's address is periodically changed for safety reasons. Thanks!
Build Your Own Bass Booster!
Go From Series To Parallel With The Flip Of A Switch
Understand Relays![]()
The first step to understand what makes this work is to understand a little gadget that's used in numerous installation techniques, primarily in the wiring of the security system, door locks & power windows. It is an electromagnetic switching device, or more commonly known as a relay switch. It is a little black box about 1 1/2 inches on each side and with a tab to secure it down. One side has five metal prongs sticking out that look like this:
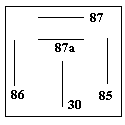
The tabs are numbered but some relays are manufactured without markings on them so you need to learn and remember which one is which and what each one is for. Plus it will give you insight as to how this all works.
85 & 86
These are the two prongs you use to connect the 12V+ and ground wires to. You can connect either connection to either side, it doesn't matter. When a connection is made through these contacts completing a circuit, the contact changes inside the relay, which changes the output. Confused? Let's continue.
30, 87a & 87
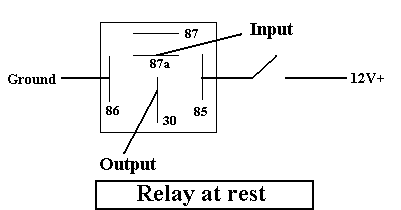
30, the vertical prong in the center, is the output on the relay. (You can use 30 as an input that can be switched to two different outputs but in this case, we'll use 30 as the output.)When the relay is at rest, or to say there is not a circuit between 85 & 86, the output from 30 is received from 87a. So if there is a wire with a current or signal passing through it and it's connected to 87a, if the relay is at rest, that signal will pass through to 30, the output.
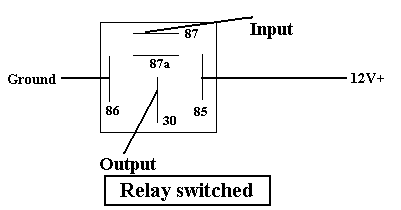
When the circuit is made between 85 & 86, the output from 30 is received from 87. So now, any connection on 87 is passing through to 30.
This ability to switch it's output is where the magic comes from. Want an animated look at it?
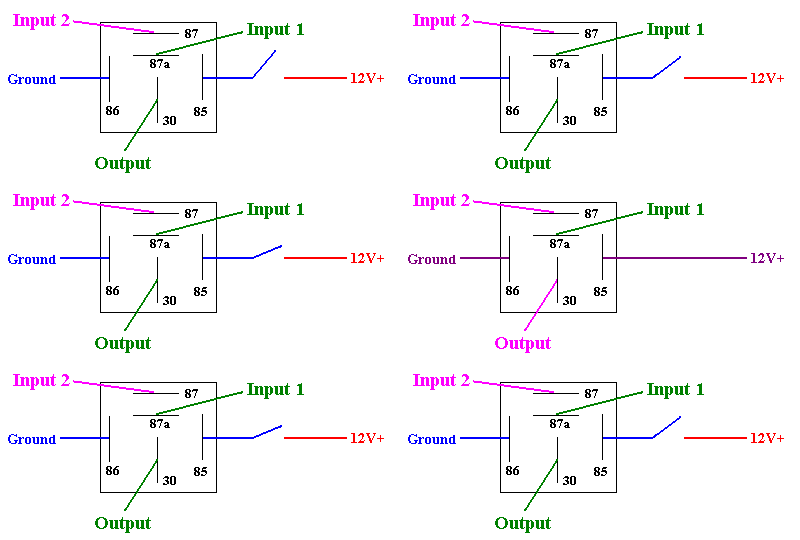
Now that you know how the relay works, let's work on figuring out your impedance load.
Impedance Loads
Bridging is when you take one amp output (+ and -) and hook them up to two or more speakers. There are two ways to bridge your speakers, series and parallel.There are a few simple formulas to figure what impedance load you'll be pushing to your amplifier when wiring in series or parallel, no matter how many speakers you want to use. Let's look at wiring speakers in series vs. parallel and see how each way effects the impedance load.
Series
Wiring in series is when two or more components are wired end to end as in a string sharing current and dividing the voltage.
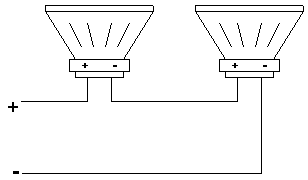
The formula for calculating the impedance is:
R
1+ R2+R3+...=RtR
1 being the resistance of the first speaker, R2 the resistance of the second, etc, and Rt is the total resistance. This formula works for any number of drivers.Ex. If both of your speakers are 4ohm, you would have an 8ohm load going to your amp:
4+4=R
t8 =R
tParallel
Wiring in parallel is when two or more components are wired together where each component has a direct line to the source output.

The formulas for wiring in parallel are a little more complicated. If you're using two speakers, the formula is:
R
1xR2Ex. If both of your speakers are 4ohm, you would have a 2ohm load going to your amp:
4x4
4+4=R
16
8 =R
2=R
tFor parallel wiring of three or more speakers, the formula for the impedance is:
1
1 + 1 + 1 + ... =R
This formula is a little tricky so even though wiring three or more speakers in parallel is rarely done, if you do try it, make sure you know what you're doing. Check the impedance!
Most quality amps these days are capable of handling a 2ohm load with no problem. Some can even handle down to a 1/2ohm load. Just be sure and make sure your amp can handle what you're going to give it. Also, when you lower the impedance load an amp is seeing, you increase the heat the amp is going to put off so be sure it's well ventilated.
What you'll need to get the job done
Besides the obvious components of an amplifier and two speakers, you'll need to get:
The above components can be purchased at Radio Shack or most any electronic supply stores or stereo installation shops.
Other things you MAY need to purchase:
The diagram of the wiring of the installation:
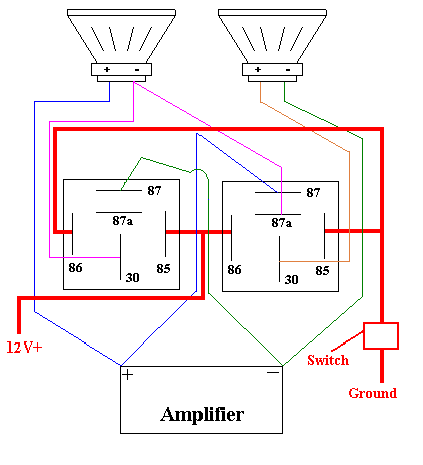
The wiring of everything is fairly simple. A few last helpful hints:
- Make sure you wire it up right!
- Check your impedance loads make sure your amp can handle it!
Good luck to you. I hope it's exactly what you were looking for. If you have any questions or there's anything I can help with, just let me know. Thanks again and let me know how your installation goes.
DavidLMills@hotmail.comI assume no responsibility if you damage your equipment during the installation of this custom switching setup. DM '03