
Ok, you want
weird, well here's something you'd probably never think I'd have on my
site!! Yes, now you see my mind has weird thoughts...believe it or not,
the image of this came to me at 2 in the morning!! Hope you find this of
interest to you. I'm hungry now....hehe. By the way, you all know I
spend all my spare time in the kitchen, slaving over a hot stove...it's so hard
to please everyone!!
Dig
in...
Arrowroot Biscuits
Ingredients:
¼ cup butter or margarine, softened
½ cup white sugar
1 egg
½ teaspoon vanilla extract
1 cup all-purpose flour
½ cup arrowroot flour
½ teaspoon baking powder
¼ teaspoon salt
Directions:
Makes 3½ dozen
Ingredients:
1 (14 ounce) can sweetened condensed milk
¾ cup peanut butter, smooth or chunky
1 egg
1 teaspoon vanilla extract
2 cups buttermilk baking mix (e.g. Bisquick)
½ cup white sugar, to roll cookies in
Directions:
Ok, so that
was just the first part, I'm sure you'll find more mouth-watering recipes here,
but how's this for some interesting and weird facts:
Would you like another recipe? Well try this one out...I've not had it, but from a good source of mine, it's one yummy delight. If you've given it a try, let me know if it's as mouth-watering as it sounds.
Pineapple Upside-Down Cake
6 slices (rings) of canned PineappleDirections:
4 tbsps golden syrup
6 cherries
5 eggs (separate egg white from egg yolk)
150g melted butter
200g sugar
180g self-raising flour (sieved)
½ tsp baking powder
¼ tsp vanilla essence
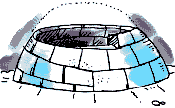
HOW TO BUILD AN IGLOO
Building an igloo isn't easy.
It takes time, and you'll need plenty of help from your friends or  family (if
you have one...who knows why you need to build an igloo in the first place!).
Plus, you'll need to know a few igloo-building tricks that will help make your
igloo strong, safe, and warm. To really do it right, you'll need
a small camp shovel and a snow saw
 for cutting your building blocks.
These saws are about 20 inches long and about 2 inches wide and can be found
in many outdoor-life stores. But if you can't get one of those, you can
just bring a regular ol' carpenter's saw and use that to cut the snow.
To start building, first find a flat
spot where you've got plenty of snow -- at least a couple of feet
deep.
Stomp out a
circle in the snow that will be your foundation for building your first layer of
blocks. This should be six to eight feet across.
Next, you need to find a source of
good snow for your blocks. You  want snow that is well-packed.
If the snow is pretty fluffy, you've got some stomping to do to prepare your
"quarry". If you have skis or snowshoes, use those to tramp down an area
near your foundation that is slightly bigger than the circle you just made.
Then stomp and compact your snow quarry even further with your boots.
Now take a little break and let the area you just stomped settle a little, so
that all your compacted snow sort of glues itself together, ensuring that you
will have a source of good, solid building blocks. Personally, this would
call for some Molson Canadian, but since you've still got to build the thing,
better lay off the booze until you're done. It might warm you up later
on, and trust me, you'll need warming up after "playing around" in the freezing
cold for 5 hours! Though a nice cup of hot chocolate would hit the spot...yum
yum!
Continuing with our igloo project, dig a little hole at the edge of your compacted area, so you can have some room to cut out your first block. Use the saw to cut out all six sides of a block. You can make the block as big as you want, as long as you can carry it to your building site. Now very carefully lift your block a little, slide it out, and go place it on your circle.
 Keep doing that until
you have your circle done. As you work on your first row, slope the top
of your blocks slightly in toward the center of your igloo. (Don't leave
a space for a door; that comes later.)
 After you finish the bottom row, cut away the top of the blocks to make
a sloping spiral. This will sort of look like a road going up and around
a mountain. It will let each block rest against the one before it as you
build your way up. You can pack the gaps with snow as you build to make
it stronger (and windproof!). Nothing is worse than sitting in the middle
of the tundra and have some of that Arctic air blasting your backside in the
middle of the night!
As we trek on, remember to keep
sloping the blocks inward as you build your spiral up. Make sure you slope
it in enough, or your igloo will get too tall and you won't be able to finish
your roof! When you get near the
 top, your last few blocks will
be almost parallel to the ground. That's ok; gravity will hold them in
place, if you've built it right. If you make them just a little bigger
than the hole, they won't fall in.
Once you've finished the walls,
tunnel under to make your entrance. If the snow isn't deep enough, you
might have to cut through your wall a little bit. You now have an igloo!
Woohoo!!