????????
??????????
KOCHYERIGIN
TsKB-11 (DI-6)
USSR
- 1935
Model Subject: Kochyerigin DI-6
History
of the aircraft modeled:
In
the mid-1930s, Soviet fighter tactics were wedded to the principle of close
co-operation between groups of fast monoplanes and groups of highly maneuverable
biplanes. In an attempt to devise an aircraft capable of engaging both classes
of fighters with equal success, a team led by ??????
????????????? ?????????
(Sergei
Aleksandrovich Kochyerigin) and ???????? ??????????
?????? (Vladimir Panfilovich Yatsenko) were assigned to the TsKB "?????????
??????????????? ?????"
(Tsentrainy Konstruktorskoye Byuro, Tsentrainy Constructors Bureau) and designed
what was then designated TsKB-11.
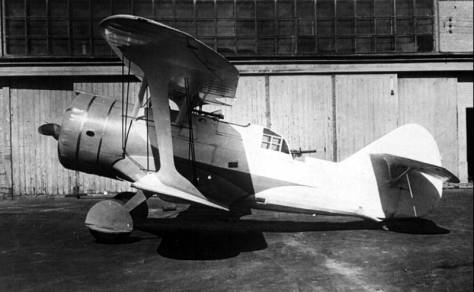
The
TsKB-11 had an inward retracting landing gear and a Wright Cyclone R-1820-F-3,
which produced 710 hp, powered the first prototype. The pilot's cockpit was
open, but a glazed canopy enclosed the rear gunner's cockpit. Armament consisted
of four-fixed forward firing 7.62-mm ShKAS machine guns and an addition ShKAS in
the rear cockpit on a maneuverable mount for the gunner.
The
wings were only 10 inches longer in span than those of the I-15 and TsKB-11 was
only 3 foot longer in length. The retractable landing gear, however, lead to a
much greater top speed for the TsKB-11, 239 mph versus 224 mph for the I-15.
There was a give away in maneuverability, as the TsKB-11 took 11 seconds to
perform a tight 180° turn, whereas the I-15 did the same in only 8 seconds.
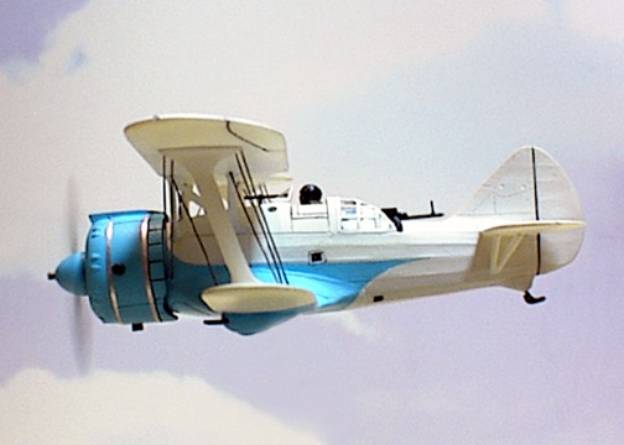
It
was envisioned that the rear gunner could engage single-seat biplane fighters in
a tight turning dogfight and when dealing with faster monoplanes from the rear.
The gunner had an excellent field of fire due to the horizontal tail surface
being mounted on the vertical tail in lieu of the fuselage.
Flight
trials commenced in early 1935. After completing State Acceptance Trials
performed between May and November 1935, the fighter was ordered into production
as the ??-6
"DI-6" (???????????
???????????-6,
Dvukhmestnyi
Istrebitel-6, two-seat fighter-6). Deliveries to the VVS commenced in late
Spring 1937. In all 222 aircraft were produced before construction was stopped
in late 1939. Only one air regiment was issued the DI-6 in the fighter role,
this regiment saw action against the Japanese during the Khalgin-Gol Conflict in
the Summer of 1939 and they were decimated by the nimble Ki-27s. After this the
DI-6 was relegated to the "Shturmovik" role and limited production
aircraft at the end were designated ??-6?
"DI-6Sh".
The
Cyrillic title "????????
??????????"
is transliterated as "SOZADANIE SHTURMOVIK" and means "THE
MAKING OF A SHTURMOVIK".
Building
the model:

Cockpit:
The
cockpit was build box stock. I did cut the incorrect control stick handle off
and replace it with a more correct loop handle. The figures came with the kit,
but I had to install the gunner for the pilot, as this figure was thinner and
the fit was better. I had to cut away an eighth of an inch from his left hand to
clear the instrument panel. His shoulders needed to be reduced by sanding quite
a bit in order for the fuselage halves to join. The pilot's seatback was molded
with an armored headrest, which may or may not have been on production or 'Shturmovik'
aircraft, but were definitely not on the TsKB-11. Therefore this was cut away
and sanded to fit correctly.
The
cockpit was paint light ghost gray, with the instrument panel painted semi-gloss
black. Instruments were done using Waldron-punched disks of white trim film
decal and Reheat Models instrument gauges in 1/72 scale. I used a couple of
Reheat Models control and data placards, but little can be seen with the pilot
in place.
The
figures were primed in medium gray and brush painted using acrylics. Light ink
washes were applies and all was finished with a coat of clear flat.
Engine
and cowling:
A-Model
did an excellent job here. The engine is a very good mold and includes a
separate exhaust collector with exhaust stubs.
I replaced the exhaust stubs with sections of styrene tubing. The engine
was painted oxidized aluminum, with the unseen gear casing painted engine gray.
The exhaust collector ring and exhaust stubs were painted burnt iron.
The
cowling is a five-part affair and will require patience to assemble and maintain
the roundness. I used thin strip of masking tape to secure the four-part main
cowling and the fifth front cowling piece in the shape desired and the fit (once
cleaned up) was really good. I applied a little Tenax to the insides of the
pieces and let this set an hour. I then removed the strips of masking tape and
applied Tenax to the exterior attachment points. Once dried, I applied some CNS
to the interior attachments to make sure this thing did crumble in the finishing
stages. It really was not as bad as it sounds, but one must used care here. The
cowling was painted light ghost gray on its interior.
The
propeller and spinner were molded as one piece. As it was, there was no way I
would be able to clean up the spinner without removing the propeller blades, so
these were carefully cut away with an X-Acto #11 blade. I added a 3-mm of
plastic rod of suitable size to the propeller blade ends where they joined the
cowling. A section of 3/32-in brass rod was inserted into the spinner and I
drilled out the location of each propeller blade to except the added styrene
rod.
Once
the CNA had set, I chucked the spinner in my Dremel Moto-Lathe. Here it was
cleaned up with 3 grades of Flex-a-grit. A section of styrene tube was cut and
the end knicked out for the Huck's starter, this was painted steel and inserted
into the spinner in the final assembly with PVA glue. Propeller blades were
painted silver with black trim film decal used for the anti-glare backsides.
They were set aside until final assembly and likewise attached with PVA glue.

Exterior:
This
was really well molded, but A-Model committed one fatal flaw, the horizontal
tail attachment locations are far too low. They should mount about a quarter of
the way up from the bottom of the vertical tail and not on the fuselage spine.
Every thing fit exceptionally well (once again, after clean up) with little or
no filling. Even the N cabane strut fit very well, but use extra care to make
sure the upper wing aligns okay before they set. Once the upper wing is attached
to the N-struts, the outer wing I-struts simply snap into place.
I
had to replace the machine gun barrels with 25-gauge hypodermic needle sections.
I used a section of an insulin hypo for the starboard I-strut pitot tube. The
TsKB-11 had two glazing portals just in front of the instrument panel on the
upper fuselage and these were not represented on the kit. I drilled out two
holes of appropriate size and these were filled with Krystal Klear in the final
assembly. The fuselage has a tail wheel molded onto the port half, but the
TsKB-11 used a fixed metal landing skid. I cut away the tail wheel and
scratch-built a landing skid from copper wire and styrene strip.
The kit's windshield and telescope sight left much to be desired. I used a section of 25-gauge hypo for the sight and scratch-build a windshield from butyrene sheet, as it bends better than styrene. The rear glazing is not the best in the world, but it fit and I used it. The flying and landing braces were done with very fine wire.
Painting:
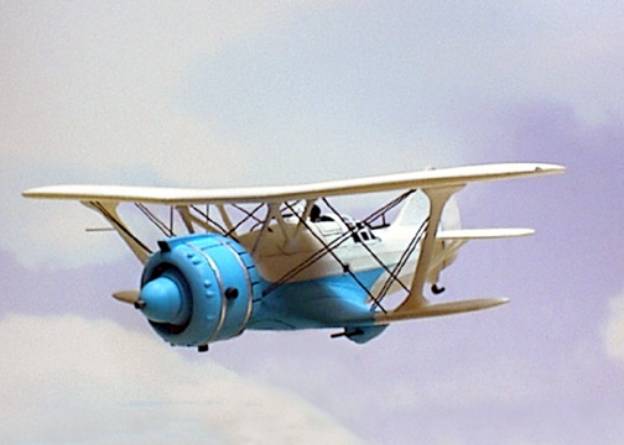
The
first production prototype was finish in white with sky blue used in its special
paint scheme. Neither soviet stars nor any stencil markings were seen until it
met State Acceptance Trials and was accepted into the VVS. Production DI-6
aircraft possessed stars on the upper and lower wings, fuselage halves, and
often vertical tail halves. Unit number marking were generally applied to the
vertical tail in a color designating the unit. Camouflage was tractor green over
underside blue.
I
used Polly Scale Reefer White as my primer and base coat. I reduced the photo of
the actual aircraft to the model's scale and cut out the demarcations to use as
a template for masking. After masking the area to remain white, the demarked
areas received two coats of Polly Scale Russian Underside Blue. The engine's
gear casing cover and the spinner were also painted underside blue at this time.
Gratitude's:
First
of all, a special thank you goes out to Boris Krotkov for sending this rare
little model to me. The DI-6 has been on my list for rare Soviet biplane models
for quite awhile. With this and the Pavla release of the I-207/3, I only need
the Nikitin-Shyevchenko IS-1 now. Thanks also go out to Boris for correcting my
obscure Russian and helping me set the records straight on the paint scheme's
other color.
Article
and photographs © Caz Dalton, September 2000