Glitter in PSP
![]()
You might have learnt to use glitter in Paintshop pro using lighten RGB, right? Well, if you didn't, you can be happy, because you can learn an easier way right away ;)I used to use the Lighten RGB to draw glitter by hand, but when I played around with custom brushes, I found a much easier way!
![]()

Step 1 - Pick a pic
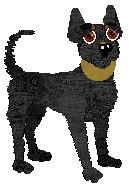
First we need a picture to use. I'll use this one, of a random anubis. Alright, since this is a pic from Petz 4, it's only 256 colours in it.
If the pic is from P5, ignore this step... If not, open the pic in PSP, choose
Colours from the top meny, then Increase Color Depth and finally 16 million
colours. There! We will now be able to add some nice effects to the pic!
Step 2 - Getting to work
Choose the paint brush tool. Okay, we're going to use a custom brush. You
can either double-click on the image that shows an example of the brush, or the
icon called "brush types" (a little pencil and an arrowhead).
There are many brushed to choose from, we want the one that is nr 16 (unless you have extra brushes added or so). It looks a bit like a star, or maybe a cross. It will probably be quite large in size, you might want to make it smaller. Also, you will probably want to make sure you've chosen white as colour, at least if you're making eye highlights ;)

Step 3 - Extras
Of course, it looks even cooler if you add some shading and highlighting
(that's not part of this tutorial however) and some extra glitter here and
there... This anubis has a golden collar, an excellent item to add some glitter
to ;)
The drop shadow is very easy to
make. Use the magic wand to select the white background, choose invert in the
selection meny, and then go to Effects > 3D Effects > Drop Shadow. I like
to use the following offsets:
Vertical: 2
Horisontal: -2
Opacity: 50
Blur: 5
And colour black :) That's what I used for the drop shadow above.
![]()