Drawing a glass, sitting on a coffee table.
In this Tutorial I will show you how to make a glass, sitting on a coffee table. Not very exciting but you will learn some very useful functions that you can apply to other projects.

Drawing a glass, sitting on a coffee table.In this Tutorial I will show you how to make a glass, sitting on a coffee table. Not very exciting but you will learn some very useful functions that you can apply to other projects. |
|
I wrote this tutorial using Rhino-3D, but the same principles can be used in other 3D programs. This tutorial requires very little knowledge in 3D drawing. All the functions used are very basic, and are great building blocks for more complex designs.
So let's get to it. Shall we?
Step 1.
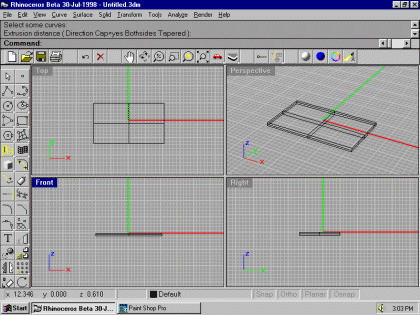
| From Rhino open a new project, and select 4 viewports. The first step is to draw the outline for our table top. From the left menu bar Select the rectangle tool. Using the top view. Click and drag your mouse. Adjust the rectangle to your liking. I went more for a coffee table look. Use the snap tool to keep the rectangle withing the grid lines. This makes lining things up easier. Note: During this exercise you may need to use the Zoom controls. They are the 4 Icons to the left of the little car Icon. For purposes of brevity I will let you decide when you need to Zoom or not. |  Click on the image
to enlarge. Click on the image
to enlarge. |
Step 2.
| Right now our rectangle is just a set of lines. We need to give our
rectangle some depth and create a solid material. To do this perform the following: From the top menu bar select Solid » Extrude » Planer Curve. From the perspective view move your mouse up and down. Note: how your wireframe rectangle thickness changes as you move your mouse. Select a thickness that is proportional to your rectangle. Once you have your thickness the way you want it click with your mouse. You should have something close to the figure on the right. Rhino provides many Undo levels, so don't worry if you make a mistake. |
 Click on the
image to enlarge. Click on the
image to enlarge. |
Step 3.
| It's time to add legs to our table. Don't fret none, this is fairly simple. Refer to the figure on the right before continuing. From the left tool bar click the box icon. Select the box Icon again. Now in the front view, click and drag your mouse intil the box resembles the leg in the figure. Your leg will need to be placed in one of the corners of the table. To do this just click on the leg intil it is highlighted. Now just left click on the leg, and drag it to a good spot, and click again. Our table needs three more legs. Just select the leg, and from the menu bar. Select Edit » Copy » Paste the new leg will be overlapping the first leg. Just click and drag over the leg and place it in another corner. Repeat this process for the remaining legs. | 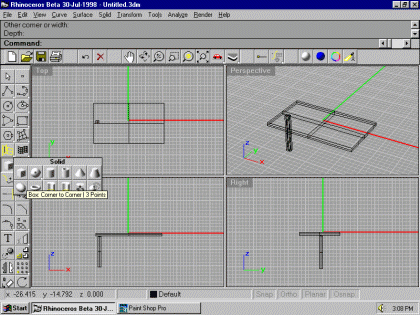 Click on the
image to enlarge. Click on the
image to enlarge. |
Step 4.
| By now your object should look like a wireframe table. Now we must add some wood like texture to our table to give it that realistic look. You will need a wood grain material in a Jpeg or Bitmap format. If you don't have one, download the image I provided. just right click on the image to download. Ok, from one of the viewports, click and drag your mouse around the entire table. All the pieces of the table should be highlighted. Now from the Edit menu. Click Object properties. A pop up window will appear. From here click on browse in the texture window. Find the wood grain file. (If your not sure of the file location use the Find function in Win95) The name of my file is wood.jpg. Once selected click ok. Nothing has really happened yet. You must render the image first. Click your mouse in the perspective view. Now click on the Blue Ball in the upper right of the menu bar. This may take a bit so be patient. A window should pop up with your table. The table should have the wood texture as shown to the right. |  Click on the
image to enlarge. Click on the
image to enlarge.
|
Step 5.
| We now need to create our glass. We need to form the outline of or glass. To do so select the Polyline tool from the toolbar. It is right under the Arrow Icon. | 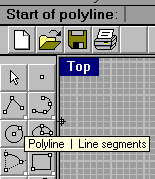 |
Step 6.
| Before drawing anything click on the Osnap button located at the bottom right of your Rhino window. Check End. This will keep your lines from being squiggly. With your mouse left click on a grid line to start your glass shape.Use your gridlines as guides. Click the next point of your glass. Four clicks should complete the outline. This may take ya a few tries to get the hang of it. Once your glass outline is done we need to do some 3D magic. We need to revolve the outline. This will give the outline a 360ş shape. From the top menu bar select the following: Select » Surface » Revolve. At the surface revolve prompt select the glass outline. From the revolve axis prompt, select the bottom middle of the glass. Drag the mouse intil the cursor is at the top middle of the glass. Press Enter. From the revolve options pop up window select Exact, start angle 0, end angle 360 and check delete curves to revolve. Press Ok. If you look in the perspective view you should now see a solid glass. Notice it is enclosed at the top. How will we ever put our favorite coctail in the glass. Follow the next few steps to find out. | 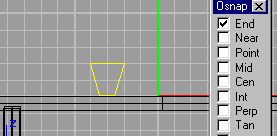 |
Step 7.
| Ok lets hollow out our glass. From the Solids tool bar ( The small Cube ) Select truncated cone. At the select base point prompt, click near the bottom of the glass. Move the cursor so the cirlce diameter is slightly smaller than the glass. Move the cursor towards the top of the glass and make the top diameter a bit smaller than the top of the glass. From the other viewports, make sure your cone is in the middle of the glass. Click and drag it into place if needed. Now it is time for a little 3D math, or Boolean operations. We need to subtract the cone from the glass. To do this perform the following: From the menu bar select Solids » Difference (Subtract). You will be prompted to select first object. Click on the revolved glass., Second select the cone. After a few moments your glass should be hollow. Go ahead and check. Perform a Quick render by clicking on the White ball next to the Blue ball on your menu bar. Remember how we added material to our table in step 4. We need to perform the same for the glass. From the Edit object properties menu. Click render color. I chose white. On the transparency bar slide it almost all the way to the right. Click the highlight box, and slide it's bar to about the middle or so. Click Ok. Try a render (Click the Blue Ball) and see if it looks right. Now we need to add some drink to our glass. Just as we used the truncated cone to hollow out the glass we do the same to add liquid. Make a cone the fits inside the glass, add some color and your done. | 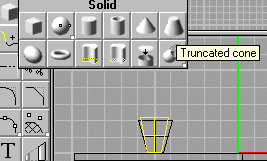
|
Step 8.
| You could be done here. But to add good shadow effects, you will want to play with the Spotlight tool. The spotlight tool is to the right of the color wheel Icon. Play around, see what you can do. |  Click on the
image to enlarge. Click on the
image to enlarge. |
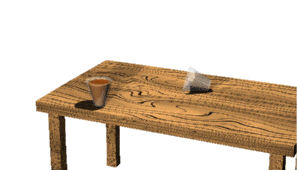
| Whew! were done. If all went well your image should look similar to mine.
If not keep playing around. This stuff takes a little practice. Hey where did that extra glass laying on the table come from? Hint: Try copy and paste. Also play with the rotate command. See if ya can do it. Have fun J. |
 |
Comments or suggestions or if you need help on this tutorial. Send email to manuss@qualcomm.com

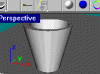 A quick render of the glass.