With photo's and instructions by Marsha Olson
(printout: 7 pages)
You may want to make a test pair of gloves first, my glove patterns tend to be a bit looser on the upper arms than they could be and fabric differs in amount of stretch.
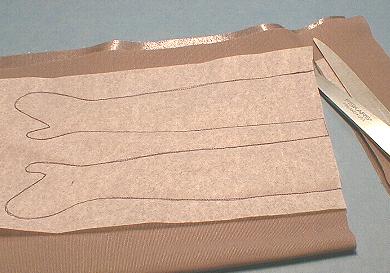
1. Start by cutting a piece of white tissue paper the size of the frame around the glove pattern. Trace the outside lines of the glove patterns on to the tissue as shown in the photo above.
These lines are your actual stitching lines.
2. Cut a piece of swimwear, lycra-spandex, or other very stretchy fabric twice the size of the tissue pattern square.
3. Fold the fabric in half RIGHT SIDES TOGETHER.
Pin the whole tissue pattern to the fabric as shown. The "Start Here" is where you start your sewing.
(Note: If you have a machine that allows you to select whether your needle stops in the 'up' or 'down' position, select 'down'. It will stop with the needle down in the fabric and allows for more precision when turning corners.)
4. Using a very short length straight stitch, stitch right along the drawn lines, lockstitching (a single back stitch and then forward again) at both sides of the top opening on each glove, removing pins as they get in the way.
5. Stitch across the gap between the two gloves and continue stitching the second glove.
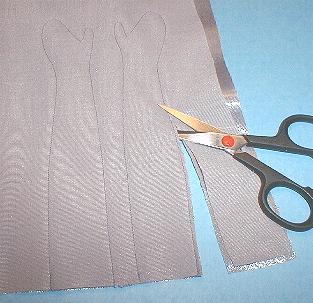
6. Trim off the fabric across the top openings of the gloves. Make sure you trim just above the lockstitching.
7. The tissue is easy to remove, just hold fimly on either side of the stitching line and pull the pattern apart. The stitching has perforated the tissue and it will fall apart on those lines.
8. Remove all the tissue.
9. Using a fine tipped scissor, start trimming away the excess fabric, leaving a narrow seam of about 1/16". If you used a small enough stitch, there should be no chance that the seam will come apart unless you cut too close to the stitching.
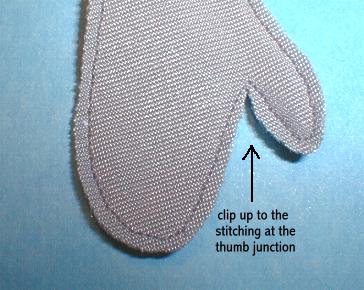
10. When you get to the thumb junction, make a small clip right up to the seam line. That clip lets the glove be turned right side out without pulling at the junction and creating an unsightly pleat of fabric on the outside.
11. Turn the open end of the glove down about 1/2" and tack by hand on both seams. Check to make sure the stitching does not show on the outside of the glove. You don't want to hem all the way around because that will eliminate the needed stretch to fit the arm.
12. Starting at the open end, roll the glove over the blunt end of a pencil to turn.
13. I used the blunt end of a size 6(G) crochet hook to turn the thumb.
Turn the thumb gently!
Too much pressure may break the threads at the thumb junction or the rounded end of the thumb!
14. Press flat with a steam iron.
Voila! Perfect gloves!
By printing out these pages and putting them in a 3 ring binder, you will have a good start on an excellent personal sewing book. Write notes in the borders that will help you the next time.
These pages can also be saved as complete webpages (including photo's).
Instructions For Making a Desktop Folder and Saving Lesson Pages!
Have fun!
Marsha Olson