1. Spray starch your voile fabric. |

|
4. Right sides together, sew the camisole front to the back at the side seams following the stitch guides on the pattern. |

|

|
5. Spread the seam open and trim only the back seam allowance down to 1/8" or less. |
6. Press the front seam allowance edge in so the raw edge meets the side seam stitching. |

|
7. Fold the seam again towards the back to make a faux 'French' seam and topstitch the folded edge. |
 |
 |
8. Pin the pleats into place and staystitch in the seam allowance. Press the pleats in place or leave them soft whichever you prefer. |
9. Finish the back opening edges by double folding the raw edge. Finish with a straight stitch or by hand. |
 |

|
10. Make a double row of gathering stitches along the top edge of each back section. |

 12. Match the center of the camisole to the center of the band. |
 13. Right sides together, pin the band to the camisole gathering the top edge of the back pieces as needed. |
 14. Stitch the band to the camisole. |
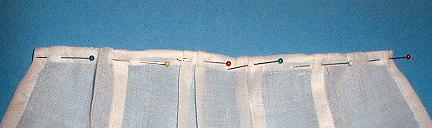 15. Fold the band to the inside and pin in place with the pins on the right side. That will keep them out of the way white you are doing your hand stitching. |
(see inside view below)

16. Using the hand sewing technique learned in lesson 1, finish the inside of the band.
Or...machine stitch the band as shown below.

17. Finish the top edge by sewing narrow picot edge lace to the top edge of the camisole.

18. Finish the hem edge using one of these methods:
a. Make a narrow rolled hem and finish by hand
b. Make a narrow serger rolled hem as a base to zigzag a lace edging.
c. Make a narrow rolled hem and machine stitch.
(this is a serged hem so I can add a narrow edging of lace)

19. Double fold the shoulder straps and machine or hand finish the folded edges together.
20. Using your doll as a guide, pin the straps in place so they fit the doll. Trim off the excess strap on the inside.

Fold the raw edge of the strap under and use a few stitches on each side to hold it in place.

21. Finish the back opening with snaps, or as I have done with thread loops and buttons. I also folded my back edges in one more time to make it a better fit for this doll so there wasn't so much overlap.


Option: Zigzag narrow lace edging to the hem.

Option: Weave silk ribbon through the picot edges of the lace.
Tip: The beads I used as 'buttons' are called Fringe Beads. They are shaped like a shank button but are less than 1/8". I get them from Fire Mountain Gems
The item is # WE1911GB. They come in many more colors than they show online so if you order, ask them to also send you a catalog.
or saved as complete webpages (including photo's).
Instructions For Making a Desktop Folder
and Saving Lesson Pages!
You are visitor number
| HOME | CLASSES | CLASS 39 INDEX | LESSON 1 |
| LESSON 2 | LESSON 3 | LESSON 4 | LESSON 5 |
| LESSON 6 | LESSON 7 | LESSON 8 | LESSON 9 |
| LESSON 10 | LESSON 11 | LESSON 12 | LESSON 13 |