Perfect Patterns Style 39
Heirloom Sewing by Machine
~ Lesson 8 ~
Pintucking
With photos and instructions by
Marsha Olson
(printout is 3 pages)

Extend the pattern piece as directed on the pattern and cut one (1).
Each size will have a different extension amount.


The pintuck piece, once finished, is intended to be cut into small squares that will be sewn together with narrow straight edge lace and inserted into the body of the skirt. A small piece can also be used for the pintucked collar on the blouse.

Spray starching your fabric is always a very important step in any heirloom construction project.
It is especially important when doing pintucking of this type and helps your fabric maintain a firm body to work with. Also important is keeping the top and bottom clips aligned on the grain of the fabric in order that your stitched lines remain straight and aligned correctly with the next line of stitching.

This is an optional piece and is not a necessary pattern piece if you opt to use flower embroidered or whitework squares in your skirt inset panel.

1. Spray starch your cotton batiste.
Trim the selvage edge if needed.

2. Cut out your pieces:
Cut 1 of Pintuck Piece (16)

Determine the right side of the fabric by gently pulling a corner of the cut piece. The pulled corner will automatically 'curl' towards the wrong side. Mark the right side of the fabric with a pin. You will be sewing your pintucks on the 'right' side in order to take advantage of that natural curl.
Finding The Straight Grain Of The Fabric:


3. If you have an even weave fabric, you should be able to pull a thread to gain your starting point for clipping as shown on the pattern piece.
An alternate method (shown in the photo above) is to pull threads out along the short edge until you have corrected any slanted cutting of the fabric. Use this 'straightened' edge as your guide for clipping.
Trim the end of the paper pattern so that the edge is on the mark.

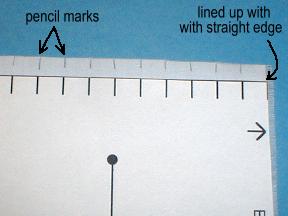
4. Use the pulled thread or the frayed out edge as your starting mark and with a pencil, mark a dot for each ruled mark along the entire edge of the fabric, moving the pattern and matching up the marks as needed.
5. Fold the fabric strip in half along the length so the two long edges meet, making sure you match up the pulled thread edge. The strip will not remail folded after clipping so do not press the fold. At each pencil mark, clip into the fabric through both raw edges so you will have matching clip marks on each edge to be your guides for each pintuck.
6. Unfold the fabric, and starting at on end, refold on the clip at the top edge matching it to the same clip on the bottom edge. Straight stitch very close to the folded edge. Repeat until you have pintucked the entire piece.

You will end up with more than you need, but may have to pick and choose sections for the pieces you will need for your inset. It is harder than you think to get each line of stitching exactly the same distance from the folded edge, so some areas will be uneven after pressing.
7. Press all the pintucks flat in the same direction, pulling the rows apart evenly as you press. Spray starch again and press from the back side of the work.
Your pintuck piece is done.

End Lesson 8


This page can be printed out
or saved as complete webpages (including photo's).
Instructions For Making a Desktop Folder
and Saving Lesson Pages!


You are visitor number


HOME CLASSES CLASS 39 INDEX LESSON 1
LESSON 2 LESSON 3 LESSON 4 LESSON 5
LESSON 6 LESSON 7 LESSON 8 LESSON 9
LESSON 10 LESSON 11 LESSON 12 LESSON 13