Making a Animated UT Cross Hair.
UnrealTournament Cross Hair's are 64*64 pixals and are saved as a 256 colour Zsoft PaintBrush (.pcx). The background colour (black) is treated as Transperient and the actual visible bit is in shades of gray(Gray Scale). Other colours can be used but for this tutorial i will stick to gray scale icons.
This tutorial will explane how to make and use one using the
following programs.
Paint: my choice for per pixal colouring.
Paint Shop Pro/ Animation Shop: for converting to .pcx and. giff
(so u can preview the animation outside of UT/UED).
UED: Unreal editor used for making the texture package UT needs.
Notepad: Any text based editor will do for modifying .INI files.
Finialy, UT: so u can play and watch your cross hair in all its
glory.
Well will be making this crosshair,I wont do all the frames
because there are 9 in total, what i will do is introduce to you
how to make it.-->
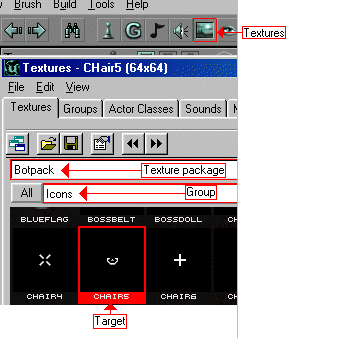
 To do this i started by
loading up UED and going to
Textures>Botpack>Icons, and
exporting CHair5(see pic 1)
When prompted for a location to save put somthing sutible
(I use C:\UT As my location for mods
in progress)
Now load MS Paint and Animation Shop, In paint load up CHair5
(from where ever you stored it), one loaded it should look like
this.

Double click the dark gray colour to get the pallet options up,
goto custome colours a enter the following

Click Add to Custom Colours, the click OK, draw a line 1 pixal up from the crosshair right across the page(Painting area, this line will be barly visibly).
To make the frames(and the .GIF animation), in Animation goto EDIT>SELECT NONE, go back into paint and start drawing. First draw 1 small arrow like below( this fill be frame 0 in the animation), when finished goto EDIT>SELECT ALL, then EDIT>COPY, go back to animation shop and goto EDIT>PASTE>AS NEW ANIMATION, hopefully if it went right the new image should be in thr first place on that animation.

Here is all the frames of the animation drawn(the white spots in the corners are just to show the seperate frames).

One each frame is drawn, copy from paint but in Animation shop add them AS NEW FRAME then save as .GIF.
Now the gif is done we now see what is runs like. To get into UT create a folder Called CHair1(This can be made anyware, its just to hold the seperate frames for the next stage), click on one of the frames in the animation and goto FILE>SAVE FRAME AS, then save as Zsoft Paintbrush (*.pcx)
 Make sure the two boxes marked in RED are unchecked And give it a name like CHair_a0(i found this method of naming is
handy becase it has the name of the hair,th purpose of the
image(the a i use to mean ANIMATION)
and the frame number(the 0).
Continue to do this cincreasing the last number by 1 for each pic, when all frames are save it should look like this image.Notice the names the number after the space is what happens if the boxes are not checked, these can be renamed but it saves time making sure the boxes are not checked. Once saved close animation shop.
Load Paint Shop Pro and load all the frames now if not already done u nead to reduuce the colours to 256, to do this, pick one of the frames and goto COLOURS>REDUCE COLOUR DEPTH>8 BIT COLOUR ( 256 COLOUR), then goto SAVE.
Continue to do the same with the other frames once done close Paintshop pro.
IMPORT TIME.
Load up UED and bring up the texture browser
Goto FILE>IMPORT

Select all the frames then goto OPEN, on the next pannel make sure MASKED is checked and GENERATE MIPMAPS is unchecked, then click on OK TO ALL.
Once the frames are imported goto FILE>SAVE and give it a name like CHair1.