Patchwork Square Tutorial
Tutorial Requirements:
PSP 6 or 7 that can download from Jasc.
Pattern fills for the "fabric".
You can download the samples I've created from Cathy's Burlap Tutorial or create your own from her very easy to follow tutorial.
There are 3 sections to creating this background:
- creating the template
- making the patchwork square
- creating the background
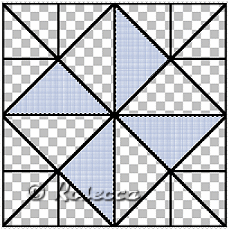
You can view how the patchwork square looks when completed.
This tutorial assumes that you have some familiarity with the tools and menus in PSP 6 or 7.
~ Remember to save often ~
Creating the template:
- Open a new document 200 x 200 -> transparent
- Set gridline spacing at 50 both vertical and horizontal
- On layer 1 - draw your square. Use black for the colour of your line.
Version 6:
Version 7:
- shapes - (rectangle) line width 2
- co-ordinates
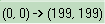 (the 199 instead of 200 will keep your line from being cut off on the right side)
- To make the rest of the template draw with the drawing tool using your gridlines as an aid. Set your line width to 2. Zoom 2:1 to make it easier to draw your lines and line up the intersecting points. Try to get the co-ordinates as accurate as possible but don't sweat it being off by 1, it will not distort the template too much.
- First part of the template divides the square into smaller squares and triangles drawing the following lines:
 		  0,0 -> 200,200   top left to bottom right
		0,199 -> 200,0     bottom left to top right
		100,0 -> 100,200   top to bottom in middle
		0,100 -> 200,100   across the middle
- Second part of template draws a diamond in the square to make more triangles:
  		  0,100 -> 100,0    1st diagonal quarter line
  		  100,0 -> 200,100  2nd diagonal quarter line
 		  0,100 -> 100,200  3rd diagonal quarter line
		100,200 -> 200,100  4th diagonal quarter line
- Third part of template divides the triangles outside of the diamond shape into smaller triangles:
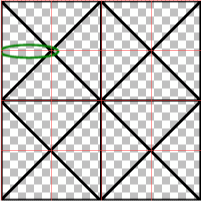 |
   0,50 -> 50,50
   50,0 -> 50,50
  150,0 -> 150,150
 150,50 -> 200,50

  0,150 -> 50,150
 50,150 -> 50,200
150,150 -> 150,200
150,150 -> 200,150
|
After you have completed drawing your smaller lines, you may want to turn off your gridlines to see how it looks at this point. This is your template for your patchwork square. ~After all this work I saved a copy (named template) so that I could use it again if I wanted to.~
Making the Patchwork Square:
Now that the template is completed the second stage is to add the "fabric" to the triangles.
- You may use the fabric samples provided or your own. If using fabric that you've created from Cathy's burlap tutorial, duplicate the original square (Shift + D) 4 times, so that you will have 5 squares. Colorize 4 of the squares with colours that will co-ordinate with your original.
- Add a new layer to your image. On layer 1, Use the magic wand to select all the areas you want to fill. (By holding down the shift key when using the magic wand, you can add to the areas you select at one time.) -> Activate layer 2 -> Flood fill with your pattern -> Deselect
*(If you wish you can select the areas you want to fill -> Selections/Modify/Expand by 1, for a tighter fit of the triangles.)
- Repeat this procedure "selecting on layer 1 and filling on layer 2" until all your triangles have a pattern fill applied to them.
- This next step will give you your "quilting stitches":
The methods are slightly different depending on whether you are using PSP 6 or PSP 7.
Version 6:
- Duplicate layer 1. The duplicate layer will be your stitches layer.
- On the duplicate layer, using your magic wand -> select the lines
- Using your eraser, swipe the eraser across the line at fairly even intervals to make it look dotted. (This doesn't have to be perfect, we are just making stitches)
- Then do a colour replace from black to light grey. -> Deselect
Version 7:
- Add a new layer. This will be your stitches layer.
- Select the lines in layer 1 -> Activate layer 3
- Switch your colour to light grey
- Using the line tool with a dotted line selected from the line styles -> follow the marquee outline and draw in the lines.
- By checking your overview window it is easy to see if you've drawn in all the lines -> Deselect
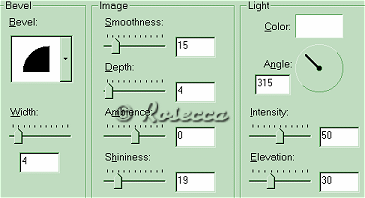
- To give the stitches dimension we will apply the Inner Bevel to the stitches layer with the following settings:
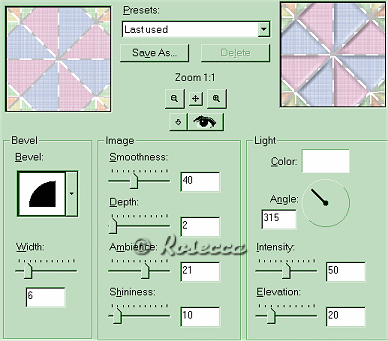
- To give the patches dimension we will activate layer 2 -> Select all -> Float -> Invert -> Apply Outer Bevel with the following settings:
- Now you can either delete layer 1 (the lines layer) or just hide it -- we don't need it to continue making the patchwork background. At this point you will notice white areas under your stitches, we will be copying the square to a new background and they will "disappear". note:(If you are just making the square and not putting it on a background: Add a new layer -> Flood fill with one of your patterns -> Move this layer to the bottom.)
Creating the Stationery or WebPage Background:
- Create a new image 1024 x 200; transparent -> Flood fill this image with one of the patterns used to make the patchwork square
- Activate your square image -> Merge layers 2 & 3 (your stitches layer and your filled triangles layer) -> Copy -> Activate new image -> Paste as new layer
- Move square image to the left (zoom in if needed to line up with left and bottom) -> Merge visible
- We are now going to cut away the top "stitches" so that it will tile correctly:
- Double-click on selection tool with settings
- Left = 0 Right = 1024
Top = 0 Bottom = 2
- (The bottom number may need to be adjusted to fine tune the selection.) ->
Cut -> Deselect
- An easy way to have your background image with no gap at the top, is to simply Copy -> Paste As a New Image. Either minimize or delete the old image, as now we will be working on the new image.
- On the New Image -> Add Layer -> With the selection tool -> Rectangle selection -> Create selection to the right of the patchwork square -> Flood fill with the pattern used for background
- Apply Inner Bevel using previous Inner Bevel settings, adjust according to the width of your selection.
- A super quick way to get rid of the bevelling at the top and bottom of the rectangular bar. Click on deformation tool -> Extend the bottom and top of the beveled edge trim beyond the border of background -> Apply
- (To fine tune the tiling of your background, test fill the pattern in an image 800x 600 -- you will be able to check the vertical tiling.) Export as JPG. Can be used for stationery or web pages.
Congratulations you've created your very own patchwork background!

Thank you Donna for this award.

© 2001 Rosecca
All rights reserved
If you have problems or questions with this tutorial, you can e-mail me
Last update: Friday, October 19, 2001