|
2) Assembling your Ghillie Suit
A) Lay your BDUs on the ground
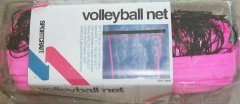
and place the netting over them.
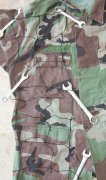
B) Cut the netting so it will wrap around the arms.
Make only the shown cuts.
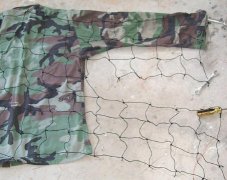
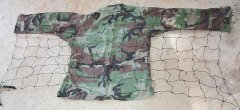
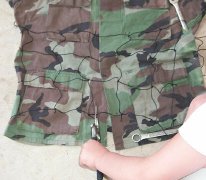
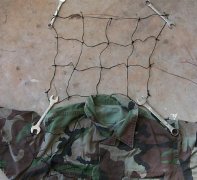
C) Wrap the netting around to the front of the BDUs
and cut to leave a 2x3" square piece, which will be used next.
D)
Place the left over 2x3" square on the front of the BDUs as in the photo. Now do the same for the pants. Take care not to
sew the netting over where you will be wearing your belt. I started just below the belt loops. To cut down on weight you can
start sewing the netting on the pants just below the front pockets. Make your jacket first to see were your jute hangs down
to position the netting for your pants. Or do what I did and attach just below the belt line.
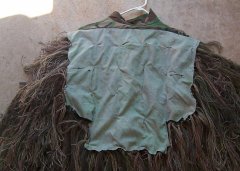
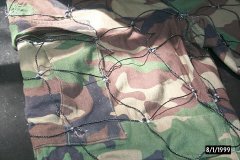
E) Cut a piece for the back face flap either 4x3"
squares, or my favorite 5x5". You must also cut a piece of fabric to attach to this. I used another BDU jacket, since It was
the same color. I cut it so I could get 3 hoods out of it from the back. Each arm was cut and un-folded for a hood. Make sure
to keep the camo side showing rather than my photo of the other side, as I goofed. You want the jute attached to non-camo
inside so when you are not wearing the hood, it is still camouflage. camo.
Now you have several hours of work. You must
sew the netting to the BDUs using waxed dental floss, non-scented. Sew on every knot, making sure when you get to a pocket,
to decide if you want to use the pocket or not. If you would like to use the pocket, make the proper cuts in the netting to
allow it to be used.
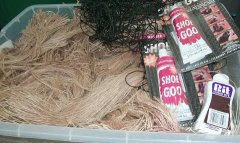
When all knots have been sewn and the netting is secure, use the Shoe Goo to put
a dab on every sewn knot. This ensures the knot will not come apart and your suit will last a long time. I'm sure you noticed
upon completion that along the arms it is a little open. That is for bow hunters. The opening allows for more room to pull
back your bow while not interfering with the suit.
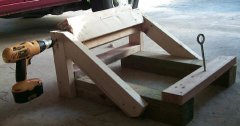
F) Now cut your Burlap, or Jute twine into 18"-24"
lengths. I will discuss the Jute twine, since I have tried the Burlap approach and felt it was too time consuming. I jury-rigged
a contraption so I could attach my cordless drill to it and spin the twine off the spool. Then I would cut the twine in the
middle, giving me the lengths I needed.
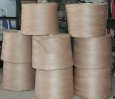
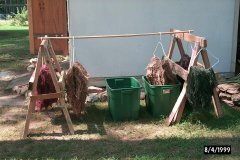
G) Next you need to dye your Jute twine to match
the surroundings you will be wearing your suit in. I made 3 different suits, Mossy Oak, Desert Camo, and Woodland. I placed
the cut Jute on plastic hangers and dipped it into containers purchased at Evil-Mart. Then I allowed them to dry. You will
need to dye more of your base color than any other color.
Woodland camo - Base color - Dark green
Mossy
Oak - Base color - Gray
Desert Camo - Base color - Natural-Light Brown
H) Now you need to attach the Jute twine. Start
by attaching a little of the base (about 5-15 strands) to every side of the square netting. You attach it by wrapping the
Jute around a netting square and tying a knot in the middle. Make sure you tie a knot in the middle or you will get a bunched
up look. This is why I like Jute twine to be 18"-24" in length as it offers better coverage, with a non-bunched up look.
When
the base is completely covered, start by adding the other colors. Black after the base color followed by dark brown, lighter
brown, greens, and finally lighter greens. Look at a camo shirt to get the idea. That's why I like the Mossy tree bark, it
has a great look that adapts to anything. (When in the field, you can always add tree branches, other leaves, etc., to the
netting to add to the look.) Make sure when attaching the Jute to periodically lift the suit and give it a good shaking to
fluff up the material. Try and get the suit to lay flat, to see what it looks like. Make sure you have enough but not excessive
coverage. It can get heavy if you attach too much.
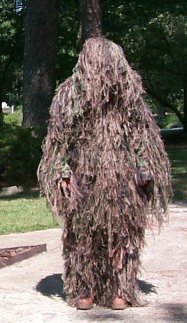
3) Finished product
4) Where to purchase Jute twine
- Do you like what you see, but don't want to make a Ghillie Suit yourself?
-
Do you not have the workshop to make a Ghillie Suit?
- Do you need a kit or the materials to make a Ghillie Suit?
Visit
Ghillie Suits.com. They will be able to help you with whatever you are looking for. Tell them the Paintball Gods sent you.
Pre-cut,
pre-dyed Jute is available as well. 1 suit requires 10-12lbs of Jute.
5) Total cost + total hours
| BDUs @ $5.00 each = $10.00 |
Dental Floss = $4.95 |
Netting = $14.95 |
Sewing Needle = $1.95 |
| Shoe Goo = $4.95 |
Containers 3@$4.95 = $14.85 |
Fabric Dye "Rit" 3-Grey@ $1.98,
3-Black@ $1.98. 3-Brown@ $1.98, 3-Dark Green@ $1.98, 3-Light Brown@ $1.98 = $29.70 |
Jute Twine 8 rolls @ $73.13 = $585.00
which gets you 3 suits = $24.38 per suit. |
Grand total for material per suit $105.73Total hours to complete one suit-
Cutting netting = 5 minutes
Sew the netting = 5-6 hours per half ( jacket
& pants) = 10-12 hours
Shoe Goo = 5 minutes
Dying fabric = 2 hours
Attaching Jute twine per half = 1-2 hours
Total
time to do one complete ghillie suit = approx. 20 hours.
Ghillie Suit Modifications by James NanneryOk this is how we make the suit in the Marine Corps. Use the same pattern as before except
turn the jacket inside out if you want to use the pockets this WILL put them on the inside. Next, you'll need to get some
heavy canvas - this gets sewn down the two front quarters of the blouse ( left and right front halves) and along the front
of the legs. Double up around the knees and elbows this will make them last longer and provide some cushion for low crawling
for hours on end. At some point wax the canvas - this will help keep you reasonably dry on wet grass or in the mud. As a sniper
spends most of his time either hunched over and moving silently or crawling on his belly there is really no need to attach
anything to the front of the suit. In addition, anything you place on the chest or front legs of the suit creates "drag" and
you'll have to work that much harder to move and this will increase the chance of making noise or leaving behind.
Now
that you have your netting sewn on to the BDU's you have to ask yourself what type of terrain do I operate in most often.
If it's grass lands you'll need to go heavy, scrubrush a moderate amount and in deep woods I'd personally go pretty light
which still means that the BDU's are covered entirely in netting and garnish, layering up for the different areas you operate
in. Use a combination of jute and pieces of tow sack dyed to the colors of your area of operations.
Now, here's the
fun part of the whole deal - all that netting that you've sewn to the blouse and trousers can be used to shove local plant
life into. If you play with tree huggers you might want them to look away while you or a buddy does this for you. This really
does help. Disguised like this you should look like anywhere else in the playing area. Remember if it looks exotic it is!
The idea here is to blend in not stand out. Jute rope and tow sacks are pretty easy to get: jute can be gotten from just about
any crafts store most people use it for making potted plant hangings, and tow sacks from any hard ware store they cost from
a few cents to a couple of bucks apiece. Just a few tips. Good luck and happy hunting.
|