PGA 2000 Ryder Cup
Here is the archive that contains all pertinent information to recreate the Ryder Cup for PGA 2000. The archive is 570 kbs in size.
Enjoy
R.S.
Point Protection
1) Once I choose my base texture for the plot, I draw a secondary layer just inside the border of the main plot, change to my final base texture and drop it. This protects the base plot from all the points being added to it, and gives me a buffer zone in case the CA decides to act up.

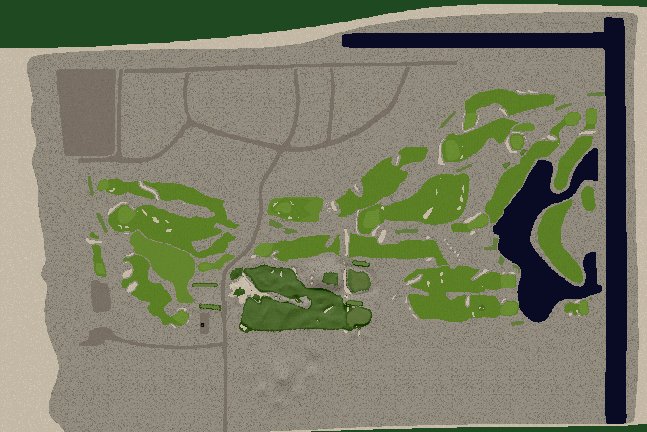
In the case of The Lido Club, I was able to use the plot itself as the buffer. As you can see below, I simply changed the main plot to sand - to give Lido it's place on Long Island, and then added my interior buffer texture and built the course on it.
A) I then add all my shapes, from green site to fairway to bunker to tee for the entire plot. I do zero elevational work until I have the entire course proper laid out - or roughed in.
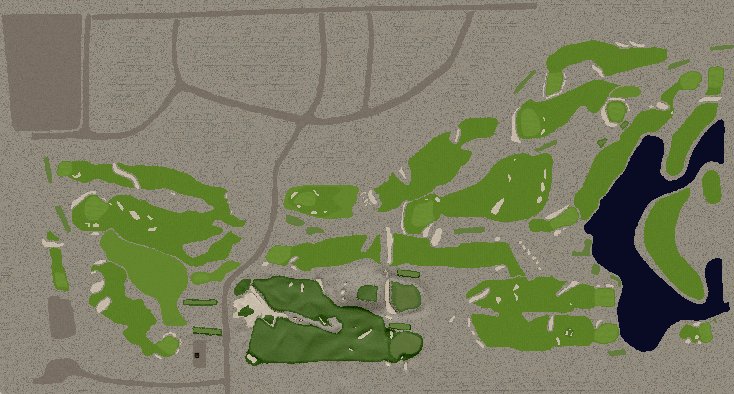
B) Then, as I start to work on each hole - choosing the best hole to start as the basis for all my elevational work - (because sometimes you can't start at hole 1 and ensure accuracy) I lay down a nested area round that hole and the cartpath to the next and previous hole (if needed) and drop it. This is an early screenshot of Lido after I had begun work on Holes 1 & 10

C) That nested shape will not be removed, because it helps to keep all the points in that area, and protects the outermost texture plot from becoming over burdened with points - hence why I added the secondary main plot texture.
NOTE: Ensure you do use nesting shapes on your course, IF for no other reason than when you start work on Bunkers. 1 single bunker when dropped, can have 5000 or more points contained within its outermost wall texture, and all the raising and lowering that is common to create realistic bunkers can indeed cause all sorts of point buildup problems on the main texture of your plot.
In addition, the simple use of a nested shape - as seen above, can help you isolate errors.
D) I do all my elevational work for that region, and IF I get that funky problem where too many points have been manipulated - you know, where suddenly the entire hole disappears and it looks like you used a dry-eraser on it ?
IF I didn't use a nested shapes, and this happened on the main plot, you would have to try and pick up each shape independently, which IF this has ever happened to you, you'll soon realize just how much time it takes to fix this problem. So IF this happens on a plot with nested holes, I simply pick up that nested region and all shapes inside of it, optimize on the 1st click from the left, and then redrop. Then optimize that area again on level 1, and the secondary base texture. Bang, back to normal.
E) From there, I do concentrated work on each shape in that nested area, ensuring accuracy and leave the bunkers to last.
I then use the same procedure for each hole as I progress throughout the plot, and doing so has helped keep the courses I've released stable with no compile flaws.
F) Once the plot is entirely done, I then go through and start changing to my finished texture set, and compile.
G) Then the last thing is to add all objects, playtesting each hole as I go along - looking for areas that need improvement or subtle changes.
Overall, Portmarnock has over 1 million grass objects alone and point totals were 985,000.
NGLA has 350,000 objects, and 945,000 points.
Harmony Ridge has my record - based on a real plot of land in South Carolina's foothill mountains - 1.4 million points and 600,000 objects.
However, The Lido Club will surely break the object record, and come close to 1.2 million points
For fictional/fantasy - I still lay down that buffer for the main plot and then do all elevational work first - then " find " the course in the layout and add my nested areas as I go along.
********
Finally, you'll find my Real Course layout method below, which I've found works fantastic. Yes, there are newer programs out there like Ghost-It, that makes part of the current program window transparent so you can look through it and trace a shape, BUT I prefer this method, since I have one less program running in the background when I'm designing - which leads to a more stable environment.
I have the following programs open and running when laying out a real course:
PGA 2000 CA
Paint Shop Pro 7 - when referring to a topography map, or aerial image as I lay the design out.
GPS Topography Suite - for isolating heigth and measuring relevant distances to specific course landmarks
Real Course Layout Procedure:
1) This method will allow you to accurately recreate the layout of any course, given the proper information, with the least amount of mess and with very accurate results.
Credit for this method goes to Frank Roorda, whom turned me on to this design method prior to my recreating NGLA. He had used it to lay out 4 real courses for PGA 2000 at that time, among them were Harbor Town and Doral - The Blue Monster.
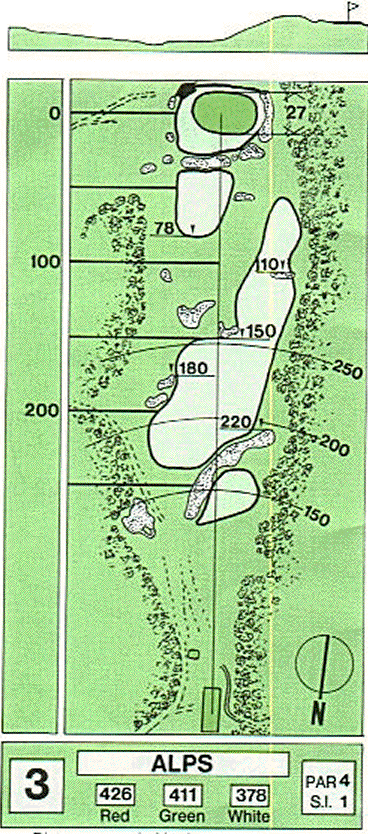
For this example, I'll be using the 3rd hole "Alps" at NGLA to show you how to use this to quickly layout a real course. As you can see with the "Alps", its in color, and shows everything you need, from length of hole, to placement of bunkers to the depth of the green site itself.
2) Once you have located the overheads for the course, you will first make photo static copies of each hole onto card stock. Nothing fancy here, but it will depend on the detail that is in them, and in most instances simple black on white paper will work just fine. If your unsure, scan the image into your computer, open it in your Paint Program (I use Paint Shop Pro 7) and reduce the colors to 2 color - black and white and see how it looks. If all details of bunkers, green, fairways and even marking lines are intact, you can safely reduce the image.
I've removed all of the trees/bushes and anything that is not part of the course proper for this step ( in PSP7) and then reduced it to black and white prior to printing.
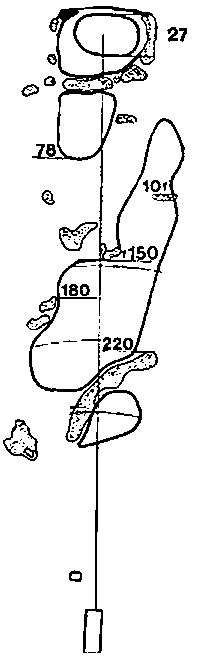
3) In this step, you will literally cut out the entire hole, leaving a thin thread of paper attached from the tee all the way to the green site. All bunkers should have a small strip to keep them attached so they will sit in the proper place for the next step.
In my example, since I can't show you the finished cutout, I've colored the areas you would remove RED. You will note the white strip that keeps everything together. In all of my real course layouts, I go ahead and do this step for all 18 holes making a folder for each as I go along, to keep each hole intact. In the end, it saves a ton of time.

4) So, open up your Course Architect file, and start a new land plot.
NOTE: Throughout this entire process of laying out the course I never ever use any custom library textures. I literally cloak all of them to prevent accidentally including a custom library that I don't want. I use all of the Princeville textures for this entire step as they show up well, and are easy to change out when the time comes for custom work.
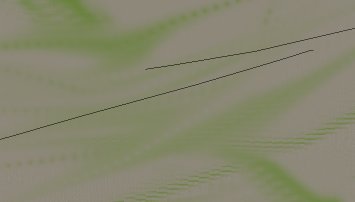
5) I first decide which direction the course will run, and draw a narrow straight line shape to represent the general tee and green site direction, in our example, North is approximately straight up.
Then measure the distance to match the length of the hole. In this instance, our hole is 426 yards. Adjust as needed to match our parameters.
Once you have the length correct - it can be adjusted later as your doing the detail work- drop the 2 shapes.
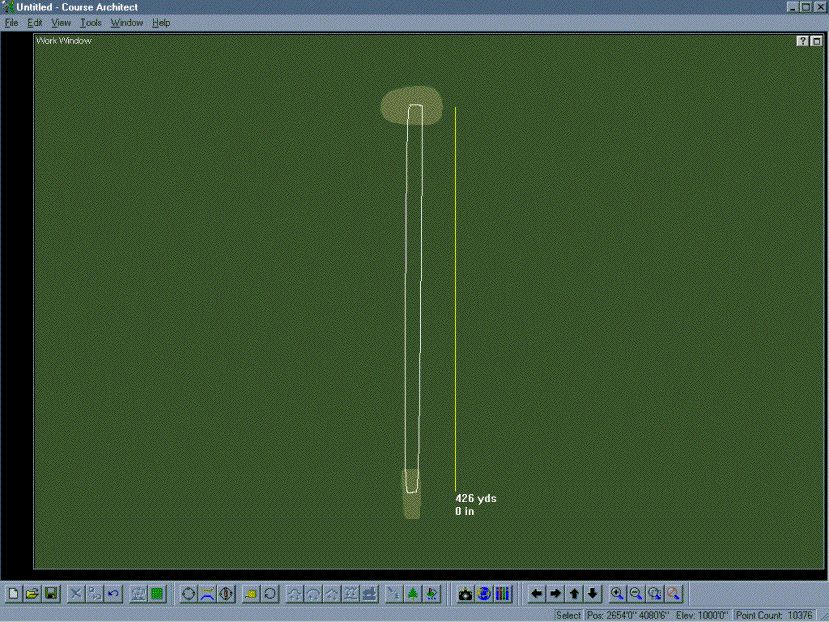
NOTE: In some instances, you may not be able to start with the first hole. The reason might be due to lack of prominent features in the layout, or a lack of reference points. If this is the case with your course, simply choose the best hole that can serve as the starting point, and build backwards/fore wards from there.
6) Now comes the tricky part, but really this is the entire layout process.
A) Lets continue with the example. I next take the cutout for "Alps", and will literally lay it on the monitor, clicking the +/- zoom button within the CA until it fits the 426 yard distance as is should.
Note: The PGA CA does not zoom in and out at the same distance, so you'll have to play with it a bit to get it to size properly.
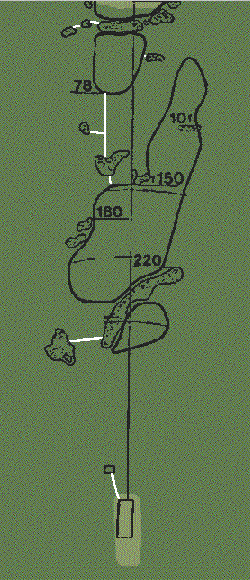
NOTE: The white strips that keep the small shapes attached
7) Frank used Chap stick to literally stick the cutout to his monitor, and then used a Kleenex to wipe it off when done. I prefer to use small loops of scotch tap on the back, as it allows me to see clearly around the outer line.
8) Once sized properly, tape the cutout to the monitor screen, ensuring that the thin pieces of paper allow the bunkers, and other objects to set where they are supposed to.
9) Using your shape tool, simply draw around each shape, till you have them all done. On my old 266 system, I was able to do 2 holes at a time before I noticed slow down, but with the new system, I'm able to lay out 8 holes at once. You'll have to see what your system can handle and judge from there.
After the entire hole is laid out, you can drop the shapes and save the plot.
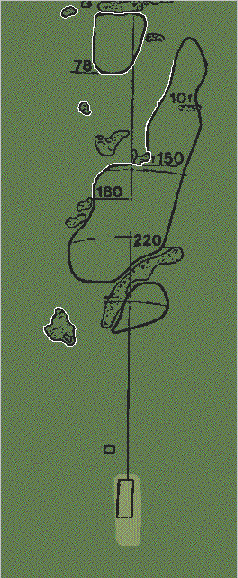
NOTE: Continue tracing around each shape till done
Now to double check your work. In our example, its 78 yards from the rear of the fairway (which sits on top of a hill) to the green. Measure and see how close you are. In most situations, IF you have the plot sized properly to fit the cutout, everything lines up as expected. If not, adjust as needed. In all of my real course designs, using this method, I've never had to move a shape more than 2 or 3 yards.
10) Continue with this method till all 18 holes are done.
11) From there, you can then use your aerial map to fine tune each shape.
12) In the case of not having overheads for a course, you can still gleam data from the aerial photograph, as long as you know 3 or 4 measurements. Watch the tournament, write down specific distances - and go from there. Ken McHale's real course procedure works well when you do not have overheads, so please refer to the tutorials section at the Copyright Club.
Finally, you can then use photographs and references to create the lay of the land, along with Topography maps to help aid in getting precise heights for each area of the course. From there, its easy to shape your holes as needed. That's it!
Hopefully this will help you to lay out the course of your dreams easier and with less headaches.
Cheers,
R.S. Barker