

<
How to build your RoadArt Masterpiece
Take the VW (left), tip it on it's side and cut this (right) from it. Trim cone (like the barrel pic below) Be sure to save the torsion bar, tranny and engine, if it's good.
Trim, wire brush (or sandblast ) to remove old rust and scum from it and prime it
and you should end up with...
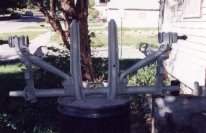
this!
Fabricating the Twin Beam Components


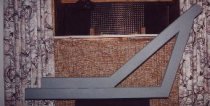
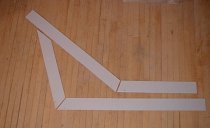
I suggest making a cardboard frame first. It is not only considerably cheaper, but you can use it as a pattern when it is completed, and simply trace it to your steel beams after you are satisfied with it. Use 2" strips for the upper Twin-beam, and 3" strips for your lower Twin-beam components. The actual length of the frame components WHEN COMPLETED are: 'A' 39", 'B' 23", 'C' 21", and 'D' 32 1/2".
Begin by cutting a strip of cardboard 3" X 63" for the Lower-beam components. Then cut a piece of cardboard 2" X 54" long for the upper beam components.
The actual cut on the 3" beam is 315 degrees from TDC (top dead center). The actual cut on the 2" beam is 290 degrees. However, there is an easier way for most of you to make a pattern.
To make frame components 'A' & 'B', measure 39 1/4" from the edge of the lower beam. Next run a perfectly square vertical line from top to bottom of the 3" strip. Next measure back from the top of that line 2 1/4", and draw another vertical line top to bottom. Now connect the two lines with a diagonal line, starting from the top of the rear line and finishing at the bottom of the first line. That should put you in the ball park
To make frame components 'C' and 'D' , follow the procedure above, only make the first line 21" from the edge of the 2" strip, and measure back 11/16" for the second line. Connect them diagonally and you should have your upper beam angle. The finished beam components should measure: A=39X3", B=23X3", C=21X2", and D=32 1/2" or close to that. A little bit off doesn't matter much. I've yet to make two perfectly identical frames.
Next, tape the upper beam components together, and also tape the lower beam components together. Now you should have two angled beams. Place the bottom of the top beam 'C' on the top of the lower beam 'A'. Place the upper front portion of the upper beam 'D', over the upper portion of the lower beam 'B'. Slide the beams foreward or backwards until the "Air Triangle", formed by the beams measures exactly 15" at the bottom. Before you go any further, measure the 3 sides of the inside 'Air Triangle' formed by the upper and lower beams. The front leg should be 16 1/2" 'B', the bottom should be 15" 'A' and the rear leg should be 25 1/4" 'D' If your measurements are exactly the same, your trike frame will be identical to the frame in this project. If it is off a little, no problem, if it off too much, make the necessary corrections. Now trace the lower leading edge of section 'D' on to section 'B'. Now your frame should look like the one in the above picture. When you trace this pattern on the steel beams, you may wish to leave yourself about 1/8 to 1/4" extra length for squaring your cuts. Sometimes that stupid saw doesn't cut exactly where it is supposed to. (I made my first two trike frames with a cutting torch, a hacksaw and a bench grinder. I had a lot of trimming to do!)
![]() :
: ![]() :
: ![]()