Link to PanAmSat Sun outage Calculator in the Sun outage section!
Home
Satellite Tips
![]()
Link to PanAmSat Sun outage Calculator in the Sun outage
section!
Did you know?
![]() Two-way satellite internet is
here. It's still rather pricy from what I gather so far. Internet gamers may
find it disappointing. There appear to be some problems concerning lag-time and
lousy ping times due to the double satellite hop coupled with processing delays on both
ends. But for web surfing, video, downloads and such, it is supposed to be the
fastest medium short of a direct fiber hookup. There are a couple of services
available in Europe. DirecTV does have a system on offer, see details below.
Two-way satellite internet is
here. It's still rather pricy from what I gather so far. Internet gamers may
find it disappointing. There appear to be some problems concerning lag-time and
lousy ping times due to the double satellite hop coupled with processing delays on both
ends. But for web surfing, video, downloads and such, it is supposed to be the
fastest medium short of a direct fiber hookup. There are a couple of services
available in Europe. DirecTV does have a system on offer, see details below.
I'll post details on this when I can find time to research it a bit more.
DirecTV does have a
system for broadband internet via two-way satellite connection: It is called
DirecWay - for more info go to: |
![]() TVRO
Satellite Dish Installation (other than DSS)
TVRO
Satellite Dish Installation (other than DSS)
Before you install that large satellite dish there are several things you need to do and several things you need to know.
Location is critical. The satellite dish should have an unobstructed line of sight, (LOS - I refer you to the story further down this page about a friend of mine), to the satellites you wish to view. If you live in a mountainous region, or in an area with many large buildings or trees it may not be possible to view the entire satellite arc. If you do not have prior experience with satellite reception systems it's a good idea to consult a professional in your area before you decide to go ahead with the installation. I highly recommend that you hire someone who knows what their doing to perform the installation for you if you have no prior experience in this field. However, if you are the do-it-yourself type and don't want to engage the services of a professional, here are few tips to help you through the process.
If you live in
the central United States the center of the domestic satellite arc will be more or less
due south of your location.
If you live in the east the center will be to your west. If you live in the west the
center of the arc will be to your east. People in the east may not be able to see
the western end of the arc and conversely residents in the west may not be able to view
the most easterly birds. You may be able to see them all from any North American
location, but this requires quite a bit of open skyline. Even if you have a totally
unobstructed view from horizon to horizon your reception from certain satellites may be
rather spotty. This has to do with what is referred to as satellite footprint
patterns. These "footprints" are discussed elsewhere in this guide.
After you have chosen the optimum location for your satellite dish the fun can begin. There are several ways you can use to prepare your site to recieve the satellite dish installation. This preparation can vary from simply sinking your pipe into the ground, installing a concrete pad, or a weighted metal base plate to hold your dish. The soil conditions in your chosen area should be a guide to your choice. Remember that your mast should be able to handle high wind conditions, so deeper is better if you decide to sink it into the ground. I recommend a depth of from three to six feet depending on the weight of your dish. One thing is critical no matter which system you choose. The pipe or beam you mount the satellite dish on should be plumbed so that it is straight up and down. This mast should also be tall enough that your dish clears the ground when it is at it's lowest elevation at the ends of your arc. This will insure proper travel of the dish as it traverses the arc.
Ok, the mast is in place and your dish is attached to the top.
You should have an unwarped satellite dish,
and a straight ground pole, it will make things easier. If the following adjustments are
done in the correct order, you can get a dish that tracks perfectly.
Start by checking the mounting of the feed horn. If your feedhorn is supported by a
single central pole you need to proceed to the next paragraph. If your feed horn is
supported by a tripod arrangement the legs on the tripod should be of the same length. You
should measure them to be sure you have the proper focal length.
Next, you have to check the distance from
three different points equi-distant on the edge of the dish, to the center of the feed
horn. Remember, even if the tripod legs have the same length, or your center pole is set
it does not mean the feed is necessarily centered in relation to the dish. You might have
to "bend" the feed back into center of dish, or adjust the tripod legs to get
the feed centered in the dish. It is critical to your signal strength that the
feedhorn is properly oriented.
Settting the off-set angle on your polar mount (declination) is critical. This is the
adjustment that tilts the dish *forwards* at an angle of about 4-6 degrees, depending on
the latitude of the place you live. You can find the exact angle for your location in
charts, but if you set it for about 5 degrees, you'll be close enough to get going. This
adjustment is usually done on one of the mounts connected directly to the dish.
You then move the dish to the highest point on your polar mount. You do this by using the
actuator. Perform this adjustment while visually looking at the dish and the polar mount.
You are basically centering the dish on the highest point on the polar mount. Now, you
have to set the elevation angle of the dish. You should use a signal strength meter to do
this, but you may also do it your with your reciever if it contains a signal strength
indicator. If your reciever doesn't have an indicator you may also use a small tv
set to watch for the clearest signal. The elevation angle is usually between 30 and
40 degrees, depending on your latitude. This is not very critical at this point because
you will adjust this angle for optimum reception later. If you measure the angle of the
dish on the mount, you might have to add it to the declination angle to get the true dish
pointing angle.
You need to find a satellite that is located as close to due south of your location as is
possible. In most cases, there is a satellite close to the longitude your location is on.
A few degrees off will not make much difference because the dish moves very little in
elevation near the center of arc. Try a Ku band satellite because the accuracy is much
higher. However, you might look for a C band satellite when you start. It will be easier
to find than a Ku band satellite. With the dish stabilized at the highest point of the
arc, you must turn the polar mount on the ground pole till you find the satellite. If your
elevation was way off, you might not even get a signal. Adjust the elevation and turn the
mount again until you find the satellite located directly to the south of you.
To fine tune the elevation angle first turn the mount from side to side until you achieve
the maximum signal strength, then you can adjust the elevation angle until it also
achieves maximum signal strength. At this point, you have set the off-set angle and the
elevation angle for the satellite at the highest point in the arc.
Now, you have to get the dish to track the arc to both the east and west. This is where
most people fail. DO NOT adjust any elevation angles on the mount at this point! Move the
dish using the actuator to a satellite to either the east or west. You should see the
signal from the next available satellite, if not, pick a satellite closer to the center of
the arc. Peak the dish on the satellite using the actuator. You may now need to adjust the
elevation angle of the dish. Do so by pushing up or pulling down on the lower edge.
You don't have to use much force, just a bit to see if the signal gets better or worse
when you push or pull on the dish. What you are actually doing changing the elevation
angle a bit. If your dish is oriented on a satellite to the east or west of center then
and you have to push up on the dish to get a better signal then your elevation angle is to
low. If you have to pull down on the dish to get a stronger signal your evelation
angle is to high. After you have achieved the optimum signal strength for a satellite to
the east or west, repeat the procedure for a satellite on the other side of the arc
center. Repeat this procedure for several satellites to either side of the center of
the arc until you have the best elevation angle for your location. If you peaked the dish
for center, and then for one side, the other side should be very close, but always check
both sides. A lot of factors enter into this equation. Your ground pole MUST be
perpendicular to the arc and stable. The quality of your LNB and your feed horn may
also effect your signal strength.
If your dish is not hitting center on the other side, try the same adjustment as above. If
the dish needs to be pushed up to get a better signal, then TURN the WHOLE mount in that
direction. If the dish needs to be pulled down for a better signal, then turn the mount
the opposite direction (towards the higher point on arc).
Then, go back and check the other side. Hopefully you won't be to far off by this time.
You might have to go from side to side before your dish tracks perfectly.
If you are having trouble with signals on both sides of the arc then your evelation is
still off.. You can then dosmall adjustments of the elevation angle to get the two sides
into peak. BUT, only do this if you can confirm that both sides are to low or to high. If
the dish is to high or low on the sides, but fine in the center, the declination angle is
off. Increase or decrease the declination and the elevation angle the same amount. They
will cancel each other in the center of arc, but track lower on the sides.
You should now have a perfectly peaked dish. If you used Ku band satellites for the
peaking, it will be as good as it can get. If you used C band satellites, you might want
to do the same thing using Ku band satellites.
Now you may sit back and enjoy the fruits of your labor. Or the fruits of your money and someone else's labor if you followed my original suggestion and hired a professional to install your system.
![]() LOS
- otherwise known as line of sight.
LOS
- otherwise known as line of sight.
A friend of mine built a new house several years ago in a neighborhood with large fenced yards and lots of space. He is a satellite junkie and immediately installed his c-band and ku-band dishes in his back yard and built his dream entertainment room. Big screen TV, concert quality audio, wet bar, refrigerator, microwave, the works in other words. State of the art comfort personified is an apt description. He is the ultimate sports fan.
He has now relocated the dishes to the other side of his yard and is paying close attention to where his neighbors are planting trees.
Before you commit to a satellite dish installation make sure that your LOS is clear and will continue to remain so. New construction or organic growth may severely restrict your access to the satellites. Plan ahead and be aware of potential problems such as your own or your neighbors trees and that three story apartment building going up across the street.
If you live in an area that experiences severe cold spells of the type that kills shrubbery and if you have a lot of deciduous trees around that lose foliage every year, don't pick a location for your dish during the winter months. You may regret it next spring when the trees refoliate. You should also anticipate projected growth patterns that may obscure your line-of-sight in the future.
If you are experiencing frequent intermittent signal drops during high wind situations check your LOS for limbs or shrubbery that may be blowing into your sight path to the satellite.
YOU DO NEED TO SECURE YOUR NEIGHBORS PERMISSION BEFORE TRIMMING HIS TREES OR SHRUBS.
![]() Satellite
Footprints
Satellite
Footprints
Footprint is the term used to describe a satellites optimum area of reception coverage. This area will vary from satellite to satellite. Many satellites have multiple coverage areas. These depend on the orientation of the individual transmit arrays for a given satellite. Below is an example of the PanAmSat 3 satellite Ku-band coverage for the North American continent.
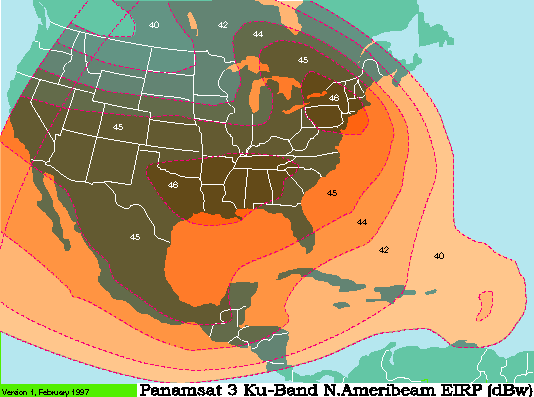
EIRP - stands for Effective Isotropic
Radiated Power
It is measured in decibel watts. The higher the number rating for a particular area,
the better reception you may expect. The example above shows that people in the
south central and northeastern United States will recieve the strongest signal from
PanAmSat 3. The lower the number is, the weaker the available signal strength.
This does not mean that people in Colombia, SA may not recieve the signal. It means
that they may experience problems or loss of signal during nasty weather or during periods
of heavy solar activity. People in Guatemala for example may experience signal
problems as they are on the fringe of the footprint.
Most satellites have multiple footprints. Each footprint is the signature of a particular transmit array on the satellite. Some satellites also have arrays that are referred to as spot beams. These arrays transmit the signals to specific geographic areas. Many of these spot beams are steerable and may be used to give coverage to different areas at different times.
![]() Sun
Outages (not sunspot activity - that's a horse of a different color)
Sun
Outages (not sunspot activity - that's a horse of a different color)
This
link will take you to the PanAmSat sun-outage calculator. Once you know the outage
information on the PanAmSat birds, it is possible to calculate outages on adjacent
satellites from your location. |
Twice each year most people with satellite dishes experience sun outages. Locations in extreme northern or southern latitudes will not experience these outages. These outages occur during the spring and fall every year. The exact timing of the event will vary from latitude to latitude. The outages are caused by the sun as it lines up directly behind the satellite in relation to your satellite dish. On the North American continent the outages will start out in the north and move slowly south as the position of the the sun changes in the sky. The outages will also travel from west to east as each day progresses. The west coast will experience the outages first and they will travel eastward as the day progresses. The time of day for a sun outage will vary depending on the satellite you are viewing. The easterly satellites will exhibit the outages in the morning and the western satellites in the afternoon. Hence the motion of the problem from west to east. Imagine that the sun causes a shadow of the satellite on the earth's surface. When that "shadow" centers on your satellite dish for any given satellite, you experience the outages.
The outages will start out with some light interference. This will grow steadily worse everyday for about a week. During the first day of the outages you will probably notice nothing more than a brief period of time during which the video signal becomes a little splarkly and the audio will experience a little crackling. This will grow worse everyday at the same time for the same satellites from your location. At the peak outage times you will experience total signal loss for as little as three or as much as seven minutes depending on many variables. These variable are effected by many several things such as the sensitivity of your LNB/LNA, the size of your satellite dish and the recieve characteristics of your satellite reciever. For another week the outages will begin tapering off as your latitude passes out of the interference band. During these periods if you go outside and look at your satellite dish you will see that the shadow of your feed horn assembly is traversing the center of your dish. During the peak outage period the shadow of the assembly will line up in the center of your dish.
There are several places to obtain charts of the times sun outages will occur in your area. As soon as I'm able to I'll post links to some of the websites that contain this information. There is absolutely nothing you can do to avoid this phenomenon. The sun acts like a huge radio beacon and overpowers the weaker signal from the satellite.
![]() Those
DSS Dishes - a few truths
Those
DSS Dishes - a few truths
There are a few things you should know before you rush out and buy one of those cute little digital satellite dishes and it's receiver, not to mention all the expenses for programming that go with them.
Contrary to what the salesman may tell you, (and I've listened to a lot of BS stories), nasty weather does have an effect on your reception. He/She is, after all is said and done, in business to make you the sale. Dallas, TX is great for DSS. Buffalo, NY is fine during most of the year, but winter is going to be a real problem for DSS owners there. Heavy rain, snow and high winds can play havoc with your reception. Even extremely heavy fog or the appearance of a massive storm cloud between your dish and the satellite can cause reception problems. A loss of signal that manifests itself as signal dropout, digital tiling or frame freezing is usually caused by the attenuation or blockage of the signal by water droplets, snow flakes, or dust suspended in the atmosphere. High winds shaking the dish may also cause reception problems.
Although the small sized dishes are usually rather stable, unusually strong winds may still mar your viewing enjoyment. High wind problems may be decreased by choosing a sheltered spot for the installation where the wind cannot get to it. If this is not possible you can also build a shelter around the dish. If the dish is mounted on the ground and covered with one of those fake rocks you may have to chase off large dogs who decide that your rock makes an excellent latrine. The only requirement is that the dish should have an unobstructed line of sight (LOS) to the satellite.
Rule number one is that larger is better when it comes to satellite reception. You need to acquire the biggest receive dish your chosen system offers. This is especially true in areas where heavy rain, snow or dust storms are frequent. The larger the surface area of the receive dish the more signal gain you get.
If you continue to have problems, contact a local satellite service and inquire about higher gain LNB's and set up a bi-annual service program.
![]() A little
maintenance!
A little
maintenance!
Your steerable satellite dish, just like anything else, requires some maintenance. Not very much mind you, but just a little bit could save you some expense and trouble down the road. Most 18" and 23" DSS dishes are fairly maintenance free, although some of the tips still apply.
First - Turn off the receiver. This will remove power from the motor and the LNA/LNB.
Then you can start by inspecting any metal parts for rust. Treat bolts to a couple of shots of protectant. A little bit of Vaseline or grease around the bolt entry holes keeps moisture from seeping into the threads.
Tighten up any loose fittings or bolts.
Visually inspect all the electrical connections. Check that they are tight and clean. You don't need to take them apart unless you are experiencing problems or if they look corroded. I found a nifty little product for protecting this type of connection. It's called liquid tape, referred to as either plastic or electrical. You brush it on and let it dry. This seals the connection well and can be found through most electrical supply outlets.
Look over your cables and check them for loose connectors and signs of aging, such as cracks in the insulation or worn spots. Treat your cables with a good brand of automobile interior protectant or wipe them down with a silicon spray.
Check all the waterproof seals for damage or cracking. It doesn't hurt to spray them with the interior protectant either.
Check the alignment of the dish support. If it is not perfectly vertical this will cause your dish to drift off of the satellite arc during movement.
If you know what you're doing you should boresight(center the feedhorn) and align your dish at least once a year. If you need help contact the company you bought the dish from or another local satellite service. It's a good idea to have your satellite dish aligned by someone with a signal strength meter. Ideally you should peak the dish on satellites in several arc positions and mark the optimum readings. This will allow you to then align the arc traverse arm so that you have the best possible positioning. It's always a good policy to check the signal peak of your dish after periods of violent weather.
Then, kick back and enjoy the viewing!
![]() Terrestrial
Interference
Terrestrial
Interference
If you have a C-band receive system and are having problems with a specific range of frequencies at certain compass headings, you may have a terrestrial interference problem. Those local towers you see everywhere carry lots of information using the same frequency range that you use for reception. Long distance services using local networks are the worst cases. If you live near a military installation or major airport you may also experience periods of interference from their radar and communications equipment.
Some aircraft altimeter radar use these frequencies. If you live directly under a heavily used air traffic route you may also experience problems. This is especially true when receiving digital C-band transmissions. This problem usually manifests itself near major airport flightpaths.
The flight path for the airport may also cause the aircraft to physically intersect your reception path while at low altitude. The interruptions from this problem are usually brief and there is no remedy except praying for a change in wind direction so that the flight paths change.
There are several possible remedies available to help you solve these problems. These include a whole range of tunable notch filters, rejection filters, and screening filters. You may also find that moving your dish to a location that is shielded from the interference source is a viable option. If none of these options are feasible or appeal to you, there is also the possibility that a shielding fence or ring will solve the problem.
If you have access to a spectrum analyzer you can usually see the interference as it occurs. Your satellite installation personnel should be able to perform this frequency inspection if they have an analyzer, but only during an actual case of interference. This may prove difficult as most interference cases are intermittent.
A good indication of terrestrial interference is a problem that repeats in the same frequency range and at the same time of day consistently. The problem may be a long distance service if it occurs between the hours 7:00 PM - 10:00 PM or on weekend afternoons and evenings. These are the peak long distance hours for any given time zone.
|
You are visitor #
© James Bryant, 1998