|
A Temporary Turtle Pen
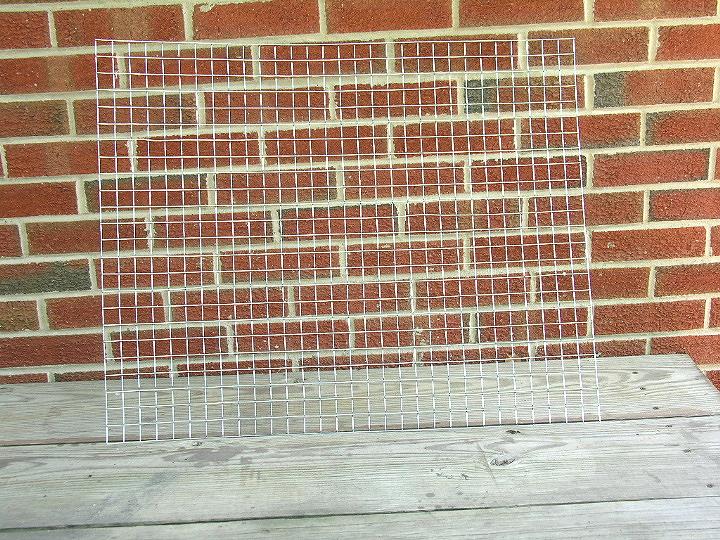
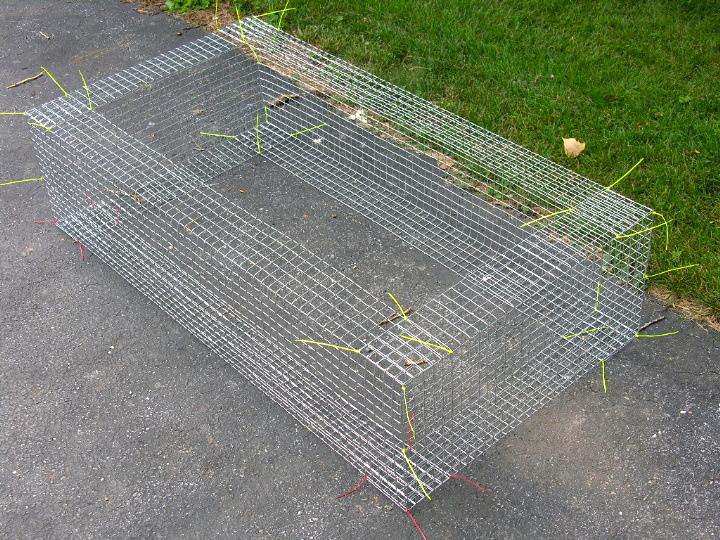
We like to put all our turtles outside for the summer in permanent turtle pens. We recognize that not all pet turtles enjoy such accommodations. Many turtles are apartment or townhouse dwellers. Other turtles are new additions to families who need time to prepare accommodations for them. And some female aquarium dwellers need a place to lay eggs. In this tour we will show how we constructed a simple and inexpensive day use or temporary use turtle pen for some townhouse dwellers who have a small yard available for them to use. The important design features for this pen are that it could be prefabricated, disassembled for transporting in a small automobile, easily reassembled, and insure no escapes. It also includes only a partial bottom so that the box turtles who will use it can dig in real soil. It was very inexpensive to build. This pen was constructed using one 15' roll of 24" wide galvanized welded cage wire with 1" by 1" square openings and one pack of plastic ties. This wire is sold for making animal cages. The wire was cut into four pieces to make a pen 30" by 57". Therefore, two pieces were cut to 30" long and two pieces to 57" long. A few inches were lost to trimming. After the wire was cut to size, all cut edges were filed smooth to eliminate sharp edges. Because of the way these pieces come together, sharp edges would be more of a hazard to people than to turtles. | pic 1 | Two bends were made in each piece five inches from each long side to make a 5" wide top and 5" wide bottom leaving the vertical sides 14" high. There is no magic in choosing 5" for the top and bottom. The bends were made so that the wires being bent rape around the crossing wire. To make the bends we clamped the wire to a work bench with a 2" by 4" board secured with clamps. The bend line was the edge of the work bench so the crossing wire was placed just on the edge of the work bench. A second 2" by 4" board was used to push down on the wire to make the bend. To make the second bend on each piece of wire we simply deflected the wire as we clamped it down for the second bend as shown in pic 6. To assemble the pieces, the ends were brought together to form the corners. The tops and bottoms simply overlap in the corners which adds to the rigidity of the finished assembly. Plastic ties make for fast assembly. The pieces can also be joined with wire, polyester yarn, or nylon string. The plastic ties were not cut off so that they would be more visible in the pictures. Brightly colored ties were also used for added visibility. After the pictures were taken, the plastic ties were removed to disassemble the pen for transporting. Anyone having limited storage space could do the same for winter storage. When assembled in a yard, plastic tent stakes will be used to secure the inner corners to the ground to prevent the turtles from going under the wire. Soil or mulch can be used to cover the bottom wire or grass may be allowed to grow up through it. Cage wire also comes in 30" widths which would allow for making higher sides and wider tops and bottoms. Cage wire is also available with 1" by 2" openings and 1/2" by 1" openings. Higher sides will be better if the bottom will be buried in soil. Our design is simple. A turtle sitting on the wire bottom can not dig under the sides. Turtles can easily climb the vertical sides, but they can not negotiate the horizontal overhanging top. The open bottom allows them to dig holes to sit in or to lay eggs. If security is an issue, the top can be closed by simply laying another piece of wire over the top of the pen and securing it along one side with loose plastic ties. This basic design can be made much larger if room permits or smaller if necessary. If you wish to build a very long pen, the sides can be made out of more than one piece of wire to make bending more manageable. Side pieces could be overlapped a few inches for rigidity just like the corners. For long narrow pens, a narrow strip of wire about 6" wide can be used to span the top of the pen to help support the sides in mid length. When assembled this wire pen is very sturdy. There are no partitions to blow over or get knocked down. This style construction can also be placed on top of a hard surface if soil is not available. Being small it is important to make sure turtles have some shade available at all times. If turtles will remain in it overnight, a hide box or pile of leaves should be provided for the turtles to take cover in. This pen is about as simple and inexpensive as it gets while insuring containment of the turtles. We call it a temporary use or day use pen because we are not concerned with providing water and shelter or cover for cool nights. However, the construction technique may be adapted for making larger more permanent pens. Here are a few pictures of this pen in use. We hope we have given you some ideas and that you enjoyed our twenty-third behind-the-scenes tour.
|
