
Sorry, but the page or the file that you're looking for is not here.
Sponsors

Magic 21 -
Free card game. For each "21" you make, you could win up to $4,999 in cash!
Go try your hand »
|
||||||||
 |
||||||||
|
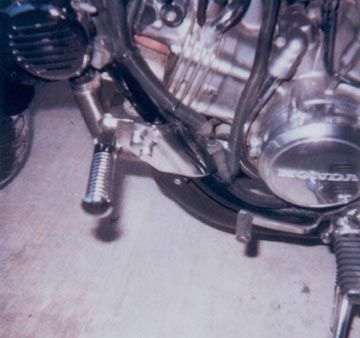
Step One , Get the gosh dang pegs: The pegs are made by a company called "MC Enterprises". I believe they are out of Central California and are a well known maker of quality motorcycle accessories. I don't know their address or phone number but your local dealer should have a catalog. I got mine from Chaparral Cycle Supply in Southern California for $72.00. The part number is 3252. You can choose from several different peg styles, holey, o-ring or rubber insert type pegs. I went with the o-ring style pegs but removed all the o-rings for a more chromed out look. Step Two, Start Cutting: Once you get your pegs, take out the right bracket and put a mark about an � inch outward from the inside of the back plate on the bracket. There, you need to cut a vertical slot, approximately one inch long, and just under � inch wide going upward from the bottom of the bracket. This slot is needed to accommodate the engine mounting point that is on the frame of the bike. (See picture # 3) You can cut the slot any way you want, but I used a drill bit to make several holes then cut from hole to hole using a dremel tool with a heavy duty cut off disc. Once I had the slot cut, I then used the same dremel tool with a grinding bit to smooth out the insides of the cut and make it as straight as possible. Oh yeah, once I started cutting, I would hold the bracket up to the bike to ensure I was cutting in the right place. Once you get the slot cut and you think it will fit, you are ready to go onto step three. Step Three, install the right bracket: Ok, we have the right bracket with a vertical slot cut in the bottom of it now. Lets start to put it on. First remove the upper and lower engine bolts but BE CAREFUL! I was told not to remove more than one engine bolt at a time however, I was able to take out two on the same side without any problems. You almost have to remove both bolts on the same side to attach the bracket anyway. The lower engine bolt is located just forward of the crankcase cover and came out real easily. The upper mounting bolt is located on the frame itself and goes through the frame into the motor. Both bolts were not really all that tight and came out using a standard socket at ratchet. Once you have the bolts removed, place the bracket into place. Although there are already two holes in the bracket, you are going to have to drill another hole to accommodate the upper engine bolt. What I did was put the bracket in place, finger tightened the lower engine bolt then took a felt tip marker and made a mark on the backside of the bracket near the upper engine bolt hole. This showed me where to drill. I then drilled a hole big enough to fit the stock upper engine mounting bolt then bolted the whole bracket to the bike using original mounting bolts. I was a bit concerned that the width of the bracket may take away from the amount that the engine bolt goes into the motor, but the bracket itself is only a quarter of an inch wide and it doesn't seem to be a problem. If you are concerned about that, you could always go get some longer bolts to make up that quarter inch, but I used the stock ones. Once the bracket is on, attach the peg to the bracket using the hardware that came with your pegs. Ok, the hard part is over, you should be done with the right side, so lets move on. Step Four, attach the left side bracket: The left bracket attaches in the same fashion as the right one, but this time you don't have to make any cuts, just drill one hole. First remove both engine bolts on the left side (Make sure you already have the right ones in and tightened!!) The left side mounts in the same place but this time, you use on of the bolts that came with the pegs. The hardest part on this side, is that you have to get the lower part of the bracket in behind all the vacuum hoses that are near the lower engine mounting bolt. I placed the bracket in front of these hoses and just kind of worked it in there being careful not to pinch or cut any of those hoses. Once you get it in there, hold the bracket up where it is going to be mounted and take the felt tip marker again and mark the spot for the upper mounting bolt hole. Then, remove the bracket and drill the upper bolt hole just like before. Once that is done, take one of the chrome spacers that came with the pegs and use a hack saw to cut it in half. You are going to need to put this spacer between the engine mounting point and the peg bracket. Now install the bracket by again working the lower portion back in behind the hoses. Then take out one of the long engine mounting bolts that came with the pegs, put it through the bracket then through the chrome spacer you cut in half, then through the engine mount point (black) then into the motor. Again the line up for the lower mounting bolt is.......through the left bracket - chrome spacer- engine mount point - motor . Tighten that puppy down then insert the stock upper engine mounting bolt into the hole you drilled and tighten. You should now have the left bracket attached to the bike. Just like before, attach the pegs to the bracket using the hardware and the instructions provided. Ok, last step......and this is optional. Step Five, cover those ugly holes that came in the bracket: What I did was take a few short nuts and bolts, insert them into the pre drilled holes that I did not use and tighten them down. Then I got some chrome bolt cover show caps and installed them over the head of the bolt. (See pictures) This cleaned it up a bit and got rid of the empty holes. Like I said, this step is optional. Ok, that's it, you're done... |
||||||||
404 - Page Not FoundSorry, but the page or the file that you're looking for is not here.Sponsors
Magic 21 - 
|
||||||||
404 - Page Not FoundSorry, but the page or the file that you're looking for is not here.Sponsors
Magic 21 -
|
||||||||
404 - Page Not FoundSorry, but the page or the file that you're looking for is not here.Sponsors
Magic 21 -
|
||||||||
|
|
||||||||
|
||||||||
|
