Rocket
R&D 3.9 Standard Arm
This Rocket from J.R. and Gary
at Rocket R&D was a fun rocket to build. Currently it
is awaiting some decals to finish. We hope to fly this rocket
this year at the April event at Colorado Tripoli's Hartsel. Overall,
the kit was easy to build, had great directions, and is built
like a tank. The fins go into precut openings in the main body
tube, to special blocks of wood that glue to the engine mount.
When the epoxy hardens, the bond is so strong, even an accidental
drop of the rocket on the floor didnt do any damage to the fins.
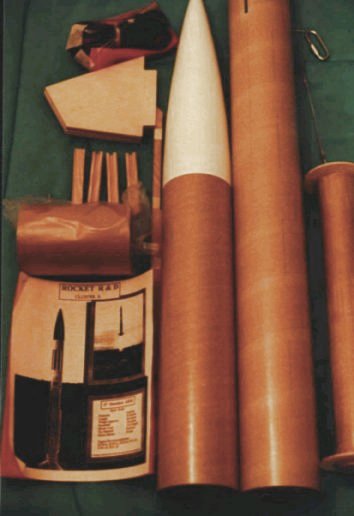
This is how the kit comes. The
instructions are top notch, and very easy to follow. The
parachute that comes with it is very durable and will work just
fine. My only concern is that due to the electronics
bay (kit wasnt designed for a bay), the rocket will be to heavy
for the current parachute, so an upgrade is in the future. The
parachute mount consists of a braided cable, a large bungee cord
and two metal couplers. The parachute mount is mounted to
the top centering ring of the engine mount via predrilled holes
for the braided cable. All the fin slots were precut. I
was suprised on the quality of the workmanship of this rocket.
I would recommend this rocket to anyone, the quality of
Rocket R&D kits far surpasses any other that I have assembled.

Here you can see the tail surface while
the last fin is setting. I just used a piece of packing
tape to hold the fins straight on my home made rocket stand.

The hardest part of this kit was the mounting
of the strakes. The wood used in these are quite long, and
very thin. They came warped slightly in the kit, and thus
made for a difficult mounting. I had to construct the jig
you see here that attached to the main fins, to keep the strakes
straight. The results were okay, there is a little bend
here and there, but overall it worked great. If you
build this kit, I would assume you would need something like this.
One thing about this rocket I didnt realize until I got
to the fin fillet step, is how much fillets you have to make.
The strakes and fins combine for alot of epoxy needed. A
couple trips to the hobby store for more epoxy and everything
was done.
UPCOMING!!
Completed 3.9 Standard Arm and Launch
pictures. Currently the rocket is painted and is awaiting
decals. I have tried the make my own decals using decal
paper and a laser color printer (Kinkos) without much luck. I
am going to purchase an Alps printer with the dry ink and see
if that is okay. If anyone has any ideas or suggestions
please email me at B&M
Rockets!!
Copyright © 1998 B&M Rockets. Don't use view/source,
be creative and make your own page.

