Portable Perch
PICTURES
COMMENTS:
Once in a while our Amazon (Rasta) will fall off of his play gym
(I think intentionally) and will stroll over to one of the dining
room chairs, climb up it and perch on the back of the chair. Even
though there is a rope going from the floor to his play gym he still
prefers to climb up the chairs. After doing this over a period of
time, his claws have started to wear through the finish on the chair
where he perches. I decided to make this perch assembly in an
attempt to better accommodate Rasta’s desire to sit at the dining
room table.
It was originally meant to be just a perch where he sits there and is
happy. Well, it turns out that the dowels and rope are a lot of fun
to climb up and down. When Rasta was provided the option of a chair
with the perch or one without the perch, he chooses the chair with the
perch. It could be that he knows the right answer.
In the next section, I will discuss how I fabricated the assembly.
What I will present to you is the rudimentary assembly for a perch to
handle up to a medium sized bird, such as an Amazon or Cockatoo. If
you should decide to make one then cut, sand, file, etc. to meet your
need.
Assembly Directions:
1. Take a 1” dowel and cut to suitable length (~18”).
2. Mark the center of the Dowel. Make a mark 3” from each side
of the center mark. These final two marks (~ 6” apart) are where you
will drill your holes. If it looks good for you then drill two 1/2”
holes all the way through the 1” dowel at the two marks.
3. Cut two 1/2” oak dowels to 15” length. I recommend using oak
since this will provide a lot of strength to the structure.
4. Check fit-up of the 1/2” dowels into the 1” dowel. If the two
1/2” dowels are not parallel then file as necessary. Glue 1/2” dowel
s in place and lay on a flat surface to dry. Make sure the dowels are
fairly perpendicular to the 1” dowel and there is sufficient protrusion
through the 1” dowel to allow a flush surface after sanding.
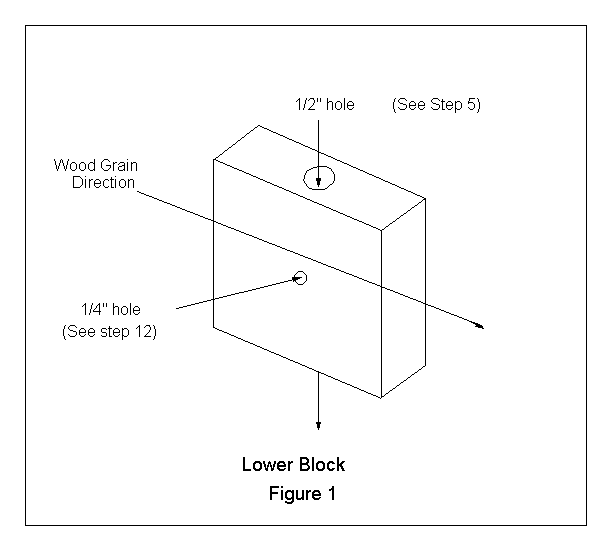
5. From 3/4” thick oak board, cut four 2” square blocks. Take
two of these blocks and drill 1/2” holes down the center of their 2”
length perpendicular to the wood grain. See Figure 1.
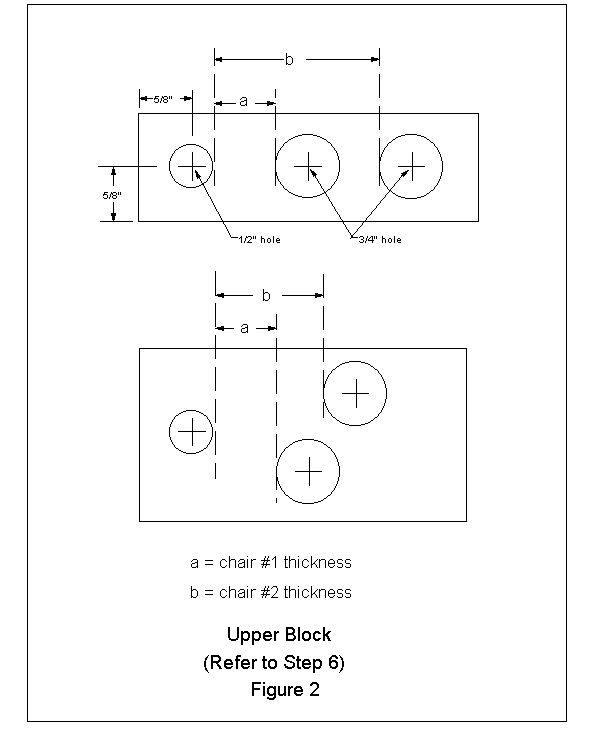
6. Before proceeding with fabrication of the piece that rests on
top of the chair, you need to measure the thickness of the chair(s)
where you intend to install this assembly. There are several approach
es that can be taken in making this piece. It can be just two holes
as I have done and will describe. It can be three or more holes in
series. It can be three or more off-center holes. The second pair
of dowels are removable specifically for multi-hole application. See
Figure 2 for the latter two options.
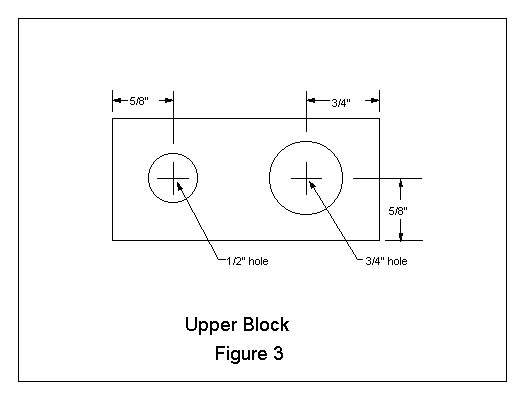
7. My application was for a 3/4” thick chair. Therefore, from
3/4” thick oak board I cut two blocks 2 3/4” x 1 1/4”. Into each
block I drilled a 1/2” hole and a 3/4” hole as shown in Figure 3.
8. Cut two pieces of 3/4” dowel to 5” Length. At one end of these
dowels install a size 10 screw eye at the other end a screw with a
1” washer.
9. After the glue has cured on the 1” dowel, sand the extruding
dowels smooth with the perch.
10. Next, before gluing any further check the fit-up and locations
of the two different types of blocks to the chair(s) where the perch
will be installed. I glued my upper blocks 1 1/4” below the perch and
the bottom blocks all the way at the bottom. When satisfied with fit
-up then glue the two upper blocks and two lower blocks in place on
the 1/2” dowels.
11. Cut two ~ 4.5 ft lengths of 1/2” cotton rope. Insert the
cotton rope through the screw eye of the removable dowels and weave
it back onto itself. You can also wrap the weave with some heavy
duty string for added strength and to deter curious minds. Whatever
knot you use it will need to fit through the 3/4” hole.
12. After the glue has cured for the blocks, mark the center of
the 2” square lower blocks (on the 2” X 2” face) and drill a 1/4”
hole into each. Also, do this to the unglued 2” squares. On the
chair side of this block chisel out a recess for the 1/4-20 bolt hex
head.
13. Install 1/4-20 x 2 1/4” long hex head bolts through both
pairs of blocks. Install a 5/8” washer and wingnut to each.
14. Your perch is now ready for any final sanding and assembly.
BACK TO AL'S WORKSHOP