
Click on the picture to see the larger version.
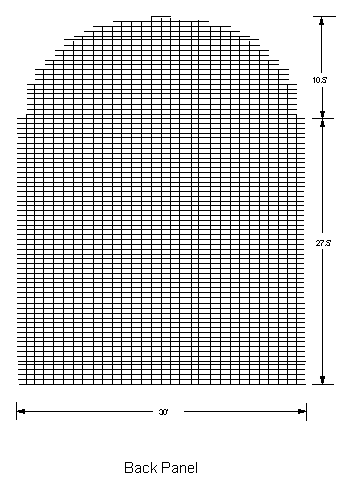
The following instructions are for constructing a 28"W x 30"L x 38"H cage from 1/2" x 1" wire mesh. I chose a 28" wide dimension for this cage to allow easy access through doorways (which are typically 30" wide) without need for disassembly. This width is also good for laying newspaper on the bottom - a standard newspaper page (27-3/4") will fit just right. The particular example I will describe and illustrate has a dome shaped top. You can use the same technique I will describe for any dimension or shape. Obviously, the simplest design to build is a rectangular cage. You can make a rectangular cage or purchase a pre-cut rectangular cage, constructed of wire mesh, from one of the dealers listed at the end of this presentation.
There are several approaches you can use for fastening together the wire mesh panels. You can use clips (purchased by mail order). You can use cage rings (purchased by mail order). You can take the approach I will describe and use the wire mesh itself. If you take the approach that I used, you do not necessarily need to fasten wrap at each wire. You can wrap the wire at an interval of every several inches.
As for materials, trying to find 1/2" x 1" wire mesh locally may be a problem.
When searching for wire mesh, first try your local feed store or hardware store. If no luck, you can purchase it through the mail. If you decide to purchase the wire mesh through the mail, you may have to deal with minimum purchase lengths as well as shipping costs. I have listed at the end of this presentation two companies that I am aware that carry this type of wire mesh. For this project, I used 30" wide wire mesh and consumed about 20 feet of it. Cost of mesh came to $1.75 x 20' = $35. I would strongly recommend using Galvanized After Weld (GAW) wire as opposed to wire that is welded after being galvanized. If you or the person selling it to you are not sure of the type of wire on hand then look to see if black marks are present at the weld joints. Black marks will indicate that it is not GAW. If you have any concerns about the toxins that may be produced by GAW wire mesh, then powder coat the cage. Powder coating can be done over galvanized metal. The particular cage I will describe was powder coated after assembly at a local paint shop for a cost of $60. Powder coating also smoothes out the rough edges. The potential risks associated with using GAW wire are addressed at the end of this presentation. This warning about GAW wire is the same warning you will find in the catalogs of the wire mesh distributors
.The approximate 1997 cost to make this cage is as follows:
| 1/2" x 1" - 16 gage wire mesh | $35 |
| Powder Coating (optional) | $60 |
| Bottom Tray (optional) | Variable (from just newspaper to Fabricated Tray) |
| Perches (2) | $4 |
| Clips & Clip Pliers (optional) | $15 |
This total cost for the bare essentials comes to ~$39. To purchase a cage of similar quality and size would cost you approximately $100 (this estimate is based upon the cost of cage, shipping, and materials required for assembly). There is really not a big savings unless you are going to build a lot of them or you may simply desire a different size or design than is commercially available. As far as I am aware, the dome top design I describe and illustrate is not commercially available in wire mesh. This style is available in wire rod cages at a much higher cost. You can be creative and do whatever type design you desire, barn top, pitched roof top, etc. A cage does not need to have a flat top roof unless you plan on putting something on top of it (i.e., another cage, play gym, etc.).
To make this cage, you will need the following tools: a hammer, needle nose pliers, wire cutters, dikes, tape measure, and file.
If you want to use a manufactured metal tray on the bottom, they can be purchased separately from Morton or California Cages, however, you will need to make your cage width and length to fit one of the sizes they have available. I simply used a piece of plywood and put a thick coat of enamel white paint on it. Other accessories such as doors, latches, feeding trays, etc. can be purchased separately from these companies.
Below is a front view sketch of the cage.

NOTE: Some cage manufacturers will use a continuous sheet of wire mesh for the base (the portion of the cage in contact with the ground). This type of design does provide a sturdier assembly; however, it can make cleaning difficult. If you desire a continuous base then add 22 more inches to the 100" section and modify the assembly instructions as appropriate.


NOTE: Before permanently securing the panels together an assembly using temporary attachments should be performed. To make the temporary attachments, use nylon cable ties, string, wire, etc.
This completes the cage assembly. Add perches, toys and food bowls to the liking and needs of the inhabitant(s).
Mesh Distributors:
|
California Cageworks Corporation 3314 Burton Ave Burbank, CA 91504 Phone: 818-843-6283 FAX: 818-843-7409 |
|
Morton Jones Cages and Supplies 925 Third Street P.O. Box 123 Ramona, CA 92065 Orders: 800-443-5769 FAX: 619-789-2740 Questions: 619-788-7323 |
GAW Wire Warning |
| The ingestion of sufficient levels of Zinc by certain birds (Psittacines) and small animals (Carnivorous mammals) may, under certain circumstances, lead to a condition known as zinc toxicosis, the background and history of which is detailed in an Information Bulletin which you should obtain from your supplier and which you must read carefully before using any galvanized wire mesh. (The Information Bulletin should be retained for future reference.) The following precautionary measures, discussed in more detail in the Information Bulletin, are summarized below: |
| 1. When building or purchasing new cages thoroughly wash and brush mesh to remove all loose zinc particles. Ensure that no particles are left on the floor of the completed installation, particularly if the material has been cut, bent, or subjected to mechanical damage. |
| 2. Apart from small particles, zinc can also be ingested by feed becoming contaminated by leaching the zinc coating from the galvanized cages. The primary condition which promotes these possibilities are high acidity of the feed, high ambient temperatures and extended contact between feed and the cage. |
| 3. At the first sign of any illness of stock introduced into new cages, the stock should be removed and a veterinarian consulted as you would for any signs of sickness. The veterinarian should be given the Information Bulletin. |
| 4. In areas which you deem critical, it is recommended that a totally non-toxic material such as stainless steel be used. |
| 5. Many thousand of tons of zinc coated wire mesh have been used for over three decades without significant problems but users can minimize any risks involved by following these precautions. |