TEMPERATURE
INTRODUCTION:-
It is very important to distinguish between Temperature and Heat.
Temperature is defined as " the degree of hotness or coldness measured on a definite scale".
Hotness or Coldness are the result of molecular activity - the faster the molecules of a substance move, the more heat it contains.
Thus, Heat is a form of energy.
Heat is usually taken to mean " quantity of heat".
A bucketful of warm water will melt more ice than a tea cupful of boiling water. The bucketful must, therefore, contain a creator quantity of heat than the tea cup full, but its temperature is lower then that of the boiling water, a fact which is readily apparent if a finger is dipped into both vessels.
A thermometer measures the "temperature" of a body. The quantity of heat the body contains will depend upon its temperature, but it also depends upon the mass of the body and the nature of the material from which the body is made.
TEMPERATURE SCALES:-
Thermometer, which is used to measure temperature, has a calibrated scale which makes it possible to measure and identify the Heat Level when there is a change in the stage or condition of the substance, such as freezing, melting or decomposition.
The temperature scales most commonly used in calibrating thermometers are the Fahrenheit scale and the Centigrade scale.
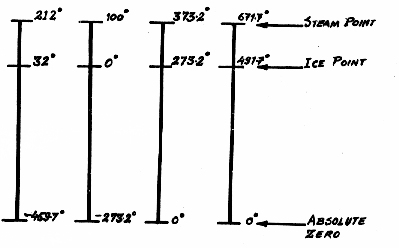
On the Fahrenheit scale the freezing temperature is set at 32°F and the boiling temperature at 212°F with 180° between the fixed points.
One Centigrade scale the freezing temperature is set at 100° with 100 degrees between the fixed points.
ABSOLUTE ZERO TEMPERATURE:-
There is a condition when there is No molecular motion hence no heat. The temperature at this point is " absolute zero temperature" the lowest temperature possible. There are two scales that have their zero points at this absolute zero level, the Kelvin Scale and the Fankine scale (See Figure-T1).

FAHRENHEIT CENTIGRADE KELVIN RANKING
Fig-T1: Temperature Scales.
On the Kelvin scale the freezing point of water is at +273°K and the boiling point at +373°K with 1000 degrees between the fixed points. The Kelvin scale is sometimes referred to as the ABSOLUTE CENTIGRADE SCALE.
On Fankine scale the freezing point of water is at 491°R and the boiling point at +671°R with 180 degrees between the fixed points, just as on Fahrenheit scale. The Fankine scale is sometimes referred to as the ABSOLUTE FAHRENHEIT SCALE.
CONVERSION OF SCALE:-
It is often necessary to convert temperature readings from one scale to another. Temperatures as read on the Fahrenheit thermometer can be converted to centigrade values by the following formula:
°C = 5/9 (°F - 32°) and °F = 9/5°C + 32
Also °C = °K - 273° and °F = °R - 549-7
THERMOMETERS.
LIQUID -IN- GLASS THERMOMETERS:-
Volumetric expansion of mercury is over six times greater than that of glass. If, therefore, a glass container holding mercury is heated the mercury will expand more than the container. At higher temperature, the mercury will occupy a greater fraction of the volume of the container than at a low temperature. If, then, the container is made in the form of a bulb with a capillary tube attached, it can be so arranged that the surface of the mercury is in the capillary tube, its position read and the assembly used to indicate temperature.
This is the principle of the mercury - in - glass thermometer.
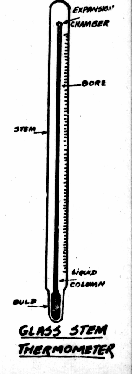
The thermometer, therefore, consists simply of a stem of suitable glass tubing having a very small, but uniform, bore, At the bottom of this stem there is a thin walled glass bulb. The bulb may be cylindrical or spherical in shape, and has a capacity very many times larger than that of the bore of the stem. The bulb and bore are completely filled with mercury, and the open end of the bore sealed off either at a high temperature, or under vacuum, so that no air is included in the system. the thermometer is then calibrated by comparing it with a standard thermometer in a bath of liquid whose temperature is carefully controlled. The liquid is agitated rapidly to keep it all at the same temperature. The liquid used in the bath depends upon the temperature range of the thermometer, the most common liquids used being water, oil, alcohol and molten salt.
For temperatures between 200°C and 600°C the contents of the slat bath consist of about equal quantities of sodium and potassium nitrates. When the standard thermometer and the thermometer to be calibrated have reached equilibrium with the bath at a definite temperature, the point on the glass of the thermometer opposite the top of the mercury meniscus is marked. The process is repeated for several temperatures. The intervals between these marks are then divided off by a dividing machine. In the case of industrial thermometers, the points obtained by calibration are transferred to a brass plate. The intervals are divided on the plate, which is then fixed with the tube into a suitable protecting case to complete the instrument.
The liquid in the column of a liquid- in- glass thermometer is part of total thermally responsive system and is affected by the temperature along its length. For this reason, thermometers are divided into two types:-
1. Partial-immersion thermometers:- These instruments have a line etched around the stem to indicate the exact immersion depth for maximum accuracy.
2. Total-immersion thermometers:- The terms total immersion does not mean that the entire thermometer must be immersed by rather than the entire bulb and almost all of the liquid column be immersed.
FILLING LIQUIDS:-
Almost nay liquid can be use. However, the following material are most commonly used:(1) Mercury, (2) Mercury-Thallium, (3) Gallium, (4) Alcohol , (5) Tolvol , (6) Pentane and (7) Silicones.
TUBE AND SCALE THERMOMETERS:-
Many liquid-in-glass thermometers are mounted on plates which bear the scale marking. They can be slid into or fastened on a case for special purposes.
INDUSTRIAL THERMOMETERS
Liquid-in-glass industrial thermometers are widely used.
The Glass capillary tube - complete with bulb and filling - is calibrated, but usually is not engraved. This unit is then mounted in a protective housing containing graduated scales (See Fig. T-2) Industrial thermometers are available in many forms (See Fig. T-3a to d).

Thermometer sizes:-
Industrial thermometer sizes are based on the length of the metal scale. Standard sizes are 5,7,910 and 12 in.
Thermometer connections:-
Fixed Connection: The bulb chamber of this type, shown in Fig. T-3a, has an externally threaded section rigidly attached to the case. The entire thermometer must be rotated to screw the fixed connection in to place.
Union connection:-
For locations where it is not possible to rotate the thermometer a union connection is used. The hub, or sometimes a flange with internal threads similar to the hub, is mounted on the apparatus first, then with the thermometer held in place, the union nut is tightened for a pressure tight seal.
Separable Sockets or Wells:-
A separable socket is a hollow chamber, sealed at one end with an external thread at the other end, for attaching the apparatus to a vessel (See Fig. T-3b and c). Separable sockets are used to prevent damage to the thermometer from high pressures or corrosive neck as shown in Fig. 3c to allow room for insulation on a tank or pipe. Thermometer connections are almost always pipe threads (American Standard Taper Pipe Threads - NPT).

Fig. T-3: Industrial liquid-inglass thermometers: (a) 90° angular from with fixed connection, (b) straight form with separable socket or well (no extension neck), (c) side angle form with separable socket or well (with extension neck). (c) handle type used for Molten metal temperature measurement.
BIMETAL THERMOMETERS
Bimetal strips consists of two metals such as invar and brass welded together to form a cantilever as shown in Fig. T-4a. When heated, both metals expand, but the brass expands much more than the invar. The result is that the bottom of the strip becomes longer than the top, and the cantilever curls upwards as shown in Fig. T-4b.

Based on this principle, various alloys are used which provide the bimetallic material used in the modern thermometer.
The general construction of an industrial thermometer is shown in Fig. T-4c. d. Motion of the helical element is transmitted to the pointer by a staff or shaft. Precision-made bearings and guides center the shaft with minimum friction. construction is simple. There are few moving parts, and hence more reliable and robust.
Calibration:-
Calibrating a Bimetal element consists of immersing it in batns of known temperatures and adjusting the length so that, for a given temperature change, the pointer will have the proper angular deflection. This calibration need be done only between two temperatures to get linearity over the entire scale.
If the setting of a Bimetal thermometer changes, reset the pointer at only one point on the scale. The thermometer will then be accurate over the entire scale.
Ranges:-
Bimetal thermometers are made in ranges from 500°C down to -180°C and lower. However, at these low temperatures the rate of deflection drops off quite rapidly. While bimetal thermometers are made in ranges up to 500°C, they do not have long time stability at these high temperatures. Usually Bi-metal thermometers are not recommended for continuous use above 425°C.
Accuracy:-
Good bimetal thermometers will retain their accuracy indefinitely. Usually industrial bimetal thermometers are ouaranteed to be within 1 percent of the scale range at any point on the scale. The smaller laboratory or general-purpose types are guaranteed to be within one-half of 1 percent of the scale range. Better accuracy than this can be obtained if each scale is hand-drawn to match each element, but high cost makes it impractical.
To get maximum accuracy, the section of the stem containing the element must be completely immersed.
Overranging:-
Bimetal thermometer, in general, can be greatly overranged, without harm. In general, however, manufacturers allow 100 % overage below 120 C, 50% up to 250° and 10% up to 400°C.
Stems:-
The stem or bulb of a bimetal thermometer using a helical element can be as short as the element it contains as short as one inch. On the other extreme, thermometers of this type can be made with stems up to 6 ft (or 2M) long - from one inch head diameter to 6 inch dia and larger.
Types of Bi-metal Thermometers:-
In general, these are divided into two classes: (1) the larger sizes with pip-threaded connections, for industrial use, and (2) the smaller sizes with smaller stems and not threaded connections, for general testing and laboratory work. all sizes, however, can be obtained with or without threads.
Also available are pointed and screw or gimlet-ended stems for use in hard substances. These ends are integral with the regular stem and are in contact with the bimetal element, permitting quick heat transfer.
FILLED SYSTEM THERMOMETERS
Principle of Operation:-
The filled-system thermometer is designed to provide and indication or record of temperature some distance away from the point of measurement (See Fig. T-5). The sensitive or measuring element (bulb) contains a gas or fluid which changes in physical characteristics with temperature. This change is communicated to the bourdon through a capillary tube. The bourdon responds to the signal from the bulb to provide a motion related in some definite way to the bulb temperature. This motion is generally amplified by a mechanical linkage or gear system to drive a pointer for indication or to drive a pen for recording. The angular motion is frequently used directly without amplification in the manufacture of dial gauges and is also frequently used directly for control purposes.

Relative advantages and Limitations:-
Advantages:- filled system thermometers are used extensively in most industrial processes for a number of reasons:-
1. Fundamental simplicity of the system allows rugged construction, minimizing the possibility of damage or failure in shipment, installation, and use. The amount of upkeep is generally minor.
2. Simplicity of the system allows inexpensive design.
3. As used in the process industries, sensitivity, response time, and accuracy (expressed in percent of span) are generally the equal of any of the other high-quality industrial-type temperature measuring instruments available (see item 5 under limitations).
4. The capillary allows considerable separation between the point of measurement and the point of measurement and the point of temperature indication. Although the system length is usually limited to 250 ft, applications upto 400 ft are in successful operation. It is frequently more economical to employ transmitters for signal transmission beyond e100 ft.
5. The system is self-contained, that is it needs no auxiliary power supply, such as compressed air or electricity. It is , however, frequently combined with a pneumatic or an electric transmission system of either the motion or force-balance types, in which case auxiliary power is required.
6. The system delivers enough power to drive not only a pointer or recording pen by also a controller mechanism.
Limitations:- Thermal systems have got the following limitations:-
1. The bulb size may be too large to fit the available space.
2. The minimum spans are not so narrow as in electrical temperature-measuring systems.
3. The maximum temperature is more limited than that in some electrical measuring systems.
4. In case of system failure, the entire unit must be replaced or repaired. Some large users have found it practicable to set up repair facilities. In electrical systems the primary element, connecting leads, and instrument are independently replaceable.
5. Sensitivity and absolute accuracy are not the equal of short- span electrical instruments used in connection with resistance thermometer bulbs.
6. Separation on the measuring element and bourdon of more than 250 ft generally is not recommended. It is frequently more economical to employ transmitters for signal transmission beyond 100 ft.
CLASSIFICATION OF FILLED-SYSTEM THERMOMETERS:-
Filled-system thermometers may be separated into tow fundamental types: those in which the bourdon responds to (1) volume changes and (2) pressure changes. Those which respond to volume changes are completely filled with a liquid. The liquid expansivity with temperature is greater than that of the bulb metal, the met pressure change being communicated to the bourdon. An internal-system pressure change is always associated with the bourdon volume change, but this effect is not of primary importance. The systems are partially filled liquid. Changes in gas or vapour pressure with changes in bulb temperature are communicated to the bourdon. The bourdon will increase in volume with increase in pressure, but this effect is not of primary importance.
Filled system thermometers have been classified as follows volumetric principle:-
Liquid filled.
Mercury filled.
Pressure Principle:
Vapor filled.
Gas filled.
Liquid filled and Mercury filled thermometers:-
Both types operate on the principle of thermal expansion, just as the mercury-in glass thermometer does (Fig-T-6) and are used satisfactorily for measuring temperature form -185°C to 540°C.
Gas Filled Thermometer:-
This type depends upon the increase in pressure of a confined gas (constant volume of gas filled under high pressure).
Nitrogen is the gas most often used for such systems, because it is chemically inert and possess a favorable coefficient of the ermal expansion. It cab measure temperature from -250°C to +540°C.
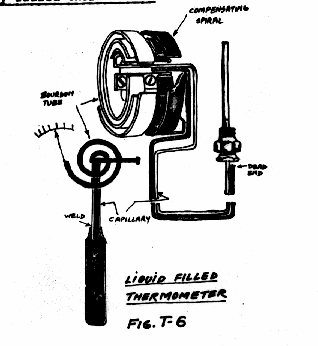
Except for the size of the bulb, the gas-filled system is identical to the liquid-filled types. The gas-filled bulb must be larger and its volume must be considerably greater than that of the rest of systems, to avoid error due to ambient temperature variation, Fig. T-6 shows an accurate liquid filled thermometer with automatic compensation for any errors caused due to ambient temperature changes.
Vapour Pressure Thermometers:-
This type of system is practically filled with liquid. The liquid expands, but as it is heated, its vapor pressure increases. At lower temperature the vapor pressure increase for each unit of temperature changes is small. at higher temperature the vapor pressure change is much greater. Also, in partially filled vapor pressure thermometers when the temperature of the bulb is lower, the liquid remains in the bulb and the vapor occupies the tubing and spiral bourdon. When the bulb temperature is higher than that of the rest of the system, the liquid and vapor change places, with the bulb now containing the vapor and the spiral bourdon the liquid. Therefore, with the simple partially-filled vapor pressure thermometer, the temperature of the bulb should always remain lower than or higher than the temperature of the remainder of the system.

To overcome this limitation, the dual-filled system is used. (See Fig. T-7) tow different liquids, a vaporizing and a non-vaporizing type are used. The temperature sensitive fluid which vaporizes is called the "actuating liquid". The vapor pressure acts on a second liquid which does not vaporize. The second liquid is called the " Transmitting liquid", since it transmits the vapor pressure of the first liquid to the spiral bourdon. In this dual-filled system there is no transfer of vapor and liquid, the actuating liquid and its vapor remain in the bulb at all times.
Vapor does not expand uniformly as liquid and gas do. The result is that vapor-actuated thermometers do not satisfy a uniform scale. Instead, the divisions of the scale are spaced so that they are wider apart at the higher readings than at the lower readings. Vapor-filled thermometers can measure temperature from - 185°C to +315°C.
When the vapour pressure thermometer is used as an indicator it may be of the simple dial type with a 27° scale or the rectangular case type with a 90° scale. Used as a recorder, the thermometer may have a very short system, with the bulb attached to the recorder case or it may have long tube systems for remote readings.
Among the filled system thermometers, gas-filled system has the fastest response, the vapor-pressure system the next fastest and the liquid filled has the lowest.
The response of all three is faster, if the sensing portion is exposed to a moving air or gas, and the faster the fluid moves past the sensor the greater will be the response. A faster response will be obtained if more bulb area is exposed to the fluid. For liquid temperature measurement, the bulb should be large enough to provide sufficient area to sense temperature changes but not so large that its mass slows its response.
Table of Characteristics of classes of Tube Systems:-
|
Class |
Filling fluid |
Low Limit |
High Limit |
Shortest Span |
Longest Span |
|
Class I |
Liquid or other than mercury |
- 185°C |
315°C |
-4°C |
150°C |
|
Class II |
Vapor |
-185°C |
315°C |
4.5°C |
150°C |
|
Class II |
Gas |
-265°C |
540°C |
38°C |
540°C |
|
Class IV |
Mercury |
-45°C |
540°C |
4.5°C |
540°C |
Bulbs, Wells and Tubing:-
Vapor filled and gas filled thermal systems are generally available with either brass, copper or stainless steel bulbs. Where required, other materials, such as Nickel or Monel, can be used. Lead or plastic coatings can be applied for corrosion resistance, and abrasion resistant coatings can be used if necessary. Mercury filled thermal systems have stainless steel bulbs, but when necessary the bulb can be coated with lead, plastic, and other materials. The choice of materials depends upon the process fluids to which these bulbs are exposed. Capillary tube which connects the sensing bulb and measuring element can be armoured suitably.
Common bulb types are illustrated in the accompanying diagrams and described below:
Plain Bulbs: are especially useful where portability is a factor, and where the medium to be measured is not under pressure. Such applications include open vats and kettles where materials batch processing is employed. a plain bulb with bendable extension neck cab be used to measure the temperatures of several adjacent vessels. And the fact that bulb can be easily installed and removed is often advantageous during charging and discharging operations. Fore more permanent installation, the bulb shown in Fig. 8 is also available with a flange on the extension.

Union connected Bulbs:-
Shown in Fig-9, are provided with fittings for installation in vessels under pressure where plant safety requirements do not specify the use of a well or socket. Fittings may be permanently fixed or adjustable. These bulbs are often installed in pipe line tees. If the opening must be closed when the bulb is removed a plug and chain can be supplied.
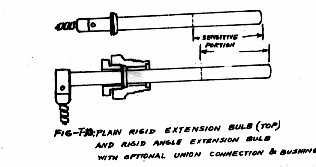
Rigid Extension Bulbs:-
Both plain and union connected are available in both vapor and mercury filled systems with rigid extensions, in either the angle or the straight type as illustrated in Fig. T-11. This type of bulb is especially well suited for use with a rotary joint for insertion in the bearing of a rotating cylinder whose internal temperature is to be measured. They are also useful in vessels with agitators or flow lines where turbulence might damage an unprotected plain bulb, but where it is not desirable to use a well.
Averaging Bulbs:-
Because of the large surface area exposed by a long, small diameter active portion, the averaging bulbs illustrated in Fig. T-11 have a very quick response and are especially effective for measuring the temperature of air or other gases, as well as the temperature of slowly moving liquids, where heat transfer conditions are not favorable.
The term averaging is used because the bulbs measure the average temperature over their active portion. The coiled type is ideally suited for duct temperature measurement where as the long straight type is available in lengths upto 25 feet and can be screwed in or out of an oven or furnace chamber.
Wells:-
A protective well into which the bulb is inserted is often required where the thermometer bulb must be protected from corrosive or abrasive effects of the measured medium or where it is desired to remove the bulb for checking or other reasons form a vessel operating under pressure or from the vessel containing hazardous fluids.

Ambient Temperature Compensation:-
Ambient-temperature compensation is accomplished in several different ways. First, if the ration of volume of liquid in the bulb to volume of liquid in the capillary and receiving element is large, say 1000 to 1, ambient errors would be small. Generally, however, this cannot be accomplished without making the thermometer bulb excessively large. compensation of a liquid expansion thermometer for ambient-temperature change at the receiving element is afforded by using either a bimetal strip or a second receiving element, arranged as indicated in Fig. T-12 . It may be seen that, if this is properly constructed, ambient temperature changes at the receiving element will result in no change of indication at the thermometer. compensation of a liquid

expansion thermometer at the receiving element and at the capillary is accomplished by using a volumetric compensation or a second receiving element at capillary, as indicated in Fig. T-13 Volumetric compensation (Taylor Instrument Companies) consists of using a small wire inside the capillary tubing. The wire and capillary tubing are made of different materials (diagram at the left in Fig. T-13). A temperature increase along the capillary causes the capillary, the mercury, and the wire to expand. IF the capillary expansion is greater than that of the wire, the expansion of the mercury can be compensated, so that the net volumetric expansion of the system is negligible. Ambient-temperature changes at the capillary therefore do not affect the operation of the thermometer. The second method, shown on the right in Fig. T-13, consists of using a second thermal system, either mercury-filled or gas-filled, with the capillary tubing of both the compensating system and the measuring system has a bulb, the compensating system and the measuring system running adjacent to each other temperature changes at the capillary therefore do not affect the operation of the thermometer. The second method, shown on the right in Fig. T-13, consists of using a second thermal system, either mercury-filled or gas-filled, with the capillary tubing of both the compensating system and the measuring system has a bulb, the compensating system and the measuring system running adjacent to each other. Only the measuring system has a bulb, the compensating system ends with the capillary tubing. Changes of ambient temperature along the capillary or at the receiving elements in opposition.
Ambient-temperature compensation may be required with the gas-expansion thermometer as well as with the liquid-expansion thermometer. The degree of ambient error depends on the temperature range of the instrument and the relative volume of the bulb, capillary, and receiving element. Ambient error is reduced by making the volume of the bulb as large as conveniently possible and reducing the volume of the capillary and receiving element to a minimum. For a small range of ambient temperature the volume of the bulb is usually large enough to make ambient errors negligible. The temperature range of the gas-expansion thermometer is normally large, and this further reduces the ambient error. Generally then the nitrogen pressure thermometer does not require compensation. When these conditions are not met, compensation is employed. This may take the form of compensation at the receiving element only, by the use of either a bimetal strip or a second gas-filled spiral or helix, as was employed for the mercury-expansion thermometer. complete compensation is provided by using a second gas-filled element and capillary, arranged as previously described for the mercury thermometer. The vapor-actuated pressure thermometer does not require ambient-temperature compensation, since the pressure in the thermal system is determined only by the temperature at the free surface of the liquid. Changes of temperature elsewhere in the system cause an expansion or contraction of volume, but this is automatically compensated by establishing a new vapor-pressure equilibrium at the liquid surface, there by maintaining a constant pressure. The thermometer is arranged so that the free liquid surface is always at the bulb for any relative temperatures of bulb, capillary, and receiving element.
THERMOCOUPLES.
INTRODUCTION:-
A device which converts one form of energy into another is called a Transducer. A thermocouple is a transducer which converts thermal energy into electrical energy.
Thermocouple consists basically or a pair of wires of different metals. The two dissimilar metals are welded together at one end and this junction is heated, a voltage is developed on the free ends proportional to the temperature difference between the welded and free ends. In modern practice, the two free ends are connected to a millivoltmeter or potentio meter which measures the cmf created and indicates or records this cmf in terms of temperature. Instrument of this type are known as thermocouple pyrometers (see Fig. T-14) or Thermocouple Thermometer.

Basic Thermocouple Circuits:-
The thermocouple is actually a differential temperature sensor. The basic equation which relates this temperature difference between junctions to a voltage is: (See Fig. T-15).
V = C (T2 - T1)
In this equation, V is the output voltage and (T2-T1) is the temperature difference between the functions "C" is the co-efficient of sensitivity which takes into account the fact that different combinations of thermocouple metals will produce different voltages under the same conditions.
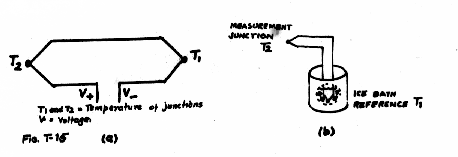
By maintaining T, at a known reference temperature, the thermocouple may be used to measure one temperature only (say temperature of the process fluid) : V=C (T2 - T reference). This reference temperature may be maintained by an ice bath (At 0°C) or an accurately controlled oven (typically at 65°C).
If you do not mind small error due to room temperature variation, you can maintain the reference junction at the room temperature.
The voltage is usually measured in millivolts. Where a large voltage output is required, tow or more thermocouples may be wired in series (See Fig. T-15a).

The Total voltage output of multiple series connected thermocouples is the sum of all individual thermocouple voltages. For example, "duplex" or double thermocouples which, when wired in series, produce a thermal voltage double that of simplex versions. Read-out is generally given as a average over all thermocouples in the circuit.
Where an averaging effect for temperature is required without an accompanying increase in voltage output, thermocouples may be wired in paralled, as shown in Fig. T-16b).
Thermocouples:-
Several combinations of two metal conductors serve well as thermocouples. These combinations of wire must possess reasonably linear temperature-cmf relationship, they must develop an cmf per degree of temperature change that is detectable with standard measuring equipment, and in many application they must be physically able to withstand sustained high temperatures, rapid temperature changes, and the effects of corrosive atmospheres.
A Few standardized wire combinations, the temperature limitations of which are shown in the graph (Fig. T-17), are discussed below:-

Copper constantan (Type - T):-
The superiority of copper-constantan over other types of thermocouples of measurement of relatively low temperatures, is well established. Copper-constantan thermocouples standup well against corrosion, are reproducible to a high degree of precision and are generally preferred for ranges between - 184°C and +135°C (-300 and +600°F)
Iron-Constantan (Type-J)
Suitable for use in reducing atmospheres where there is a deficiency of free oxygen. Above 1000° F the rate of oxidation of the iron wire increases reapidly and the use of No. 8 gage wire is suggested. No. 8 gage Iron-constantan protected thermocouples are generally considered satisfactory and economical upto 871°C (1600°C).
Chromel-Alumel (Type-K)
Developed especially for use in oxidizing atmospheres where there is an excess of free oxygen. Under these conditions, Chromel-Alumel will generally give better service life than Iron-Constantan, particularly at higher temperatures. Complete absence of free oxygen (a reducing atmosphere) has a tendency to alter the thermoelectric characteristics of these wires, causing a loss of accuracy. No.8 gage Chromel-Alumel protected thermocouples are generally considered satisfactory and economical upto 1149°C (2100°F).
Platinum-Platinum Rhodium (Types R & S):
These Thermocouples are used for the higher temperature ranges. They are adversely affected by atmospheres containing reducing gages, and so should always be protected with suitable ceramic or porcelain tubes when used above 537°C (1000°F) in the presence of such gages.
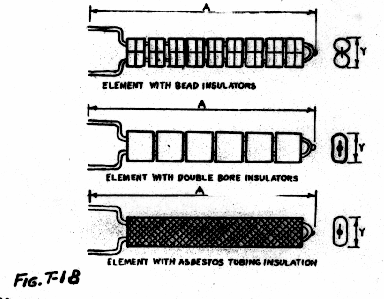
Fig. T-18 shows thermocouple element, with various types of insulation's, joined at one end to form a measuring junction and intended for use as a thermocouple or as a part of a thermocouple assembly.
Thermocouple Assembly:-
For convenient handling, installation and maintenance, thermocouples are made up as assemblies. A thermocouple assembly is an assembly consisting of a thermocouple element and one or more associated parts such as terminal block connection, head and protecting tube.
1. Terminal Block:-
A Terminal block is a block of insulating material that is used to support and joint the termination of conductors. (See Fig. T-19)
2. Connection Head:-
A connection head is a housing enclosing a terminal block for an electrical temperature sensing device and usually provided with threaded openings for attachments to a protecting tube and for attachment of conduit (See Fig. T-20 and 21)

3. Connection Head Extension:-
A connection head extension is a threaded fittings or an assembly of fittings extending between the thermowell or angle fitting and the connection head. The connection head extension length is the overall length of the connection head extension as shown in Fig. T-24b.
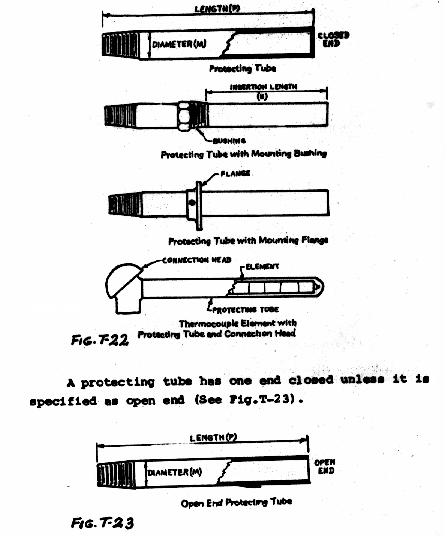
4. Protecting Tube:-
A protecting tube is a tube designed to enclose a temperature sensing device and protect it from the deleterious effects of the environment. It may provide for attachment to a connection head but is not primarily designed for pressure-tight attachment to a vessel. A bushing or flange may be provided for the Attachment of a protecting tube to a vessel (See Fig. T22)
5. Thermowell:-
A thermowell is a pressure-tight receptacle adapted to recive a temperature sensing element and provided with external threads or other means for pressure-tight attachment to a vessel.

A lagging extension is that portion of a thermowell, above the threads, intended to extend through the lagging of a vessel. The lagging extension length is the length from the lower end of the external threads of the thermowell to the upper end of the portion intended to extend through the lagging of a vessel, less one inch allowance for threads. (See Fig. T-24).
The Immersion length of a thermowell, protecting tube, or thermocouple element is the length form the free end to the point of immersion in the medium which is being measured. (See Fig. T-25).
The insertion length of a thermowell, protecting tube or thermocouple element is the length from the free end to, but not including, the external threads or other measures of attachment to a vessel (See Fig. T-24a and T-25)
Angle Type Thermocouple Assembly:-
An angle type thermocouple assembly is an assembly consisting of a thermocouple element a protecting tube, an angle fitting, a connection head extension, and a connection head.

Thermowell Installations:-
Thermowell Installations are shown in Figure T-26 a, b, c, d. The Thermocouple assembly shown in Fig. T-26a is the kind normally used for the measurement of air or gas temperatures, as in a furnace. The thermocouple assembly shown in Fig. T-26b is used for pressure vessels and pipe lines, particularly for liquids under pressure. An open-end thermal well, shown in Fig. T-26c is sometimes used where only slight protection is required as in furnaces at lower temperatures. an open-end thermal well only protects the thermocouple from mechanical damage and from the erosive effects of fast moving gases, while supporting the thermocouple from sagging.

When corrosion may be severe, especially at temperatures over 1000°C or where platinum thermocouples are used, two thermal wells are employed, as shown in Fig. T-26d. A secondary thermal well covers the primary thermal well. The purpose of the secondary well is to prevent sagging of the assembly at high temperatures and to protect the surface of the primary well so that is will remain gas tight. Secondary wells are made of either metal or ceramic, depending on the requirements.
TEMPERATURE MEASUREMENT USING
THERMOCOUPLES AND MILLIVOLTMETER.
Thermocouples develop a millivolt (mv) signal, which depends on the difference in temperature of the measuring junction and that of the reference junction (Fig. T-27).
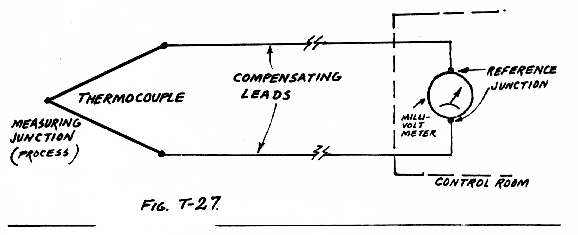
In industries 'compensating leads' are used to connect the thermocouple in the process and the instrument mounted on the control panel. Compensating lead wires are used only to reduce installation costs, as these are cheaper than the actual thermocouple wires themselves. Compensating leads are manufactured with materials having similar thermo-electric properties to that of the thermocouple wires, in order to reduce the error and shift the reference junction to the instrument terminals where the temperature is more consistent.
When compensating leads are used to connect the thermocouple and the instrument as shown in Figure T-27, the reference junction would be located near the instrument. If the measuring instrument is located in an air-conditioned control room, there won't be any error introduced due to ambient temperature variation. If the control room is not air-conditioned or if the temperature of the control room is not accurately controlled, then there will be error introduced due to fluctuations in the control room temperature.
AUTOMATIC COMPENSATION FOR ERRORS DUE TO AMBIENT TEMPERATURE CHANGES.
Atmospheric temperature varies widely from winter to summer. Even the temperature of the air conditioned room also fluctuates considerably.
Whenever ambinet temperature varies, the reference junction temperature also changes, reducing or increasing the millivolt output of the thermocouple, introducing and error in the indicated temperature.
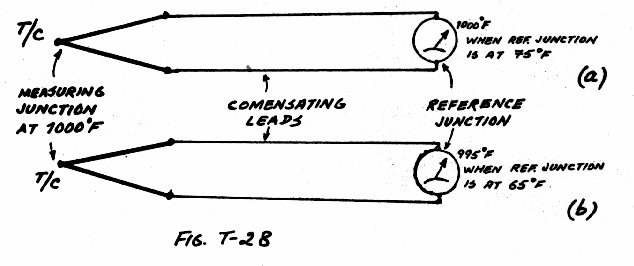
Compare Figures T-28a and T-28b. Even though the process temperature is remaining same (exactly at 1000°F), the reference junction temperature has changed from 75°F to 65°F and this has shifted the instrument reading. Control room operator thinks that the process temperature has been reduced (and he may increase the temperature of the process) even though there is no change in the process temperature.
Why the instrument pointer has shifted? The pointer has shifted because (1) Reference junction temperature has changed (ii) Because of the room temperature change the moving coil meter resistance also has changed.
In modern temperature measuring millivoltmeters both the above effects are automatically cancelled as shown in Fig. T-29a and b.
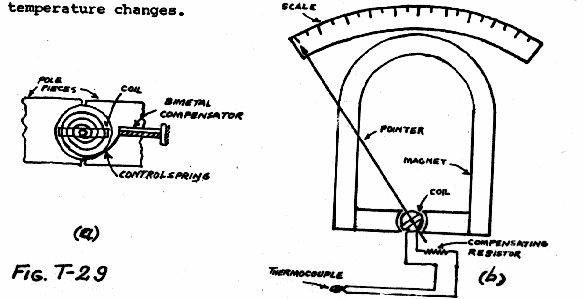
Whenever room temperature changes, the built -in bi-metallic compensator shifts the pointer of the instrument mechanically. (Fig. T-29a). A temperature compensating resistor-thermister network keeps the resistance of the meter coil constant irrespective of any ambient temperature variation. And hence the pointer will move only when the process temperature changes and there will not be any movement of the pointer due to ambient temperature changes.
TEMPERATURE MEASUREMENT USING NULL BALANCE
POTENTIOMETERS-WHY NULL BALANCE METHOD IS
PREFERABLE TO OTHER METHODS OF MEASUREMENT?
If we take 6 V energizer battery and measure the voltage by means of a voltmeter it will read 6 volts at 'no load'.

But if we connect the above battery to a transistor radio and then measure its voltage, it will read less than 6 volts (say 5 volts)
This is because the radio is drawing current from the battery.
If we have to measure accurately the very small millivolt signal developed by thermocouple then we should not draw any current from the measuring circuit.
At 'null balance' there is no current flowing thorough the thermocouple to the instrument and that is why 'null balance' potentiometric Indicators and Recorders are widely used along with thermocouples and resistance thermometers.
PRINCIPLE OF NULL BALANCING:-
If a potential difference of 1 volt is applied to an uniform wire of 100 cm long, then the fall of potential per cm is 10 millivolt (Fig. T-30a).
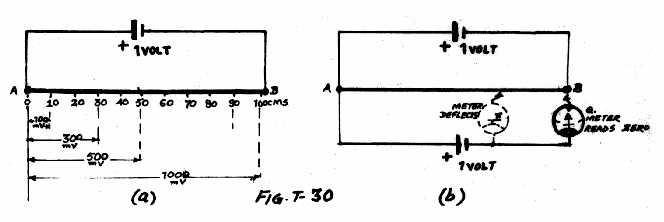
If we connect another 1 volt battery and a galvanometer as shown in Fig. T-30b, then move the contactor over the slide wire, the meter pointer will read 'zero' when we touch the right hand extreme of the slide wire.
This is the principle of "NULL BALANCING" which is used in potentiometric method of measuring e. m. f. produced by a thermocouple.
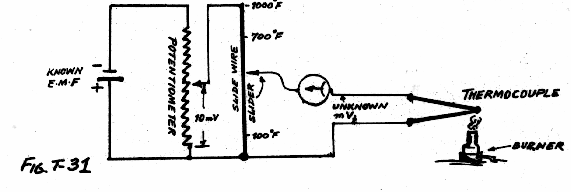
In order to understand the principle of "Null Balancing" the above experiment (Fig. T-31) would be useful. The unknown 'e.m.f.' produced by the thermocouple is compared with the known 'e.m.f.' impressed across a slide wire. The thermocouple tip is heated by a burner as shown in the Fig. T-31. When the slide wire is moved up and down the slide wire, at a particular point the galvanometer would read zero. We know the voltage at the particular point of the slider on the slide wire. From this we can find out the m.v. produced by the thermocouple and hence its temperature.
The various positions of the slide wire can be directly calibrated in terms of temperature.
This is the basic principle of "Continuous Balance Potentiometric Indicators and Recorders".
AUTOMATIC CONTINUOUS BALANCE POTENTIOMETRIC INDICATORS AND RECORDERS:-
These type of instruments oppose an unknown e.m.f. (E unknown) by a known e.m.f (E standard) supplied by a zener regulated constant voltage supply (Fig. T-32). The know e.m.f (E standard) is varied by the movement of a contactor along a slide wire across which the zener regulated constant voltage is impressed. When the two opposing emf's are equal' no current flow in the balancing circuit. Since the e.m.f. generated by a thermocouple exposed tot a process temperature has a definite value for each value of temperature, the position of the contactor along the slide wire can be calibrated to read directly in temperature units.

In the industrial potentiometric temperature indicators and recorders, this 'null-balancing' is done automatically by a "Servo Amplifier", which detects the unbalance between the know and unknown voltage, amplifies the error signal and drives the servo motor (Balancing Motor) which in turn positions the slide wire contactor (Refer Fig. T-33). This slide wire contactor movement is connected to the Temperature Indicating pointer and to the recording pen, which records the temperature over a chart, which is rotated by a clock mechanism or a synchronous motor.

The unbalance between the d. c. millivoltage developed by the thermocouple and that from a standard voltage source (E Standard) is converted into an a. c. voltage, which is amplified so that it cab actuate the slide wire-contactor.
Whenever the process temperature changes, then there will be an unbalance voltage between the slide wire voltage and the thermocouple voltage. As soon as this unbalance occurs, the balancing (servo) motor rotates to re balance the tow voltages by moving the contactor on the slide wire, at the same time moving the instrument pen or pointer to a new temperature value.
The direction in which the motor rotates is determined by a definite phase relationship between the a.c. supply voltage and the amplified a.c. thermocouple voltage. This relationship depends of course upon whether the temperature has increased or decreased form the value indicated by the instrument pointer and pen. When no unbalance exists, there is now movement of instrument pen or pointer.
TEMPERATURE MEASUREMENT BY RESISTANCE THERMOMETERS.
Introduction:-
Let us take a certain length of thin platinum wire and immerse it in a bath whose temperature is maintained at 32°F. We can measure the electrical resistance of this wire by connecting this to an accurate "Ohmmeter" as shown in the sketch. Let us presume the ohmmeter reads 100 ohms at 32°F.

Now. if we heat the bath by means of a burner and increase the temperature of the bath. As the temperature of the bath is gradually increased the ohmmeter reading also gradually increases. When the temperature of the bath increases to 33°F ohmmeter will read 100.22 ohms, at 34°F, it will read 100.44 ohms and at 62°F, it will read 104.5 ohms and so on. For each degree temperature increase, the resistance also increases by 0.22 ohms.
When the bath temperature again cones back to 32°F, the ohmmeter will read exactly 100 ohms. Thus we find the relationship between the resistance and the temperature is stable and exactly " reproducible".
Temperature Co-efficient of Resistance:-
The amount of resistance change per degree change of temperature of a particular wire is defined as its temperature co-efficient of resistance. If the resistance of the wire increases with increase in temperature, then the wire is said to have positive temperature coefficient of resistance. Certain semiconductor material like "thermistor" is having negative temperature coefficient of resistance (Thermistor resistance decreases with increase in its surrounding temperature. Thermistors also are used in low temperature measurement and control, as well as in temperature compensation network).
Resistance Bulbs:-
Industrial Resistance Thermometer Bulbs usually contains ether copper, platinum or Nickel wires.
Platinum Resistance Thermometers:-
Platinum has been chosen as the resistor material for high accuracy standard thermometers. The precision platinum resistance thermometers is used to define the international Temperature scale from -182.97°C ( boiling point of oxygen) to 630.5°C (melting point of antimony) and -297.3 to 1167.9°F).
In the standard precision platinum thermometer bare platinum wire of highest purity is used. The platinum wire is wound non-inductively over a Mica former. The protection tube used is made up of Pyrex glass. The leads are insulated with glass tube and mica spacers. But in an industrial thermometers and leas are insulated with ceramic tubes or beads and protecting wells are metal tubes.
Platinum has got the following advantages over other materials:-
1. The relationship between resistivity and temperature is very simple, it holds over a wide temperature range.
2. Its resistivity is relatively high.
3. Its temperature coefficient of resistivity - i.e. change of resistance per degree change in temperature - is satisfactory.
4. Physically it is very stable.
5. It is resistant to corrosion.
6. It can be stress relieved by heating to high temperature in air.
7. It cab be drawn to very fine wires.
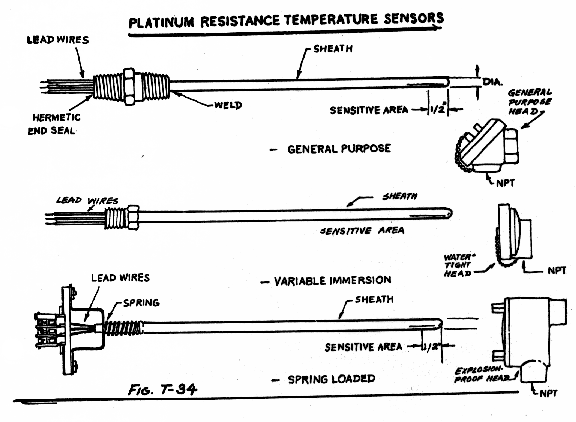
Platinum however is subject to contamination by reducing atmospheres and metallic vapours and hence they have to be suitably protected. Various kind of platinum resistance temperature sensors are shown in figure T-34.,and a typical assembly of Ressistance Thermometer is illustrated in Fig.T-35
NICAL RESISTANCE THERMOMETER:
Nicel wire has beenused satisfactorily as a resistance thermometer material. Its low cost as compared with standard platinum thermometer has been the determining factor in its adoption for industrial temperature measurements from -75 to + 150°C) (-100 to 300°F). It is less stable in its characteristics than platinum. The upper limit is imposed by the materials used in insulating the nickel wire - (enamel, silk or cotton).
Copper Resistance Thermometers:-
The temperature co-efficient of copper is slightly greater than that of platinum. It can be secured commercially in a pure state, so that it is not difficult to match an established temperature resistivity table. The resistivity temperature curve is straight within narrow limits from about - 60 to +400°F. That is, for copper the curve becomes RT=Ro(1+AT). Because of this linear characteristic two copper resistance thermometers cab be used for temperature difference measurements with high degree of precision.

Disadvantages:-
a. Its tendency to oxidize at higher temperatures.
b. Its low resistivity compared to platinum or nickel.
c. Its windings must be of fine wire to avoid massiveness and consequent slowness in response to temperature changes, if it has the same resistance as platinum or nickel thermometers. Typical characteristics of various resistance thermometers are given in the table below:-
TYPICAL CHARACTERISTICS OF RESISTANCE THERMOMETERS
|
NOBLE METAL PLATINUM |
BASE METAL |
||||||
|
Precision |
Industrial |
Copper 10 ohms |
Copper 100 ohms |
Nickel 100 ohms |
|||
|
1. |
Sensitivity |
0.1 ohm/°C |
0.22 ohm/°C |
0.22 ohm/°F |
0.22 ohm/°F |
0.186 ohm/°F 0.213 ohm/°F |
|
|
2. |
Precision |
0.001°C |
0.3°F |
0.1°F |
0.1°F |
0.1°F |
|
|
3. |
Accuracy |
±0.01°C |
±3°F Std ±1.5°F Special |
±0.5°F Std ±0.2°F Special |
±0.5°F Std ±0.2°F Special |
||
|
4. |
Response -bare w/well |
15 sec. 30 sec. |
20 sec. 60 sec. |
40 sec. 90 sec. |
40 sec. 90 sec. |
||
|
5. |
Resistance |
25.5 ohms at 0°C |
25 ohms at 32°F |
10 ohms at 77°F |
100 ohms at 77°F. |
100 ohms at 77°F |
|
|
6. |
Range |
452.2 to 1166.9°F (-269 to 630.5°C) |
-352 to 1000°F (-200 to 590°C) |
-100 to 300°F (-75 to 150°C) |
-325 to 300°F (-200 to 150°C) |
-100 to 300°F (-75 to 140°C) |
|
Measurement of temperature using Resistor bulb Thermometers:-
In industrial applications, Resistor bulb (Primary sensor) is used in conjunction with a measuring circuit known as a "bridge". Wheatstone bridge is the most common type used in Industrial resistance thermometers.
A Basic Approach To Whetstone Bridge :- (Fundamental Principle)
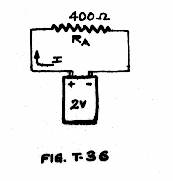
Let us consider a piece of Resistance wire (RA) of 400W value, connected across a 2 volts battery source (E). The current (I) drawn from the e. m. f. source cab be calculated from the simple Ohms' law:
Current = Voltage .
Resistance
= 2 Volts .
400 ohms
= 0.005 Amperes or 5 milli amps. (5 mA).
Now let us consider the case when two Resistors R1 and R2, each having 800W value respectively, are connected in parallel across the 2 volts e.m.f. source.

Such a parallel combination will still draw 5 ma current from the source because the equivalent resistance (Req) is 400 ohms.
The equivalent resistance for a parallel circuit is calculated as below:
Req = RaxRb
Ra+Rb
= 800x800
800+800
= 400 ohms
But the current flowing in the two branches will split as shown in the sketch T-37. In the above case, as the two branches have equal resistive values (Ra=Rb=800 ohm),
the current of 5 ma will devide equally into the two branches i.e 2.5 ma will flow in each branch.
But what will happen if the values of the Resistors in the two branches are not the same ? Let us consider such a case :
Suppose Ra = 600 ohm and Rb = 300 ohm, connected in parallel across the 2 volts emf source.
Then the equivalent resistance acting across the source will be
Req = Ra x Rb = 600 x 300 = 200 ohm
Ra + Rb 900
Thus current (I) drawn from the source = 2 Volts = 10 ma
200 ohm

Now let us find out the ratio in which the 10mA current will divide in the two branches. There cannot be an equal flow because RA and RB are different.
The ratio of current flow to the resistive values of parallel circuits is as per the following formula:-
IA (Current Flow in branch A) = I R B .
RA + RB
= 10 x 300
300 + 600
= 10 x 300 = 3.33 mA.
900
Similarly, IB (Current Flow in
branch B) = I. RA
RA + RB
= 10 x 600
300 + 600
= 10 x 600
900
= 6.66 mA.
And therefore, I (Current drawn
from the source) = IA + IB
= 3.33 + 6.66
= 10 mA.
Resistance RA of 600 W is also the same as joining two Resistance's R1 = 400W and R2 = 200 W values, in SERIES.

Thus we cab substitute R1 = 400W and R2 200W for RA and similarly R3 = 100W and R4 = 200W for RB, thereby forming a four resistor network, as shown in Figure T-40.
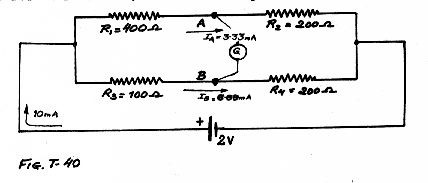
As there is a difference in current flow in the two branches there will be a potential difference across points A and B. A galvanometer (G) connected across these two points will deflect indicating current flow from B to A.
The galvanometer will indicate " Zero" only when equal currents flow through the two branches or in other words, when there is no potential difference across A and B.
How to achieve this " Zero deflection" condition?
Let us look more closely to the Resistor R1 (Fig. T-41a). we cab replace it with a variable resistor RV. , such that any value From 0 to 400W can be obtained by sliding the contactor S, as shown in Fig. T-41 (b).

Let us adjust the slider S to such a point such that only 100W are offered in the circuit. Now reviewing the bridge-circuit, we find the branches are balanced. (See Fig. T-42). Now, in this case, total resistance of Branch A = Total resistance of branch B.
or RV + R2 = R3 + R4 or RA + RB = 300W
Thus, equivalent resistance connected across the e. m. f source,
Req = RA x RB = 300 x 300 = 150W
RA + RB 600
Thus current I = 2v = 13.33 mA.
150W

And current flowing through branch A will be :
IA = I. (R3 + R4)
(RV + Rz + (R3 + R4)
= 13.33 . 300
300 + 300
= 6.66 mA, and similarly
IB = I. (Rv + Rz)
(Rv + Rz ) + (R3 = R4)
= 13.33 . 300
600
= 6.66 mA
As IA = IB, potential drop across A and B are exactly equal and hence we will observe " ZERO" deflection in the galvanometer.
The bridge-network formulated in Fig. T-42 is known as a simple " Wheatstone" Bridge. Such a bridge is used in industrial Resistance Bulb thermometry.
The resistance R3 is nothing but the resistor bulb (as shown in Fig. T-34 and T-35 ) which senses the temperature. As the temperature varies, its resistive value also changes and in order to achieve "Zero" deflection, the slider "S" of the variable Resistor RV is adjusted.
The resistance arm RV is directly calibrated in terms of temperature.
AUTOMATIC COMPENSATION FOR ERROR DUE TO AMBIENT TEMPERATURE CHANGES

Suppose we want to measure the temperature of a process fluid flowing inside a pipe line, which is located a few kilometers away from the Control Room. Let us insert one resistance thermometer bulb inside the pipe line and connect this bulb to the measuring bridge by means of two copper wires (b) and (c), which are routed through different plant locations, at different temperatures, before reaching the control room. The resistance of the inter connecting wires normally made up of copper, also changes due to the temperature variation of the surroundings. Let us assume that effective resistance offered by the lead wires b and c under

equal to that of either "b" or "c". Also as the compensating lead "a" is routed through the same path, this is also subjected to ambient temperature changes. And hence any change in lead wire resistance of "a" due to ambient temperature variation would be exactly equal to the resistance change of lead wire "b".
As the lead wires "a" and "b" are included in the opposite arms of the Wheatstone bridge, any resistance change due to ambient temperature variation will be automatically cancelled and the bridge will indicate only the changes in resistance of the thermometer bulb, which in turn is the rue indication of the process temperature.
BALANCED WHEATSTONE BRIDGE:-
Refer pages T-35 to T-39 for principles of temperature measurements by automatic null balancing with thermocouple transducers. Similar null balancing principle is used with resistance thermometer sensors also for indicating and recording the process temperature. Figure T-46 shows a typical whetstone bridge network, where the resistance thermometer (which may be a coil of nickel , platinum or copper) is connected to one arm of DC bridge circuit. In the opposite arm there is a variable resistance in the form of a slide wire. Variations in the process temperature cause a change in the resistance sensor and unbalances the bridge network. The error signal appearing in the form of a DC potential at AA, is converted in to AC and amplified to drive the balancing motor in the proper direction to re balance the bridge. The balancing motor shaft is connected to the pointer and pen to indicate and record the temperature.
Various different temperature regions, as shown in Fig. T-43, is 10 ohms. Now let us suppose that the process temperature remaining constant (500°C), the temperatures of different plant location vary. (Fig. T-44)m thereby raising the effective resistance of lead wires b and c form 10 ohms to 15 ohms.
The measuring apparatus in the control room will read 5 ohms more and we will be under the impression that the process temperature has increased even though it has not at all changed. This error should not occur because what we want is that the measuring apparatus (bridge) should indicate only the resistance change of the thermometer bulb (R3) and not to detect the lead resistance due to ambient temperature changes. Two achieve this, one more compensating lead is used, as shown in Fig. T-45.

In the sketch T-45 we can see three leads connecting the resistance element to the measuring instrument. The lead " a" is the compensating lead whose length and dia are exactly same as leads b, c.
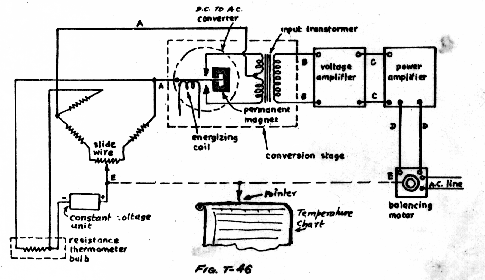
It may be noted that thermocouple by itself cab generate D.C. millivolt signal proportional to change in process temperature, where as a resistance thermometer requires external power (constant zener regulated D.C. power supply) to do the same job. The lead resistance changes due to ambient temperature variation is not compensated in thermocouple installation, where as this is fully compensated in the resistance bridge method of measurement.