

Well, it's been a month (June, 99) since I first introduced my homemade Aragorock into my 60 gallon reef aquarium and I am seeing coraline algae spots all over the rock. How I got this to occur was I took a large piece of fiji coraline incrusted rock and broke it into small pieces. I then placed the small fragments all around the rock and made sure that my calcium,alkalinity, and strontium levels in my water were in check the entire time. I run my metal halides for 6 hours and my VHO attinic's 12 hours each day. I have found over time that coraline algae grows the best in low light conditions. Since my attinic's run for 6 hours without the halide lights on (two hours prior and 4 hours after), it has provided the coraline algae with the proper low light intensity to grow.
If you are just starting up an aquarium and are considering using aragorock (which I suggest strongly that you do), run you attinic's for 14 hours straight without using any other type of lighting and you should notice coraline algae growth on your Aragorock within a couple of weeks. Eventually, my aragorock will be completely covered with purple and pink coraline algae. I am sorry that I cannot provide you with a picture of this at this time as my digital camera is a relatively cheap one with no zoom and the pictures keep coming out clowdy. Once the coraline algae growth becomes substantial, I will be sure to include pictures of this.
It's kind of funny but recently I decided to upgrade the skimmer on my 60 gallon reef aquarium to a Reef Devil 40 down draft skimmer made by E.T.S. I wanted to suspend the skimmer about 6 inches from the bottom of my sump since the out take tube on the skimmer is only about 3 inches from the base and I wanted to maintain a certain water level within my sump that would not be attainable (the skimmer would not function) without the skimmer being suspended. After a few minutes of thinking how I was going to accomplish this, it hit me. Why dont I just use a couple of large Aragorock caves. I did so and it has worked great for me. Not only does the Aragorock suspend my skimmer and keep it firmly in place, it provides additional surface area for beneficial bacteria to grow. Go Aragorock!
Making your very own Aragorock is a very fun and educational experience. I’ve been making Aragorock for the last 1 ˝ years and have come up with some very interesting while reef friendly shapes and sizes. I use Aragorock in all of my reef aquariums because they provide for greater water circulation than most of the harvested live rock that comes from the ocean. Also, they provide your reef with a very small footprint which prevents detitrus from building up and the fish just love to swim through and hide in these rocks.
To get started, fill your 20 Gallon Rubbermaid Container Ľ to ˝ way with aragonite gravel. You do not absolutely have to use a 20 Gallon Rubbermaid Container. Any sort of relatively large container will work. I like the 20 Gallon container because I can make several rocks per container. Once your container is filled Ľ - ˝ full with aragonite gravel, moisten the gravel with water in order to get the gravel ready to mold. The trick here is to moisten the aragonite gravel enough to easily mold into the shape(s) you desire. Also, when it comes time to cover your newly formed rock with aragonite gravel, the wet gravel helps the loose gravel to stick to the rock ( I will explain about this in detail later on in the article.
By doing so, it camouflages the cement that is used to hold the foundation of your rock together. Most of the time, I will cover the newely formed Aragorock with an old thick book to help ensure that the loose gravel sticks to the rock.
Make sure that you don’t cover the mixing container when the Aragorock is drying so that you don’t create moisture within the container which will prevent the rock from drying. Also, let your rock dry for about one week in a damp free environment prior to placing the rock in freshwater for curing. This will help to ensure that your rock is completely dry prior to starting the curing process.
Once you’ve moistened your aragonite gravel, you are ready to make your Aragorock mold. You should now decide (if you haven’t already) what type of rock(s) you want to make. I like to make 2-3 different types or Aragorocks in one session. Next, construct your mold for shaping your Aragorock formula. Use your creativity here. Design your mold so that your rocks have a small footprint. This will help to ensure that you have sufficient water movement throughout your entire aquarium.
Once your mold is formed, you are ready to mix your Aragorock formula. I like to mix my formula in the following ratio:
Also, clean your mixing bin after each mixing session so as to keep it clean and debris free. If you don’t, you may get excess mortar fragments mixed in with your new aragonite mix which could make your rocks look very unnatural. Use some sort of measuring device to ensure that you get the proper mix of aragonite, oyseter shells, and cement. Having the right combination is very important to ensure that your rock not only look natural but also are rugged enough so that they don’t fall apart.
Once you’ve thoroughly mixed your Aragorock formula, begin to pour the formula slowly into your tightly packed mold. I like to use my hands for this to ensure that my Aragorock formula is evenly poured throughout the mold and that the mold stays tightly packed. Let the rock dry for 48-72 hours prior to removing your rock(s) from the sand.
Finally, you need to cure the rock(s) for 30 days prior to introducing them into the aquarium. I use a 30 gallon Rubbermaid container for this. I carefully place the rock in the container and fill the container with fresh water. I use a Rio 600 powerhead to provide water circulation throughout the entire container. I change the water in the container at least once a week so that the rocks will cure faster. Once your rock(s) are fully cured, you are ready to place them into the aquarium.
Making your own rock is not only beneficial, it is also a lot of fun. Prior to constructing your own live rock, measure the width of your aquarium to ensure that you don’t make your rock either too big or small. Eventually, this rock will be covered with corraline algae and reef inhabitants. Once this has been accomplished, I will post an updated picture of this piece of rock.
I like using cave rocks in my aquariums since water can easily circulate through the cave thereby helping to ensure that my reef inhabitants are receiving the proper amount of water movement. Also, notice that the rock is pitched at an angle. This is to help ensure that I can provide light to my reef inhabitants anywhere on the reefs surface.
Eventually, this rock will be covered with reef inhabitants. I cure my homemade aragonite rocks in freshwater for 30 days prior to introducing them into my reefs. I change the water at least once a week. This allows the rock to cure faster.
I let the Aragorock cure for about a month prior to introducing the rock into the aquarium. Frequent water changes will cut down on the time needed for the Aragorock to fully cure.
When you first start to cure the Aragorock, you will notice that the water will become very clowdy after 24 - 48 hours. This is cement particles detatching itself from the rock. Don't worry about this. It will not cause the rock to crumble. A good indication that the rock is fully cured is when you have had the rock soaking for about 3-4 day after a water change and the water appears crystal clear.
Have fun with this project. Report back on your success. As I create new and interesting Aragorock shapes, I will post them on this page for hobbyists to replicate.
This is a picture of the Aragock being used to suspend my Reef Devil 40 downdraft skimmer. The Aragorock does an excellent job of holding the skimmer in place. Take the plunge! Start making your own Aragock. You'd be suprised of all the benefits Aragorock brings. The Coral Guy. 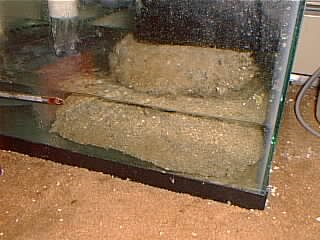
To make your own Aragorock, you are going to need the following materials:
I purchase my Caribsea Florida Crushed Coral at my local aquarium store. I get my oyster shells from our local beach. If a beach is not readily accessible, find a restaurant that sell either oyster or clam and ask them if they will save the shells for you upon discarding them. If this doesn’t work, find someone who likes either oyster or clam and have them over for dinner. To crush my oyster shells, I put a bunch of shells in an old pillow case and hit the pillow case with a hammer several times until the oyster shells are on average about ˝ the size of a dime. I bought the Portland cement, and the 20 gallon Rubbermaid containers at my local Home Depot The measuring cup that I use is nor more than a normal 32 ounce plastic cup. You can use any size cup. You just need to make sure that you mix your formula in a certain ratio (I will explain later in this article).
This is a picture of one of the containers that I use to form my homemade aragonite rocks. This particular container is a mortar mixing bin I purchased at my local home depot. These container cost me around $5.00 Once the rock is formed the way that I want it, I cover the entire rock with loose aragonite gravel. 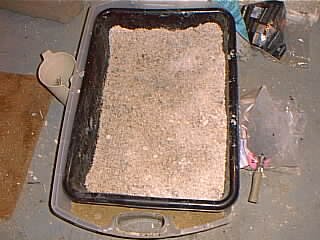
It is ok if you want to change the ratio of oyster shells to Aragonite gravel however, do not change the ratio of cement and water. This may compromise the stability of your Aragorock. Once you’ve added your ingredients into your mixing container, thoroughly mix the ingredients so that the cement is completely wet along with the cement being mixed thoroughly with the oyster shells and Aragonite gravel.
This is a picture of the plastic mixing bin that I use to mix my aragonite formula for making my homemade aragonite rock. I purchased this plastic mixing bin at my local home depot for around $5.00. You can use just about anything to mix your aragonite in. Just make sure that your mixing container is clean prior to adding your aragonite. 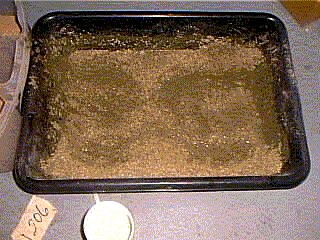
This is a picture of one of the aragonite table rocks that I used within my 60 gallon reef aquarium. As you can see, this picture demonstrates the extremely low footprint of this rock. All of the rock that I am using within this reef have a similar bottom to ensure that I get strong water movement throughout the entire aquarium. This helps to prevent detitrus from building up.
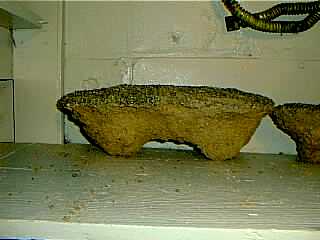
This is a picture of one of the cave rocks that I made. As you can see, the rock is standing up on its own without it having to lean against anything. This is accomplished by building small one small leg on the bottom front of the cave and two small legs on the bottom back of the aquarium. 
This is a picture of the Aragorock curing in a 30 gallon rubbermaid container filled with fresh water. These containers are readily available at your local home depot. I place a small powerhead at the far end of the container to provide water circuation throught the container.

Please e-mail me your comments/feedback on this site