
Do it Yourself

Do it yourself project - Attemp this project at your own risk
Do it yourself project - The following article is for informational purposes only.
About a year ago, I purchased a dual 55 watt power compact lighting setup (retro fit - Hamilton) from the internet for $165.00 + shipping and handling. At the time, I thought that this was a great deal. About a month ago, I decided that I wanted to keep Small Polyp Stony (S.P.S) corals in my 37 gallon reef aquarium. I experimented with a couple of frags and was unsuccessful. After testing my water and deciding that I had adequate water circulation, I decided that I needed to increase the lighting wattage in this aquarium in order to house these inhabitants. As a result, I decided to purchase another duall 55 watt power compact set up so I could increase the wattage on my 37 gallon reef aquarium from 110 watts to 220 watts. Remembering what I paid for the original dual 55 watt power compact setup, I decided to do my own research and see whether I could purchase the components separately and save money.
I started out by calling electric supply houses to see what type of ballast I needed to power dual 55 watt power compact lights. After calling around to a few shops, I was told that I could use a ballast manufactured by Advance Transformer Co. model number REL - 2TTS50. I called Advance to verify this ballast would fire up two 55 watt power compact lights and they said that the shop was correct. With this good news, I purchased one ballast from the shop for $25.00. It was near my house so I saved on shipping and handling. If you would like to order this ballast from them, they are called Cooper Electric and their phone number is 1-(201)-385-7777. They had to special order the ballast from the manufacturer. It took about a week for the ballast to arive at the shop.
While I was waiting for the ballast, I went and ordered the lights, sockets, light clips, and reflector. I purchased one daylight bulb and one attinic 03 from Hamilton Lighting. I decided to continue to use Hamilton bulbs since I already had two on this aquarium and they have worked great for me in the past. They Cost me $27.00 each. If you shopped around, you could probably find them cheaper. If you do, please let me know. I found out after doing research on the web that these bulbs are made by Osram/Sylvania. The power compact lights made by Custom Sealife are made by Panasonic. While the Panasonic bulbs will work with the Advance ballast mentioned above, you will need different sockets since the pin configuration on this bulb is different then the Osram/Sylvania bulb. I ordered water proof sockets from Hamilton for $3.35 cents a piece. I've read stories on the web where Custom Sealife will sell you water proof sockets (2) for $23.00. This should be a crime. Finally from Hamilton, I ordered two metal light clips to affix the bulbs to my reflector. The sockets are the screw in type however, the bulbs are somewhat long and you need a means by which to attach the far end of the bulb to the reflector to prevent the bulb from coming out of the socket easily. These clips were around $2.00 each.
Finally, I needed to purchase the reflector. After many hours research, I decided to use 1/8 inch mirrored acrylic manufactured by a company called Acrylite. Most people don't know that mirrored acrylic exists. It is excellent for reflecting light. I purchased a 13" x 28" piece for $12.00 from a company called FARCO plastic supply located in Hackensack NJ. telephone number 1-(201)-444 . To affix the mirrored acrylic to my existing canopy (made from acrylic) I purchased a tube of Weld-On 16 glue which cost me $5.00. If you are using a wood or metal canopy, you can bolt the acrylic to your canopy.
Once all of the parts arived, It was time to assemble the lighting. Below I have listed a diagram obtained from Advance lighting corporation that shows how the ballast should be wired to the sockets (Note: If you choose to use a bulb other than Hamiltons that has a different pin configuration on the bulb, the wiring diagram will change. You will need to consult with Advance in order to ensure that you are wiring the sockets properly.
That is all that there is to it. Please e-mail me with any questions that you may have. Remember, this advice is being given for informational purposes only. Implementation of this project is being done at your own risk.
Regards,
The Coral Guy (See pictures below)
| This is the picture of the Lexan Mirrored acrylic that I purchased from a local plastics dealer which I used as my reflector. It came with a plastic protective film over the mirrored side (pictures taken with the plastic protective film still on the Lexan) to protect the mirror from scratching while working with the Lexan. |  |
Once I glued the Lexan to my acrylic canopy and installed the light sockets and bulb clips, I removed the plastic film and inserted the bulbs into the sockets. Once this was done, I was ready to use my new power compacts .
The mirrored Lexan works extremely well for
reflecting light back into the aquarium. I am really suprised that more hobbyists have not
yet caught onto this idea as an effective, inexpensive means for a light reflector. My feeling is that it is only a matter of time until mirrored Lexan becomes more popular in the hobby
| This is the picture of the Advance ballast that I am using to power 2 55 watt power compact lights on my 37 gallon reef aquarium. I purchased this ballast at a local lighting distributorship for $25.00 (Cooper Electric in Bergenfield, NJ.). | 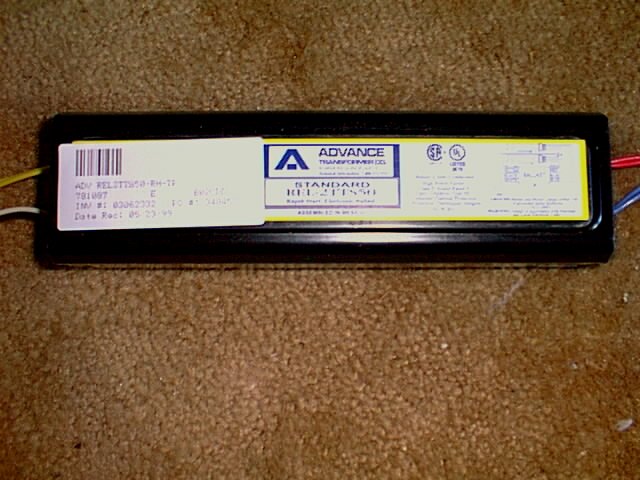 |
The ballast came with instruction on the top of the ballast on how
to wire the ballast wires to the bulb sockets. Remember, this is a do it yourself project and you are attempting this project at your own risk. This entire do it yourself project is for informational purposes only. You should consult and use a licensed electrician to wire this light setup for you.
If you want to use CLS bulbs instead of
Hamilton, the ballast should work however you will need to use a different type of socket
since the pin configuration at the base of the CLS bulb is different than Hamilton's. I've
read articles on the net that the CLS sockets cost around $23.00 a pair. Alot more
expensive than the two Osram/Sylvania sockets that I bought for $6.70.
I'd be interested to hear if you were able to purchase these bulbs
from a lighting store for much less. I've heard of hobbyists trying in the past to
purchase these bulbs in lighting stores and in every case were unsuccessful in doing so.
The bulb clips are absolutely necessary in order to properly mount the
lights to your canopy. The sockets have mounts on the bottom of the base which makes it
very easy to use screws to mount the sockets to your canopy.
This is the picture of the two 55 watt power
compact light bulbs that I purchased from Hamilton
Technologies . One is a 6100 55 watt daylight bulb and the other is an 7100 55 watt
attinic 03. They cost me 27.00 each. Please take note that CLS power compact bulbs will
not work with the osram/sylvania sockets that I talk about in this article.

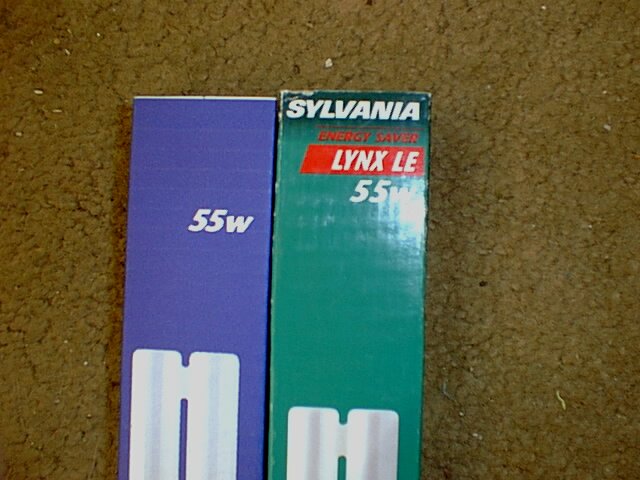
This is the picture of the package that the
Hamilton bulbs come in. As you can see, these bulbs are made by Sylvania. I've heard from
more than one hobbyist that Hamilton commissioned Sylvania to make these power compact
ligts for them and that Hamilton probably has an exclusive contract with Sylvania to
produce these bulbs.
This is the picture of the bulb sockets and clips that I purchased from Hamilton Technologies .
I purchased two of these bulb sockets from Hamilton for $6.70 and the clips for around
$2.00 a piece.

Please e-mail me your comments/feedback on this site