How to make your own paint grenades
I have spent a long, long time researching paint grenades. I have spent an equally long time
surveying peoples experiences of using paint grenades. Paint grenades fall into two basic
categories: explosive, and "splatter". Explosive grenades use a small charge, usually no larger
than a firecracker, to break open a paper shell and spew out the paint contents. They are usually
lit with a fuse or use a pull-pin.
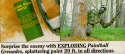
The picture above is an example of one of these (model is the M-69). The paint tends to fly out
in sloppy chunks, (observe orange splots on tree in above photo) if it flies out at all,
due to the fact a distressing number of grenades tend to be duds. The grenades that I know of
that fall into this category are: the M-69 made by Strange Ordnance; a grenade made by Enola
Gay (brand name unknown); and a grenade made by Pro-Line (brand name unknown). Of these,
the only one used extensively is the M-69, which is odd seeing as how it has the greatest overall
failure rate. Now let me interject the final word here about explosive grenades: I DON'T LIKE
THEM. The reason they set me on edge so much is twofold. One, I don't care how small the
charge is in the grenade, it is still an explosive, and as such threatens everyones safety, including
your mask and goggle system. Two, paintball still labors under a negative public image. I'm not
helping matters admittedly by encouraging a "scale-model wargame" atmosphere with my ideas
and plans, however my point is; if the public at large hears about us tossing EXPLOSIVE
materials at each other, it's all over, all of it. Strange Ordnance are you paying attention? I admit
these grenades are fun, the go boom, hell I want to play with one. But they don't, repeat don't
engender a safe atmosphere. Okay, that's off my chest. Now on to the good stuff!! Okay, where
was I, the second category of grenade is the "splatter" kind. Grenades which fall into this
category are: the SquadBuster by Tippmann (which is pictured in the photo at the top of this page);
 :
:
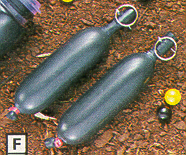
the Little Betty (manufacturer unknown but is pictured above); the
grenade which you will be making here; and water balloons. These type of grenades rely on paint
under pressure to hurl their contents onto targets. So let's begin shall we?
Materials needed: A section of 1/8" rubber tubing about a foot long. (available at hose supply
stores, medical supply stores, or chemistry supply stores.) Alternately, you could use a used
SquadBuster.
A plastic clip tie
A large syringe ( if you don't have medical friends, you can find syringe like
"emergency pumps for basketballs" in your local sporting goods store)
Some paint (either boiled down paintballs or childrens washable non-toxic paint
A pair of hemostats
Some ball bearings of slightly larger diameter than the tubing (you can find these
in your hardware store)
Some cotter pins
Some alcohol
A rubber band (optional)
A target
1) Take the tubing, and cinch it down tight in the middle. If you want to make smaller; Little
Betty type grenades, use only a six inch length and tie off one end of the tubing. If you're using
an old SquadBuster, this is already done for you.
2) Fill the syringe with the paint mixture and inject it into one side of the tubing. Leave about 2 to
2.5 inches at the top empty.
3) Before you remove the syringe, crimp off the tubing below it with the hemostats. The filled
section of tubing should look like a hotdog.
4) Lubricate one of the ball bearings with the alcohol and insert it into the tubing above the
hemostats. If you still have the cap from the SquadBuster, just fold the tubing tip over and place
the cap on.
5) Insert one of the cotter pins above the ball bearing, through the tubing. Or place the old
SquadBuster pin through the hole in the cap. Leave the hemostat on until the alcohol dries.
If you are making a Little Betty type grenade, you are now done.
6) Take the other empty side and repeat the process, except use the same cotter pin to hold both
bearings in.
7) If you want the grenade to have maximum area coverage with a smaller paint coverage, simply
leave as is. However, if you want maximum paint coverage put a weak rubber band around the
grenade. The theory being this: When you pull the cotter pin out and throw the grenade, the non-banded kind will fall apart, pointing in two different directions. The banded kind will however,
spray a greater amount of paint at a specific area. However, both types will spray in a radius
because the release of pressure will make the hose tip wag around.
I have tested one of these, they do work, and expect about a 5 to 6 foot spray radius. Remember
VERY IMPORTANT: get a good arc on these or try to throw it at something hard (like a bunker
right behind your target) because you need to get enough pressure when it hits to push out the
bearing (or knock off the cap). Conversely, after you have pulled the pin, DON'T squeeze the
grenade or you will get very, very messy! Also, after you pull the pin, if you notice a small
amount of leaking paint, throw it quickly or it will blow soon! And this should be the final result:

So there you go folks, hope you enjoy it. If you try this out, email me an let me know your
results or send me some pictures. I am also interested in anyone using these as cannon or mortar
ammo! Please let me know if you try this! Thank you all and happy painting!
All the above photos with the exception of the pics of the M-69 and the
Little Bettys, are courtesy of The Cimmerians
make sure to drop by and check out their page!
I now have my first review of the peformance of these grenades!:
I have made and tested one of your homebrew grenades and I am greatly
pleased. Myself and several members of our team are working to arm
ourselves with thess lovely little toys. Thank you for posting such useful
information.
Sir Davicus of the Gray Knights
This page has been visited  times.

 :
: