|
[d r a w i n g] faces
 [Anime] and manga characters are known for their interestingly styled faces, with large expressive eyes. This tutorial will help you understand how this system works. [Anime] and manga characters are known for their interestingly styled faces, with large expressive eyes. This tutorial will help you understand how this system works.
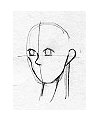
[A] primary problem faced by many artists (including myself) is that the face should not be thought as a two dimensional object. This thinking leads to features "floating" on the surface of the head. You should understand that a face is a three dimensional image, which necessitates that you draw it as such, thus your construction lines should have a bit of curvature to them. For example: if you look at the image to the left, a practice sketch I did for the Nicki character from the impromanga Abaddon, I used faint construction lines on the face which "map" where the eyes, nose and mouth should go.
|
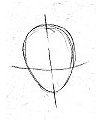
Step 1
[Sketch] in an oval shape to represent the face. The eye level is about half way down the head. The ears are normally situated at about the same place, but on most anime characters, they are small and sit beneath the eyes.
|  |
|
Step 2
[Add] eyes. Don't wory about adding the pupils yet - you just want to get the positioning right, you can add ears too at this point.
|  |
|
Step 3
[Stylisticaly] to keep things simple, an ordinary dot or line for the nose will suffice, with a triangular shape or a curved line for the mouth.
|  |
|
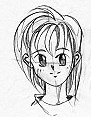
Step 4
[Note] at this point, that the face is about complete. At this point, one may add hair, eyebrows, blush lines etc. to finish the image.
|  |
|
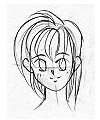
Step 5
[Now] add a bit of shading and you're finished! Stand back and admire your handiwork!
|  |
[Problems] can arise if construction lines are not used. My early work (never to be posted on line...) suffered from "facial feature floating syndrome". This is where the features moved around on the face and fell in unnatural places, making a generally bad image.
[You] will notice that the features of the face follow the curved construction lines. This helps prevent distortion when the face is pointing in any other direction than straight forward. The nose goes slightly below where the eyes are and the ears are positioned on either side of the "head" where the sides are intersected by the "eye line".
[Of] course, you needn't follow this guide exactly. You might start with a circle instead. You merely follow the same steps through to achieve a similar result. In general, the smaller the face, the cuter the result. Of course, stylistic changes, such as a sharper face or a shallower face also change the way your character looks.
[Male] faces are built the same way as their female counterparts with a few structural differences. Most of the time, it is inappropriate to give male characters the "wide eyed" look. I know this is sexist, but it's the way the "craft" goes. Male characters also normally have stronger jaw lines, although this is by no means universal. Here's a generic guy example:
|
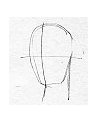
Step 1
[Sketch] in a blunted oval shape to represent the face. - This is not cannon, but i tend to give my male characters strongly defined jawlines.
|  |
|
Step 2
[Add] eyes, and other features.
|  |
|
Step 3
[Note] at this point, that the face is about complete. At this point, one may add the eyebrows, scars, eypatches, what you will, to finish the image.
|  |
|
Step 4
[Now] add the hair, and you're done!
|  |
|
[ up one level ]
Version 6.4 © 1998-1999 Studio Mica. Made with editPAD™
|