This tutorial will take you through a unique technique for creating a face in 3D Studio Max 1.2 (NOT NURBS)
You can also use this as a reference for 3D Studio.
I shall create half of the face to make teaching simpler.
To start with it is best to sketch a left profile of the face and use it as a background image.
But is not necessary.
So lets start with real stuff now:
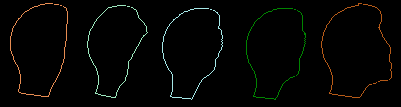
Create different cross-sections of the face as in the picture here:
Remember that all the splines should have the same number of vertices and in the process following, 1st vertex of a spline would join with first vertex of other splines. So we can control the horizontal shape of the face with the placement of vertices on the splines, at this stage only.
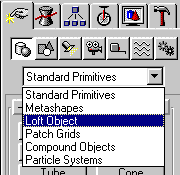
Create an arc - 180 degrees (half the circle). This will be used as a path to loft the above shapes on.
This is as follows:
Select the arc, and click on the "loft object " in the create tab
and then on the loft button.
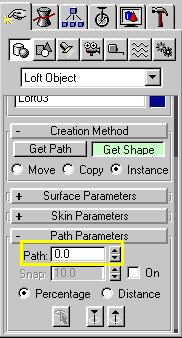
Now click on the get shape button and then click on the first spline (anywhere). This would place the spline on the arc and loft it along. It would be a good option to keep the perspective viewport in "smooths and highlights " shaded mode.You would see the lofted object in 3d.
Now change the path percentage to 5%(highlighted with yellow - also check the percentage option next to it)
again click on get shape button and click on the second spline. Immediately you would see the impact in the perspective viewport. Here we are just specifying different shapes at different levels of path, and the s/w would connect them all (1st vertex to first, 2nd to 2nd etc)
Repeat the same, changing path percentages, for all the shapes.
This is how my lofting looked
Horrible!! I won't pull all the verteces and put them in the right position. Well you don't have to. read on...
DO NOT check the skin checkbox in skin parameter drop down. This will keep our mesh visually simpler and easy to work on further. Just let the skin in shaded checked (as default is) so that perspective shows 3d object.
Now comes the true power of the software.
Select the lofted object and click on the modifier tab
The same settings as we had for lofting appear here ( well obviously).
( We can play a little with path steps in "surface parameters" to get smooth shape with least path steps - to have lower poly count).
Click on the sub object and select shape option. Now we can select any spline we lofted and "edit spline it" This way you can edit the spline in 3D. Above that the s/w will show the impact on the 3d model in real time. This is the reason I suggested that skin checkbox should not be checked as now we can edit spline very comfortably.
We can also keep a mirror "instance" of this object next to it to make a complete face and as we edit the spline of one , the effect is mirrored on the other as well and we can see the final complete face.
We can also add another spline at another level on the path.
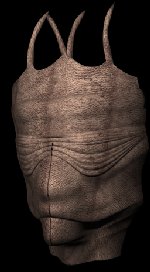
To give a more organic look (in case of aliens, animals especially) we can further use displace map. Just pick any bmp with good number of shades and texture, and use it as a displace map.
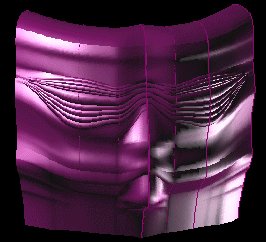
So here's what I achieved in 3D Studio Rel 4.0 (not MAX) from this technique.
As you can see this gives a little less flexibility then NURBS but is much simpler.
alokjain
All material on this website is covered under patent rights. Not for any commercial use/sale/copy.