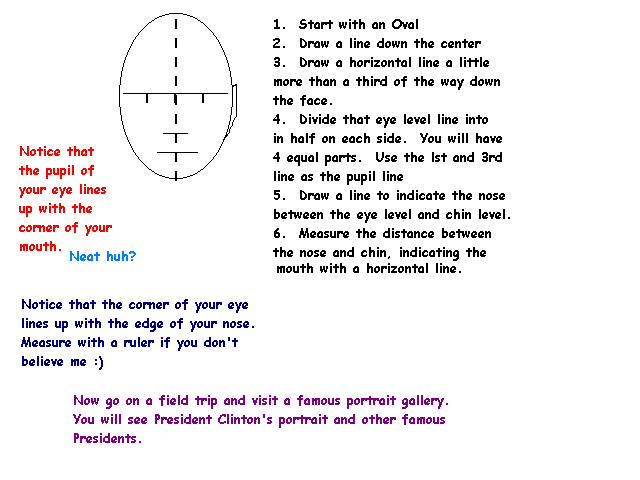
ART TEACHER ON THE NET
www.artmuseums.com

ART SKILLS

Here is another way to draw portraits.  Try the above model, this one,
and invent your own method.

Portrait Drawing
Facial Feature and Proportion Guide

Materials Needed

Paper
Pencil
Soft Eraser
Ruler

Instructions


First locate a person to serve as your model.  Draw a full frontal
face view of the person, date it, sign it, and lay it aside.  Now you
are ready to begin your portrait drawing lesson and you will have
this initial “before,”  portrait to compare your learning skills.
Step 1-Draw an oval.
Step 2-Look at your models face and see that if you drew an imaginary
line down the center your model’s face that it  would be symmetrial.
Indicate the symmetry with a line down the center of the oval.
Step 3-Draw a horizontal line at eye level and divide it into 5 equal
parts.
Step 4-Indicate with a horizontal line the placement of the nose
which is about halfway between the eyes and mouth.
Step 5-Indicate the placement of the mouth with a horizontal line.
You will probably find the mouth about halfway between the nose and
chin area.
Step 6-Go back to the line that you have drawn to indicate eye level.
At the second square and the fourth that you have drawn on the eye
level line, draw a small round ball to indicate the pupil area.
Now go to the fourth square and do the same.
Step 7-Using the small round circle as an indicator, drop a line
down to the mouth indication line.  The edge of the mouth will be
parallel to this line.
Step 8-Beginning at the inside edge of the corner of the eye, drop
a line down to the nostril area of the nose.  Indicate this line.
Step 10-Look at the top of the model’s ears,  you will find that they
are probably even with the pupil of their eyes, and the earlobes end
between the nose and lip line.  Illustrate this meeting with a line.
Step 11-Now use a black marker to retrace the lines that you have
just drawn.  Now you have a schematic for placing facial features
and proportion for future portraits.  Just lay the schematic
underneath your drawing paper next time you draw a face, and
you should see improvement in your drawing ability.

Remember this is only a guide.  Everyone has a unique face.
Observe you individual model and make adjustments in each portrait
you draw.

You can see portraits of all the American presidents from
Washington to Clinton, and learn about their lives at
http://www.npg.si.edu/

(c) Art Teacher on the Net, l998