"FIVE/ONE" Defensive Drills
I wish I had a secret formula to relate to coaches on how to build defensive determination, desire and pride in the team and in each player. But I do not. I believe the use of break-down drills helps players develop their defensive skills better than any other learning tool. Once a player has learned how to play defense correctly, sees the results and understands the role that defense plays in winning basketball games that determination, desire and pride will follow. It is human nature to take pride in the things we do well and receive positive results from. So players must be taught HOW to play defense correctly and effectively. The resulting pride of accomplishment will then bring out the determination and desire in each player to exhibit these skills.
Individual defense is a prerequisite of a sound defense. Coaches should develop their individual defense before they turn their attention to team defense. And we believe the best way to develop these skills is with the use of break-down drills. This is the opposite of our philosophy for teaching team offense.
Break-down drills can be made much more difficult than actual game situations that will be encountered. Making the defense easier in games than it is in practice. Also, break-down drills can be controlled more closely than scrimmages. Corrections can be made on the spot and the entire team can benefit instead of only one or two players because all players are working on the same area of skill development.
All of our break-down drills are actual maneuvers that happen in a basketball game. All we do is isolate the areas and work on them independently.
Periodically in our defensive break-down drills we stop and ask a player how his man or the man with the ball, can hurt him in this situation. I cannot prove that we are any smarter or more defensively aware from this. But it makes sense that is should increase a player's alertness and awareness.
Drills
INDIANA CONVERSION DRILL:
Play 5 on 5. On coach's whistle offense drops ball and becomes defense. Defense picks up the ball and becomes offense. Each new defensive player must pick up and guard a player other than the player just defending him. New offense attacks the same basket as previous offense.
CLEVELAND STATE CONVERSION DRILL:
Play 5 on 5. On coach's whistle offense drops ball and becomes defense. Defense picks up ball and becomes offense. New offensive team attacks the opposite basket from the one being attacked by the previous offensive team. New defense must sprint back to the lane and set up their defense. There are no restrictions on who the new defense can guard.
1 on 1 BASELINE DRILL (Diagram 17):
The offensive player (1)will start at the wing area (below the free throw line extended). The defender (B) will start in his help position (in the gap between his man and the passer). The passer will pass to 1, B will close out playing the baseline side. B's baseline foot is back to protect against the baseline drive. B's top foot is splitting 1's feet (if quickness between the two players dictates B may drop further toward the baseline). 1 attempts to drive the baseline hard. B must prevent the baseline drive.
2 on 2 BASELINE DRILL (Diagram 18):
One offensive player (1) will start at the guard spot with the ball. The other offensive player (2) will start at the wing area (below the free throw line extended). A will defend 1 stopping a direct drive to the basket. B is defending 2. B has 'jumped back to the ball', closing the gap between his man and 1.
1 will pass the ball to 2. (Before he makes this pass 1 may attempt to penetrate the gap between himself and B.) On the pass from 1 to 2, A will 'jump back to the ball', closing the gap between his man and 2. B will close out on 2 with his baseline foot back to protect against the baseline drive. 2 attempts to drive baseline. But 2 can also drive the middle.
VICTORIA 1 ON 1 FROM THE FREE THROW LINE DRILL (Diagram 19):
Players line up as shown in the diagram. All Xs are on the same team and all Os are on the same team. The first player in the X line under the basket will roll the ball to the first player in the O line at the free throw line. He will then close out and play 1 on 1. The same procedure is taking place at the other end of the court (with O on defense and X on offense). After a winner has been determined (offense scores a basket or defense gets the ball before the offense can score) X will go to the end of the X line at the opposite end of the court and O will go to the end of the O line at the opposite end of the court. The loser must run a bleacher before moving to his line at the opposite end of the court. We limit the number of dribbles the offense may use. A team score is also kept with the losing team running at the end of the drill. We will put ten minutes on the clock for this drill. The defense plays as to prevent a direct drive to the basket.
3 on 3 DEFENSE THE POST DRILL (Diagram 20):
The player line up as in the diagram. This is the same as the '2 on 2 Baseline Drill' except that we've added a post player. While the ball is on the perimeter the perimeter defenders play the same as in the '2 on 2 Baseline Drill.' When the ball is above the free throw line the post defender denies the pass into the offensive post man. Once a pass is made into the offensive post man, the perimeter defenders 'jump back to the ball', with the top defender executing a "SEAL". When the ball is passed out of the post the perimeter players recover to their man and continue playing perimeter defense.
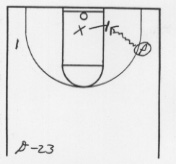
HELPSIDE DRILL (Diagrams 21, 22 & 23):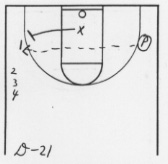

In this drill we will cover: "Close-Out"; "Defending the Flash"; and "Helping on the Drive from the Helpside". When first introducing the drill we will take each of these defensive concept seperately. Then we will work up to having the defense read the situation.
"Close-Out": The passer will make a skip pass to 1. X will close out and play the same as in our '1 on 1 Baseline Drill'.
"Defending the Flash": The offensive player (2) will make a direct cut toward the basketball. As soon as 2 starts his cut X will start adjusting his position. As 2 enters the lane X will be in a closed denial stance and will stay in this stance as long as 2 is in the lane. If 2 cuts behind X, X will execute a 'Head-Snap' and continue denying the ball to 2 in the lane.
"Help": X is in his defensive position, using his pistols. The passer puts the ball on the floor to drive to the basket. X must move over to stop the drive outside the lane.
1 on 2 DEFENSE THE CUTTER DRILL (Diagram 24):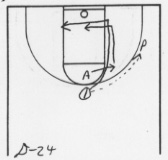
A is guarding 1 above the free throw line. A is preventing a direct drive to the basket should 1 dribble. 1 will pass to the passer. A will 'jump back to the ball'. A will make a basket cut. A will attempt to cut between the ball and A (inside the NBA Lane). A will square up on the cutter and at the 'line of the ball' stop giving ground and force the cutter to: (a) cut behind him, (b) charge over him, or (c) veer to the outside. In this drill we do not allow the offense to veer to the outside until the defender can accomplish either (a) or (b).
As the cutter (1)cuts behind A, A will continuously drop so that he can see his man and the ball. The cutter (1) will go as deep as the block and then move to the helpside block. A will then adjust himself in his helpside defensive position.
Should 1 cut between A and the ball inside the NBA Lane we do not want A to stay behind 1. We tell A that if something happens and he cannot get there first, to get there second BUT TO GET THERE!
1 on 3 DEFENSE THE CUTTER DRILL (Diagram 25):
This drill is the same as '1 on 2 Defense the Cutter Drill' except now the cutter may pass either direction and make his cut.
1 on 3 DEFENSE THE CUTTER ON THE SIDE DRILL (Diagram 26):
This drill is the same as '1 on 3 Defense the Cutter Drill' except that it starts with the ball below the free throw line extended.
PROPER DEFENSIVE POSITIONING DRILL #1 (Diagram 27):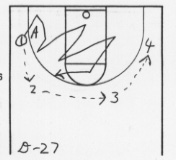
The drill starts with A defending 1, who has the ball, below the free throw line extended. 1 passes to 2, 2 passes to 3, 3 passes to 4, and these three players continue to pass the ball around the outside. At the same time 1 is moving randomly around the court. A must continuously be adjusting his position everytime the ball moves and/or his man (1) moves. The passers are not attempting to pass the ball to 1. We just want to see A's defensive positioning. We will vary the starting position of 1, sometimes starting him above the free throw line.
PROPER DEFENSIVE POSITIONING DRILL #2 (Diagram 28):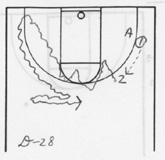
The drill starts with A defending 1, who has the ball, below the free throw line extended. 1 will pass to 2. 2 will now randomly dribble around the court. 1 will remain stationary. A will adjust his defensive position everytime the ball moves. Later we will allow 1 to randomly move around the court as 2 is dribbling. Again, we are only interested in observing A defensive positioning. 2 will not pass to 1. We will vary the starting position of 1, sometimes starting above the free throw line.
PROPER DEFENSIVE POSITIONING DRILL #3 (Diagram 29):
The drill starts with A defending 1, who has the ball, above the free throw line. We will have five other player spaced out over the court in perimeter positions. 1 will pass to one of these five perimeter players. The five perimeter players now randomly pass the ball around the court - we encourage skip passes. 1 will remain stationary, A must adjust his position according to the location of the ball. We will vary the starting position of 1, sometimes starting him below the free throw line extended.
4 on 4 SHELL DRILL (Diagrams 30, 31 / Diagrams 1 & 2):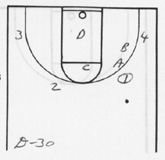
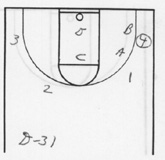
Offensive players will start in four perimeter positions (two above the free throw line and two below the free throw line extended). The offensive players will move the ball around the perimeter and stay in their positions. The defense will adjust their defensive positions on each pass. The next step is we keep the offensive players in their general positions but allow them to attempt to penetrate on the dribble while moving the ball around the perimeter.
4 on 4 HELP AND ROTATE DRILL (Diagram 32):
This drill starts the same as our '4 on 4 Shell Drill'. When the ball is passed to an offensive player below the free throw line extended a coach will step in and screen the defender guarding this man. In the diagram this offensive man is 4. 4 will then drive baseline to the basket. D must move over to stop the drive outside the lane, B will recover back to his man and double the ball, C will rotate down to the bottom of the lane to stop the pass to the opposite block area, and A will jump back to the ball in the lane.
After this portion of the drill has been mastered we allow the pass out of the double team and work on recovery.
4 on 4 SHELL PLUS TWO DRILL (Diagram 33):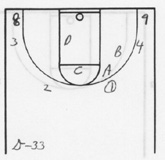
This drill is set up the same as our '4 on 4 Shell Drill' except we now have two additional offensive players - one in each corner. In the diagram A is guarding 1, B is guarding 4, C is guarding 2 and D is guarding 3. 8 and 9 are the two unguarded offensive players. The unguarded offensive players can only move once they receive a pass. When they receive a pass they drive hard to the basket. The defense must stop the drive and then recover when the ball is passed out (one unguarded player cannot pass to the other unguarded player). The offensive players move the ball the same as in the '4 on 4 Shell Drill' but they may pass at anytime to one of the unguarded offensive players in one of the corners - this can be a direct pass or a skip pass.
4 on 5 DEFENSIVE DRILL (Diagram 34):
We start this drill in the hands of the unguarded (5th offensive man) player. He can immediately attempt to penetrate the lane, or he can pass and cut through, pass and screen away, or pass and move in any way he chooses. The four defensive players must guard their assigned man while at the same time guarding the unguarded player preventing all penetration into the lane. All five offensive players can move in any manner they choose on the perimeter with cuts through the lane and post areas.
11 MAN DEFENSIVE DRILL (Diagram 35):
This drill start with the "11th Man" holding a basketball a few feet above the three point line (with the coach standing beside him). While the "11th Man" is standing holding the ball we play him as if he is being defended. Once he starts his drive to the basket (the coach will signal him when to start his drive by tapping him on the back) we play him as an unguarded player attacking the basket and rotate to stop his penetration into the lane.
While the "11th Man" is holding the ball, the other five offensive players are moving randomly around the court. Their defensive men must constantly adjust their defensive positioning.
We will vary the starting position of the "11th Man" but it will always be on the perimeter. We will also do the same drill but have only four offensive men moving and their four defenders or three offensive men moving and their defenders.
SEAL AND ROTATE DRILL (Diagrams 36 & 37 / Diagrams 5-15):

We will start this drill the same as '4 on 4 Shell Drill' with an offensive post player and a defender on him. We can require the offensive post man to always be ballside or to remain on the same side of the court. We execute the drill the same as '4 on 4 Shell Drill' with the addition of the offensive post player and his defender. Once the ball is passed into the post, we 'jump back to the ball' and the defender on the ballside top man performs a "SEAL".
We rotate out as described in Chapter Two.
4 on 4 SFA BOX DRILL (Diagrams 38-43):


Offensive players line up in a box (elbows & blocks) as shown. You will have two passers, only one of the passers will have a ball at a time. The passers can pass back and forth as the coach instructs. The offensive players in the box can move in any of a number of ways. The diagrams show only a few examples of the movement of the offensive players. However, it should be noted that this is not random movement, but rather movement that is predetermined by the coach. Each offensive player in the box is guarded by a defensive player. The defensive players must defend their player according to that player's movements.
HELP AND RECOVER INSIDE DRILL (Diagram 44):
Players line up as shown in the diagram. X (the defensive player) is guarding 2. 1 starts with the basketball. Until the time 1 starts his dribble we play him as if he is being defended. When 1 starts his dribble to the basket, we play him as if he has just beaten his man off the dribble and is free driving to the basket. When 1 starts his dribble X must move over to stop 1's penetration outside the lane. As 1 starts his dribble 2 moves to the free throw line. After X stops 1's penetration to the basket, 1 passes to 2 who will catch and shoot. On the pass to 2, X must recover to 2, get a hand in his face, "yell" and then block him out.
DEFENSE FLASH / HELP AND RECOVER DRILL (Diagrams 45 & 46):
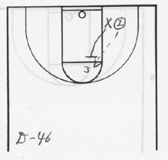
The players start as in the diagram. The coach starts with the ball. X (the defensive player) is guarding 3, and 2 is unguarded in the ballside corner. 3 will flash directly to the ball. X will deny the flash. The coach will then pass to 2. 2 will drive to the basket. X will leave his man and go to (help) stop the free man driving to the basket outside the lane. Once X has stopped 2's penetration to the basket, 2 will pass to 3 at the free throw line, 3 will catch and shoot. On 2's pass to 3, X will recovery to his man (3), get a hand in his face as he shoots, 'yell' and block him out.
We can vary this drill by making it a two ball drill. The coach can start with two balls. He can pass the first ball to the player making the flash (3), as X knocks down this pass the coach can pass the second ball to 2 in the corner and the drill continues as above.
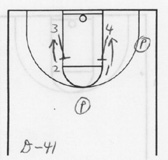
DEFENSE CLEAR OUT AND FLASH DRILL (Diagram 47):
B is guarding 2, who is ballside, below the free throw line extended and does not have the ball. 1 starts with the ball above the free throw line (throughout the drill we assume that he is being guarded or we could have a man guard him and make it a 2 on 2 drill).
1 will dribble to the ballside wing area. As 1 starts his dribble, 2 will move away from the ball and cross the lane, continue out circle the cone on the court and then flash directly back to the ball. As 2 starts his cut away from the ball B will continuously adjust his position to prevent 2 from receiving the ball in the lane and still be ready at all times to help should 1 beat his man off the dribble. When B reaches the mid-point of the lane he will stop in his helpside position in a pistols stance, always adjusting his position to his man and to the ball. When 2 flashes across the lane B will defend the flash.
3 on 1 DEFENSE FLASH DRILL (Diagrams 48 & 49):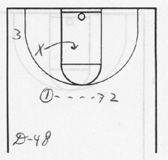
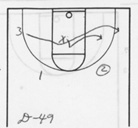
1 and 2 are passers. X is guarding 3 who is ballside and below the free throw line extended. 1 starts with the ball. 1 passes to 2. X will 'jump back and to the ball'. 3 will flash directly to the ball until he is cut off in the lane by X. 3 will go behind X out to the ballside wing area. X will deny the flash. When 3 goes behind him X will execute a 'head snap' and re-establish his denial stance on 3 until 3 leaves the lane. X will now adjust his defensive position to a 'jump back and to the ball' position in the gap between his man (3) and 2 (who has the ball). The only place that 1 and 2 can pass the ball to 3 at is in the lane. The drill continues in the same manner.
3 on 3 DEFENSE THE CUTTER (Diagram 50):
In this drill we play 3 on 3 on the perimeter. The only thing the offensive players are allowed to do are: (a) pass and cut through and go - and either go out helpside or ballside, (b) penetrate off the dribble to the basket, or (c) shoot if not defended on the perimeter. When an offensive player passes and cuts through the helpside offensive player replaces him. The defenders must now use all their defensive rules to defend the three offensive players.