 Equitation
Equitation has a purpose. It is not to make you look pretty on a horse. It is to put you in an effective, balanced position so you can make the most of your aids. Often riders find themselves frustrated because their horse is not responding properly, usually it can be traced back to the aids not being given properly. When reaching a training block often just concentrating on your equitation not your aids, and trying the exercise again will prove more useful then dwelling on what your doing wrong.
For example: if you are practicing your transitions from the trot to the walk and your horse is resisting, raising his head and tightening his jowl, it is instinctive to try is again, asking with lower hands, fidgeting more, and in the end stiffening your back, legs, arms and neck in turn stiffening the horse and creating the same result if not worse than the last time. Now if the rider were to try again and instead concentrate on her equitation: sinking down in her heels, pushing her pelvis forward and relaxing through her lower back; sitting tall while looking ahead better results would occur. Why??? because the rider instead of focusing on the horse's resistance, has focused on her position and making herself the most effective. Her soft back does not resist against the horse, her heels deep lengthen her leg against the horse pushing him into the transition, and her looking ahead keeps her thinking forward and not completely blocking him in the mouth. The result will be the horse no longer stiffening against the rider, in his back, neck and jowl. It may take a few tries with this new approach for the horse to give and relax because the horse is used to the stiff, demanding rider who makes him uncomfortable and causes his resistance.
Equitation no matter what should be natural, not a forced stiff "look" that is aimed for winning a class. Also not all riders have the long, lean perfect for riding bodies but that does not mean they can not have just as good if not better equitation then the 'ideal" riders.
The overall picture of proper equitation is balance. The rider should appear and be in balance at all times. Looking from the side in the full seat (used in sitting trot, walk, canter) an imaginary line can be drawn from the ear, through the shoulder, the hip, to the heel. Viewed from the front the rider should be balanced, not tipped to either side, a line drawn through her nose should go straight down the middle of the chest, the middle of the saddle to the middle of the horse.
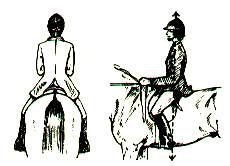
The shoulders should be straight, even and parallel with the horse's shoulders. . No shoulder should be tilted or dropped down. The shoulder blades should be not touching but close with the chest out, this holds the riders back straight and tall. The shoulders should not be forced back as this will only create a stiff non effective position. In the full seat the shoulders should be straight, in line with the hips as this puts the riders center of gravity over the feet which puts the rider in balance. In the posting trot, two point, or following seat they should be inclined slightly to stay with the horse's motion and to keep the riders balance over the feet. The riders center of gravity is just below the rib cage. While galloping or jumping the shoulders incline closing the hip angle so that the center remains over the feet and keeps with the motion of the horse

The riders hips should be straight, parallel with the horse's hips. For example when asking for the canter the inside hip should be slightly forward just like the horse's inside hip, thus freeing up the horse to get the correct lead. As with the shoulders the rider should keep them soft yet straight.

The arms should be placed ahead of the rider with a slight bend in the elbow. If the bend is too great in the elbow the rider will lose efficiency as she can not move and absorb movement from the horse's frame through the arm.
The hands should be placed infront of the rider, three inches apart. The hands should be infront of the withers in such a place that if the rider where to go into two point they would not have to move forward to keep the balance. Riding with the hands too close to the body loses the riders balance and makes the rider much less effective. the hands should be just at the mane or slightly below beside the crest not pressing against it but able to if support is needed (jumping etc.). The hands should be tilted in slightly with the thumbs on top, so that if the rider were to hold straws in her fists they would cross but at the top. This puts the hand at the ideal position for the crest release. The wrist should be straight, not bent in, out or down. The hand should be closed, fingertips touching the palm, the rein going between the pinkie and ring finger, up through the fist and across the top, with the thumb holding it at the top. The thumb should have a slight bend in it so that the thumb tip pressed lightly against the rein making a secure contact.
Exercises which work on Equitation:
ALL OF
THEM!!!!!!!!!!! while doing any riding concentrating on your equitation
is a must as it makes you the most effective!!!!!!