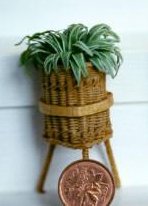
MINIATURE SPIDER PLANT
by: Carolyn
I use 1 inch wide floral tape, in either shade of green. light or dark, both look nice.
Cut several pieces about 6 or 7 inches long. (Now comes the fiddly part).
Using sharp scissors cut notches out along the long edge of the tape, so it looks like jagged teeth. Be careful not to cut too close to the other edge.
When you are finished cutting, paint stripes on them.
It makes them more realistic.
Either paint a very fine line down the middle of each point or paint very fine lines down each pointed edge. Use a creamy off white (something with yellow tones).
Now using a pointed wooden skewer (like you would use for shish kabobs), roll your leaves up like this:
Lay the tape over the skewer, starting at one end. The
pointed end of the skewer should be on the uncut long edge of the tape. If you painted the leaves they should be facing inside.
Now, carefully, start rolling the tape up around and around the end of the skewer. Keep the leaves flat against the skewer. Pinch the ends tight against the point of the skewer as you roll. When you reach the
end of the tape, you are ready to start shaping your plant.
While tightly pinching the bottom edge; slowly and carefully start to open the spider. Start by pulling down the last pointed leaf, go around and around. Pull the points down one by one. You can curl them
slightly by dragging with your finger nail (like curling ribbon with a scissor edge).
When you are all done, you can plant directly from
the skewer into the clay in pot.
This sounds MUCH more complicated than it really is. HONEST!!!
Carolyn
Napanee, ON
Return to TUTORIALS