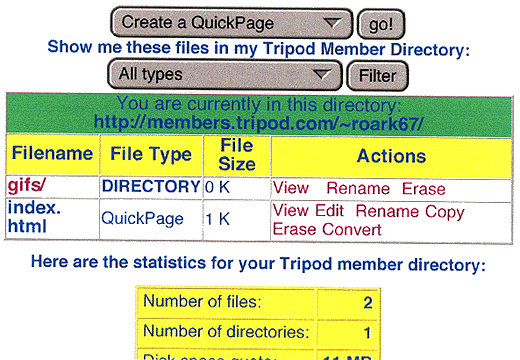
On the Quick Page EditorŽ each section can be edited on it's own (see image). Each of the processes below can be done to any or all of the sections. Of course you need to have something in the section to begin with.

MODIFY A SECTION

All this does is take you back to the original starting point for adding what you have in that section. You can make changes this way if you want. Though it is easier to use the Edit to do that.

EDIT A SECTION

Click on the "Edit the HTML..." which will take you to the "HTML Editor" page (see image). Scroll down and highlight the box. Activate the cursor with the return key. Use only the arrow and delete keys within the box.

Now you can change or add to the html you already have in the box. You can also at this point add anything else to this particular section you want to. Say you have a picture in this section already. You can add text, maybe links or another image. And you can add as much of anything you want. It just needs to be done using HTML.

You can also makes changes to your "Color Scheme". You can change the bgcolor and or the text and links colors. You can even change from the bgcolor to a background image.

After you have done what editing you want to do scroll down and click on the "Use this HTML" button.

That will take you to the "Section Stored" page. There you will see whatever additions or changes you made. Below that will be all the actual HTML you used. Now if you are satisfied with what you have done click on the "Save Page" button below the HTML.

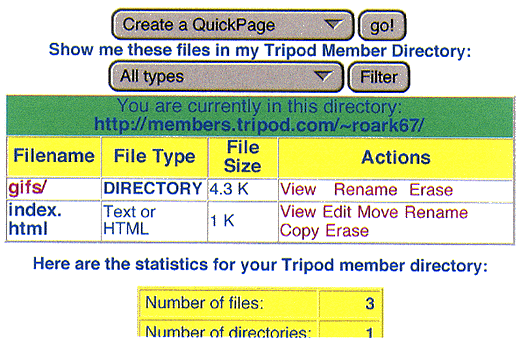
That will take you to the "Page Saved" page (see image). It will show the address of your page about a third of the way down this page. Click on it to see your revised page. If you are doing this for the first time for the whole page it should show up as you made it. If you are doing this after revising the page you will probably have to reload the page to see the changes. After that those changes will always show up.

Back to the "Section Stored" page. Now if you are planning on working on other sections of the same page you should click on the "OK" button. That will take you back to the "Quick Page Editor" of that page.

If you see something wrong with your additions or revisions when you are at the "Section Stored" page or decide to add somethng else click on the "Edit" button. That will take you back to the "HTML Editor" page.

CLEAR A SECTION

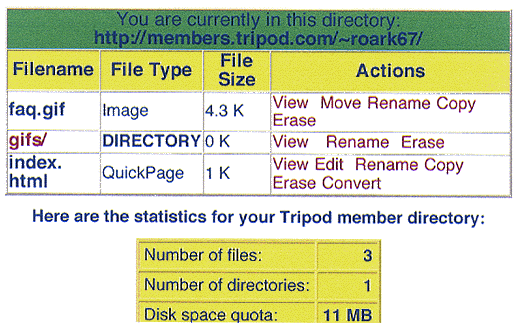
If you want to erase a section just click on the "Clear this section". That will take you the "Section Cleared" page (see image). Just click on the "OK" button and it will bring you back to the "Quick Page Editor" you were on.

If you are in the process of revising or adding to the different sections and want to see what the page looks like before you "Save" it for the world to see just scroll to the bottom of the page and click on the "Preview Page" button. Use your back key to return to the "Quick Page Editor"

SUBDIRECTORIES

Once you have been at this for a while you will start to build up a long parent directory. Especially if you have been transloading a lot of things to your site. So now you would want to create a subdirectory to store your files (gifs,jpgs,etc) in a more ordered fashion.

Above your parent directory list are two pull down menus (see image). The first starts with "Create a quick page". This is also what you will use to create a new page. Click on that one to pull down the menu and then click on the "Create a new subdirectory". Now click on the "Go" button.

That will take you to the "Create a new subdirectory" page (see image). Erase the text in the box and type in your choice for a name for the subdirectory. It is case sensitive. Use something that suggests what is going to be stored there. If you are going to put all your gifs there then call it "gifs". (quotes are not needed) Or if you want to be more selective and put just lines in that one use "lines". Name it whatever you want.

Now click on the "Use this filename" button. That will take you to the Parent directory (see image) where it will be part of the list.

MOVE FILES TO THE SUBDIRECTORIES

Here I've already transloaded an image (see image). In the right hand column of the Parent directory under "Actions" click on "Move" on the line of the file you wish to put in the subdirectory. That will take you to the "Move a file" page (see image).

Since this is the first subdirectory that is all that is shown. As you create more it will become a pull down menu. You would click on it to choose the subdirectory you want. Now click on the "Move it" button.

That will take you to the subdirectory (see image) itself. Your file should now be listed there. It will also now have a different address. The address will include the name of the subdirectory. Now in the header of the subdirectory list click on the "Return to home directory". That takes you back to the parent directory.

CUSTOM EDITOR

Should you want a little more flexibility in making your pages you can convert the page made with the "Quick Page EditorŽ" to a "Custom Editor". The biggest difference between the two is that unlike the sections you can access to edit on the "Quick Page Editor",the "Custom Editor" is just one continuous page of HTML. Be sure you want to convert the page because once it is converted you can't convert back to the "Quick Page Editor".

At the parent directory (see image) on the line that has your "Quickpage" listed there are "Actions" in the right hand column that you can do to the page. Click on the "Convert".

That will take you to the "Convert Your Quick Page" page. The instructions are pretty self explanatory. After reading them click on the "Yes" button at the bottom of the page.

The next page is "Converted your Quick Page". Again read the instructions, then click on the "OK" button at the bottom of the page.

That will take you back to the parent directory. There you will see that your page formerly listed as a "Quickpage" is now called "Text or HTML" (see image).

Now when you click on "Edit" it will take you to the "Page Editor". It looks and works like the "HTML Editor" page for the sections of the "Quick Page" except that it is the whole page of HTML. After editing the page scroll down and click on the "Use this HTML" button.

That will take you to a page showing your page address. Click on it to take you to your newly edited page. Sometimes you may need to reload that page to see the one with the new edits.


c149@webtv.net

powered by lycos Search: Tripod The Web