Heater core plumbing...The RX-7 uses standard 5/8" heater hoses, while the LS1 used a combination of (1) 5/8" and (1) 3/4" hose. With a little silicone spray, standard 5/8" heater hose can be slipped over the LS1's 3/4" fitting, allowing you to use all 5/8" hose for heater core plumbing. Proper hose routing is as follows...
...RX-7 upper heater hose outlet on firewall- plumb to the larger 3/4" LS1 fitting.
...RX-7 lower heater hose outlet on firewall- plumb to the smaller 5/8" LS1 fitting.
...RX-7 5/16" vent tube- plumb into the upper radiator hose.
EVAP plumbing...
Injected applications...The stock RX-7 fuel system uses an in-tank pump, connected to the rotary engine's injector fuel rail, with a rail mounted pressure regulator routing excess fuel flow back to the fuel tank thru the fuel return line. The Camaro/Firebird version of the LS1 used a fuel supply system that located the fuel pump, fuel pressure regulator, and fuel return plumbing entirely within the fuel tank, requiring only a fuel supply line (no return line) connected to the LS1 fuel rail. In order to insure that your conversion is 100% smog legal, your RX-7 will need to adopt the LS1's in-tank pump/regulator/return arrangement.
 If your RX-7 does not need to be smog legal within the letter of the law, there is an easier solution....the LS1 Corvette fuel filter/regulator assembly. Available at most any auto parts store (NAPA# 3737), the Corvette fuel filter features an internal pressure regulator with an external fuel return connection as if it was made for the FD/LS1 conversion. The inlet and return lines connect with traditional push-on hose-and-clamp connections, while the outlet connection to the LS1 fuel rail requires GM's proprietary LS1 fuel line fitting. While the most simple and straight-forward installation locates this filter/regulator in the RX-7's engine compartment, a more sanitary and stealth installation location would be under the RX-7's fuel tank access panel near where the lines come out of the RX-7's fuel tank. Regardless of plumbing methods used, BE SURE TO ROUTE ALL FUEL LINES AND CONNECTIONS IN A SAFE AND SECURE MANNER AWAY FROM (OR SHIELDED FROM) ALL EXHAUST COMPONENTS.
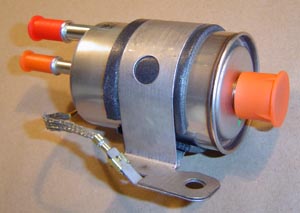
Identification of the Corvette FPR's inlet and outlets are as follows...
...Large single female outlet...(orange cap on right side of pic)...this is the FPR's pressure outlet that gets routed to the Camaro/Firebird LS1's fuel rail.
...Large 3/8" male barbed inlet...(red offset cap on upper left side of pic)...this is the FPR's supply inlet that gets plumbed to the pressure line from the RX-7's fuel pump.
...Small 5/16" male barbed outlet...(smaller orange cap on the left side of pic)...this is the FPR's excess fuel return line that gets plumbed to the RX-7's fuel tank return line.

Connections to the Corvette FPR's barbed male tubes can be done with rubber fuel line and clamps or with compression fittings and AN adapters. Connection to the female pressure outlet port requires a special snap-in o-ring fitting that GM uses on many of it's newer vehicles. For a low buck solution, the fittings can be obtained at a wrecking yard, and connected w/ compression fittings to common tube or fuel hose available at the auto parts store. For a better looking and possibly more secure solution, compression fittings and AN adapters can allow use of stainless braided fuel line. The FPR pictured at right uses all three connecting options.
Carbureted applications...If you are using a carburetor with your conversion, a fuel supply loop should be plumbed in to make the hi-pressure RX-7 fuel pump compatible with the low pressure / volume requirements of your carburetor. The RX-7 fuel pump must have a constantly circulating fuel flow through it for cooling purposes. To make both the carburetor and fuel pump happy, we install a ?T? into the fuel line, connecting the pressure and return lines together, to form a path for the fuel to circulate back to the fuel tank. The 3rd leg of the ?T? should go to a fuel pressure regulator (available at any auto parts store), then on to the carburetor. Plumbed like this, fuel will just return to the tank through the return line without building any pressure for the carburetor. In order to get the 4-6 psi pressure recommended for the carburetor, some restriction is needed in the return line. An easy way to get this restriction is to use a pair of ?Vice Grip? type pliers, and slowly and incrementally crimp the steel section of the return line until there is about 8-10 psi before the pressure regulator. After this is achieved, the regulator can be adjusted to further drop that pressure to 4-6 psi for the carburetor.
Re-plumbing the RX-7's AC system is easier than one might think. We suggest that you re-use the OEM hose fittings/pipes from the RX-7 at the firewall, condensor, and drier. Re-use the OEM hose fittings for the compressor that you are using. Salvaging these fittings will not only save you money, but it will insure that you have the correct fittings for your application. The salvaged fittings will be fitted with new hose and crimp sleeves, and hose length and fitting angle can be adjusted to your exact requirements. The AC system plumbing should be routed as follows...
...large firewall fitting connects to the compressor suction port.
...small firewall fitting connects to the reciever/drier outlet port.
...compressor pressure port connects to top of the condensor core.
...condensor core bottom connects to the reciever/drier inlet port.
After the hose lengths and fitting direction are tailored to your application, return to the hose shop to have your new crimp sleeves crimped onto your new hoses permanantly.
After the hoses are attached, you can take your car to the AC shop to evacuate and charge the system.
If your completed AC system is operating under severe conditions, a small 10" fan can be attached to the condensor core to boost performance.
The electrical part of your engine conversion for the AC system is covered in the electrical section.
2....Considerations & Requirements....
4....Engine / Transmission Installation....
5....Exhaust / Throttle Cable / Accessory Drive / Pulleys....
6....Cooling / Fuel Systems....
7....RX-7 Wiring Harness Connector ID and Circuit Locations....
8....Electrical System Modifications By Circuit....
9....Start-up / Troubleshooting....