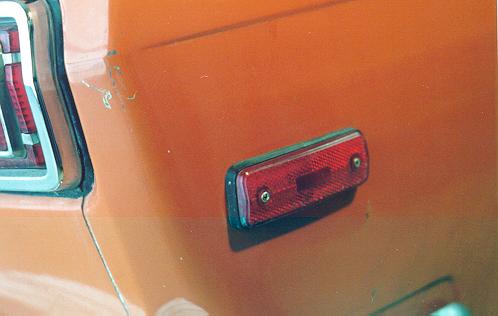
Far Superior Side Marker Lights

If you are like me you pride yourself in knowing that you can count the stock parts on your car on one hand.
This is just one more small thing you can do to set your '70 or later 510 (or a lot of other Datsuns) apart from the rest.
All you need is a few crimp on terminals, a phillips head screw driver, a small piece of thin scrap metal,
and a set of late '70s Toyota side marker lights. Your new lights will look cleaner than the stock lights (in my opinion),
put out more light making you car safer at night, and they contain no metal to rust out. They require no cutting of
the car's sheet metal and if you use the right crimp on connectors there is no need to hack up your wiring harness.
The Toyota side marker lights used in this article were taken off of a '78 Toyota Celica. The rears are the same as
Toyota used on just about every car they produced between '78 and '85. The only Toyota Ive seen with these particaular
front side marker lights are the second generation Celicas. The lights should be available at just about any
"self service" type junkyard. I purcahsed mine at Coronado U-Pull It in Albuquerque, NM. U-Pull-It is a
gold mine that any one can walk through for ideas and inspiration for $1.00. Their prices are low and on occasion they even
give stuff away to repeat customers. The total bill for mine was $6.35 for all four lights. The lights are different on each
side so make sure you don't accidentally pull two of the same side and color.
When you find your donor car unscrew the lights cutting the pigtails as long as you can get away with. Especially in the front.
You don't need to grab the screws because you will use the stock 510 screws to hold the in place. All you need now is eight thin
pieces of metal about 1"x2 1/2" with holes along the long side about 1/8 of an inch from the edge. In a pinch you could cut up a
couple of soup cans to make the metal pieces.
Take the stock lights off of your 510. Remove the little metal nut clips from the fenders and quarter panels. Be careful not to
scratch your paint taking them off. Now put the little clip nuts on the pieces of metal with the holes aligned. Put the new lights in
place making sure the cover the entire hole. Put the metal clips pieces on the back and screw the lights in place with the stock 510 screws.
Hook up the wiring and your all set.


Email Us .
More to Come... Stay Tuned...
Back to Mods
Back to Main.