Contents
Transmittance,
Opacity and Density
Diffuse,
Specular, and Optical Density
Gray Levels
and RODs
Valid Density
Measurements
Calibrating
Optical Density Values
Semiquantitative
Densitometry
Strategies for
Semiquantitative Densitometry
Issues in
Normalization
Quantitative
Densitometry
Density
Standards
Interpolation
or Approximation
Calculating
the Density Value
Limitations in
Densitometric Imaging
The Clipping
Problem
Extrapolation
Appendix:
Densitometric Applications
Receptor
Analysis
Total,
Nonspecific, and Specific Binding
Autoradiographic
Measurement of Rates of CGU, CPS, and CBF
Cerebral
Glucose Utilization
Cerebral
Protein Synthesis
Blood Flow
References
The Nature of Density
Transmittance,
Opacity and Density
Incident illumination is light
falling on a specimen. Transmittance (light passed
through) and reflectance (light reflected) are
measurements of the proportion of incident illumination which
is obtained from the specimen (equations 1 and 1b).


Reflectance can be useful in making targets
visible. For example, it is reflectance that makes silver
grains stand out in dark field illumination. Reflectance can
also be used in quantifying opaque specimens, such as some
electrophoregrams. However, transmittance measurements are
far more common in life science densitometry.
Transmittance decreases as the specimen
absorbs more of the incident illumination. For example, our
illumination level is 200 units, and a specimen placed
between the light source and the sensor reads at 100 units.
The transmittance is 0.5. A darker specimen might read 50
units, yielding a transmittance of 0.25. When darker
specimens are more heavily labeled (e.g. autoradiography,
immunocytochemistry), we could transform transmittance (or
reflectance) to opacity (equation 2). As the
absorption of the specimen increases (and the amount of label
increases), opacity rises.

Density (equation 3, the common
logarithm of opacity) is often preferred to transmittance,
reflectance or opacity. Like opacity, density increases as
the specimen darkens. Density has the additional advantage
that it accords with our perceptual judgments of how dark a
specimen is. In making a visual judgment, you would tend to
describe a density of 1.0 as being about twice as dark as a
density of 0.5.

Density values (Table 1) found in typical
film autoradiographs of brain sections vary from close to 0
(100% transmission) to about 1.2D (6% transmission). Imaging
plates, stained gels, and any opaque specimens (e.g.
membranes) can exhibit a much broader range of densities,
with some specimens going beyond 2D (1% transmission).
Table 1: Optical density and transmission values
across a range spanning most biological specimens. By about
1.2 density units, film becomes saturated. Stained or opaque
specimens can exhibit a much broader range of densities.
Density
|
%
Transmission
|
|
Density
|
%Transmission
|
0.00
|
100.00
|
|
1.00
|
10.00
|
0.01
|
97.72
|
|
1.20
|
6.31
|
0.05
|
89.13
|
|
1.40
|
3.98
|
0.10
|
79.43
|
|
1.60
|
2.51
|
0.15
|
70.79
|
|
1.80
|
1.58
|
0.20
|
63.10
|
|
2.00
|
1.00
|
0.30
|
50.12
|
|
2.20
|
0.63
|
0.40
|
39.81
|
|
2.40
|
0.40
|
0.50
|
31.62
|
|
2.60
|
0.25
|
0.60
|
25.12
|
|
2.80
|
0.16
|
0.80
|
15.85
|
|
3.00
|
0.10
|
Diffuse,
Specular, and Optical Density
From our definitions, above, density is a
proportion of incident to transmitted (or reflected)
illumination. Theoretically, a given specimen should always
yield the same proportion of incident to transmitted
illumination. Unfortunately, the situation is not as simple
as this. For a given specimen, a density value is only
replicable under tightly controlled measurement conditions.
Different density values are observed as the conditions of
illumination or the densitometer characteristics are changed.
The problem of variable density arises from the many factors
that affect the way in which light passes from the light
source, through the specimen, and into the densitometer. In
the real world, these factors are not easily controlled.
To illustrate the difficulty in making real
world measurements, consider the way in which a density
reference standard (used for the calibration of
densitometers) is made. Density reference standards are
composed of a transparent matrix (e.g. celluloid, glass)
containing various amounts of light-absorbing materials. The
light-absorbing materials (e.g. carbon granules) are selected
to maintain constant properties of absorption and reflectance
across a broad range of illumination intensities. During
calibration, the standard is evenly illuminated over an angle
of 180 degrees. Both the amount of incident illumination and
the illumination passing through the standard are measured,
each over a collection angle of 180 degrees. The sensing
element is a simple photometer, that responds linearly to a
very wide range of illumination intensities. When a ratio of
transmitted to incident illumination is taken under these
conditions, the result is a parameter termed diffuse
density. A diffuse density value will be constant across
a range of illumination intensities, and from densitometer to
densitometer -- as long as the measurement conditions are
appropriate (180 degree illumination and collection, etc.).
With most biological specimens, it is
impossible to control diffusion properties. Also, an
image-forming optical system contains lenses which collect
light over some angle, and not all of the light passing
through the specimen lies within that angle. Light
transmitted directly through the specimen reaches the sensor,
while scattered light lies beyond the collection angle of the
lens and does not contribute to the density measurement. This
is quite a different situation from the hemispherical
collection required for diffuse density measurements.
The measurement of light from an angle of
collection yields a parameter termed specular density.
The specular density of a specimen will depend upon the lens
formulation, f-stop, and distance from the specimen, and will
always differ somewhat from a diffuse density.
Density is also affected by components of
the optical chain (e.g. the surface of a glass slide) that
reflect or scatter the incident light, and by the response
properties (deviations from linear response) of our density
sensor. For all of these reasons, the measurement of diffuse
density is usually impossible. Instead, we can read optical
density (OD). An OD measurement is specular (does not
require 180 degree illumination and collection angles), and
does not assume diffuse specimens. Rather, OD is just the log
of the ratio of transmitted to incident illumination. Under
perfect measurement conditions OD will correspond to diffuse
density. More often, the OD will vary somewhat from the value
that would be read under perfect conditions. Therefore, the
OD of a given specimen can vary from densitometer to
densitometer, as the measurement conditions (e.g. the angle
of collection) vary.
Consider OD as a somewhat relaxed form of
density measurement. The measured OD of a given specimen can
vary somewhat between instruments, but should remain constant
for any one instrument. To achieve internal measurement
consistency, most scanning densitometers contain an internal
density standard. During the scan, this internal standard is
used as a reference and to ensure linear response. That is
why you can use a scanning densitometer without having to
perform a calibration to external density standards. The
calibration is performed within the instrument.
In contrast, cameras cannot be calibrated
internally, because there is no practical way to measure both
incident and transmitted illumination (though attempts have
been made). To obtain replicable camera density measurements,
we must calibrate to an external standard. The external
calibration step makes the use of cameras slightly more
complicated than the use of internally calibrated devices.
However, the end result is that consistent OD measurements
are available from cameras.
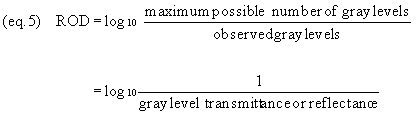
Gray
Levels and RODs
Incident light induces a voltage in the
density sensor. Light that is below the sensitivity threshold
of the sensor induces a voltage that cannot be discriminated
from internally generated noise. Light that is too bright
will saturate the sensor. Between these extremes is a range
of incident illumination that will affect the voltage output
of the sensor in a usable fashion. This is the dynamic
range of the sensor.
In an analog system, the dynamic range is
displayed on a voltage meter. Higher levels of incident
illumination cause greater deflections of the indicator. In a
digital system, illumination-induced voltage is displayed
numerically. Before this can be done, the dynamic range must
be broken (digitized) into discrete steps. Imaging systems
contain a digitizer, which digitizes the sensor's voltage
output range into discrete steps or levels. Each of
these levels corresponds to a shade of gray in the image.
Therefore, the steps are termed gray levels.
Although 8-bit (256 gray level) density
resolution is by far the most common, some imaging systems
(MCIDTM and AISTM included) can work
with data at greater bit densities. High bit densities are
critical when using scanning imagers, imaging plate readers,
and cooled CCD cameras. Most of these instruments provide up
to 16-bit (65,536 gray levels) digital data to take advantage
of their broad dynamic range. For a detailed discussion of
dynamic range, see the "Cameras and Scanners"
chapter.
If the amount of incident illumination can
be precisely quantified, we can measure both incident and
transmitted illumination in gray levels, and then create an
optical density ratio as described in equation 3.
Measurements of incident illumination are possible in systems
that pass a beam of coherent or highly collimated light over
the specimen (scanning densitometers). However, incident
illumination measurements are not practical in camera-based
systems, which illuminate the specimen with diffuse light.
Therefore, camera-based image analyzers start with
uncalibrated gray levels. These can be used, directly, or are
converted to uncalibrated transmittance or density values.
Gray level transmittance or reflectance
(GLT or GLR) can be measured as follows (equation 4):

Gray level transmittance or reflectance go
up as brightness increases. Therefore, we usually prefer to
convert GLT or GLR to relative optical densities (ROD) as
follows (equation 5):
Note that, in using GLT, GLR, or ROD,
specimen density values are referenced to the dynamic range
of the imaging system, and not to any external reference.
Therefore, a GLT, GLR, or ROD value tells us very little
about the OD which would be measured by a densitometer. With
a camera, there is no measurement of incident illumination,
so a given specimen may yield a ROD value of 0.5 under one
set of lighting conditions, and 0.8 under different
conditions.
To summarize, camera-based imaging systems
express density (levels, GLT, GLR, and ROD) as purely
relative values, reflecting only a ratio of incident
illumination to maximum system response. In addition to
changing with any alteration in the lighting conditions, the
relative values are affected by nonlinearities in any
component of the measurement chain. For these reasons,
camera-based imaging systems require external calibration if
stable and replicable density measurements are to be
obtained.
Valid
Density Measurements
The history of biological densitometry is a
record of attempts to improve both the validity and
efficiency (speed, convenience) of density measurements.
Early systems used spot (Bryan and Kutyna, 1983; Haas,
Robertson and Myers, 1978; Reivich, et al., 1969) or
computer-controlled scanning spot (Goochee, Rasband and
Sokoloff, 1980; Leitz DADS) densitometers. These systems were
often quite precise, but were very slow and tedious to use.
Today, scanning laser densitometers have replaced most of the
earlier scanner-based systems. Scanning laser densitometers
are nicely packaged (smaller, faster, cheaper, and more
reliable than the old scanners), yield highly replicable OD
values (incident illumination is measured), and are linear.
These systems provide reliable density values across a wide
range of staining intensities, reaction product densities, or
autoradiographic exposures. However, they are slow and
tedious to use. They also use a scanning beam that is
relatively large (e.g. 50 m m), so they are not suitable for small specimens
(e.g. microscopic sections, rodent brain autoradiographs).
Camera-based systems are very attractive
because they are much faster than laser densitometers, and
can digitize an entire specimen in a fraction of a second.
They can also be used with small specimens (using lenses to
magnify). However, cameras lack the wide linear dynamic range
of scanners. Under bright field conditions (the situation is
different at low light levels), the high densities (above
about 1D) are compressed. The higher the actual density, the
more nonlinear is the camera's response. This characteristic
results from physical and electronic properties inherent to
the camera, and from optical aberrations (flare). Unlike
collimated or coherent beam scanning systems, the
camera-based system is illuminating and acquiring large areas
of the specimen simultaneously. Therefore, it is subject to
flare (internal reflections within the lens and scattered
light that does not pass through the specimen).
With the limitation in dynamic range
understood, and with a reasonable amount of care, a
camera-based imaging densitometer can yield highly accurate
density measurements. At the very least, the camera-based
system must be proven to be linear prior to use. That is, the
sensitivity of the camera (the ability to discriminate
between shades of gray) must be constant across the density
measurement range found in the specimens. This linearity can
be demonstrated by calibrating the system, as discussed in
the next section.
Calibrating
Optical Density Values
Optical density values must be replicable.
That is, a particular image analyzer should always report the
same OD values for a given specimen. However, a camera-based
system does not measure both incident and transmitted
illumination to form an OD ratio, and the camera may be
responding nonlinearly. That is, it is more sensitive in some
parts of its range than in others. For these reasons,
camera-based density measurements are unlikely to replicate
without external calibration.
For example, labeled spinal cord cells
contralateral to a cortical lesion transmit 64/256 gray
levels (GLT = 0.25), while labeled cells ipsilateral to the
lesion transmit 128/256 gray levels (GLT = 0.5). We would
wish this relation between the two sides of our specimen (one
side yields twice the density value of other) to be dependent
upon treatment condition, not upon illumination intensity.
Similarly, in analyzing gels and blots, it is important that
the difference between the peak density of a band and the
baseline density reflect only the amount of substance, not
the illumination level of the specimen. Without external
calibration, we would probably find that the density
characteristics of our specimens (ipsilateral vs.
contralateral cells, peak vs. baseline) change as
illumination changes.
What type of external calibration should be
used? At minimum, a calibration to diffuse density standards
can establish that our optical density measurements are
linear. Once an external calibration is established, the
camera-based densitometer is yielding OD (as opposed to ROD)
values (e.g. Baskin and Wimpey, 1989). The calibrated OD
values are corrected for nonlinearity, and should be the same
as those obtained by measuring both incident and transmitted
illumination. That is, they should be precisely replicable.
A better way to perform external
calibration is to use concentration standards. After all, we
are trying to use OD as an operational definition of tissue
properties (binding levels, metabolic rate, etc.). However,
even the most rigorously measured OD has no intrinsic
biological meaning. In contrast, calibration to concentration
standards defines a relation between ROD (the image
analyzer's uncalibrated measurement scale) and tissue
properties.
Calibration to external standards is
usually possible at the macro level. Large density step
tablets and concentration standards are available and easily
used. At the micro level, density calibration is more
problematic. Microscopic density references are not easily
obtained, though we have some of these available. Even with
microscopic density standards, the complex optics of
microscopes do not lend themselves to precise calibration.
For these reasons, microscope densitometry is often performed
without external calibration. The best you can do is to
establish that the imaging system is linear across the range
of illumination intensities seen through the microscope.
Linearity should be documented with any report of
uncalibrated density values (Table 2).
Table 2: Conditions for reading density.
| Procedure |
Instrument |
Replicability |
| Internal calibration |
Scanning densitometer,
phosphor plate imager, other types of scanner |
high |
| No calibration |
Camera, simple
densitometer |
very low |
| External calibration to
diffuse density standards |
Camera, or any without
internal calibration |
high - assumptions must be
made about biological relevance |
| External calibration to
concentration standards |
Camera, or any without
internal calibration |
high - direct measurement
of biologically relevant data |
Semiquantitative
Densitometry
In semiquantitative densitometry, we make
density measurements without calibrating the system to a
range of concentration standards. As commonly used,
semiquantitative densities demonstrate regions in which a
target molecule is localized. At best, densities obtained
with semiquantitative methods are proportional to the amount
of the target molecule. Without a standard curve, however,
the relation between the concentration of the target molecule
and the tissue density cannot be known. In semiquantitative
densitometry, our first goal is to obtain replicable and
sensitive measurements which reflect (but do not quantify)
tissue biology.
Strategies
for Semiquantitative Densitometry
High levels of error variance can result
from unpredictable influences of exposure, incubation,
development, etc. Ideally, we would minimize these problems
by calibrating to concentration standards. Even without
calibration, however, error variance can be minimized to
yield more sensitive experiments. A few strategies are given
below.
Use tightly controlled
conditions (e.g. Brown and
Fishman, 1990)
The specimen processing, lighting, and
sensing conditions are exactly the same for all readings.
This approach is very prone to error, as many irrelevant and
subtle factors (especially those associated with tissue
processing) can affect the density of specimens.
Normalization
Uncalibrated densities are normalized to an
internal standard and inter-condition comparisons are formed
from the resulting ratios. Theoretically, the normalization
process removes contributions of non-specific density
variation (e.g. background density) from the ratio data.
Therefore, it is the ratios, as opposed to the absolute
density values, that are used for group comparisons (e.g.
Burke et al., 1990; King et al., 1989; Reis, et al., 1982).
It is important that linear system response be demonstrated,
if normalization is to yield replicable ratios.
Normalization and tight control
It is often possible to combine
minimization of processing-induced variation with
normalization. For example, brain hemispheres from
experimental and control conditions could be glued together
before sectioning, processing, and side-to-side ratio
formation (Tatton and Greenwood, 1991).
Issues
in Normalization
In quantifying reaction product (e.g.
immunostaining), a within-section reference provides the best
control for extraneous influences. An example would be
reaction product density in cells ipsilateral vs.
contralateral to a treatment (e.g. Garrison, Dougherty and
Carlton, 1993; Mize and Luo, 1992). In whole body
autoradiography, the blood is often used as a reference. In
semi-quantitative brain autoradiography, each regional
density could be normalized to the mean density of the entire
brain (e.g. Ramm and Frost, 1983, 1986).
Try to ensure that specimen preparation,
illumination intensity, label density, and other conditions
are held as constant as possible across specimens. The
density of the reference region should be highly sensitive to
irrelevant factors, such as development and exposure, but
insensitive to the independent variable. This can be easily
tested by comparing density values of the reference region
across exposure/processing conditions (irrelevant variables),
and across treatment conditions. We want to observe a
significant relation between irrelevant variables and our
reference density. In contrast, we should fail to observe a
relation between the reference density and the treatment
conditions of our experiment.
Normalization to an internal reference
would, theoretically, allow us to obtain the same value from
a given target each time we measure it. However, this is only
true if the system density response is linear across the
entire range of measurements. Any nonlinearities will affect
the ratio between our reference and target regions. As a
precondition of semiquantitative densitometry, both the
reference and target values must fall within the linear
response range, and it should be shown that system response
was linear over the entire measurement range used in the
experiment. This set of conditions should be achieved
automatically, with most internally calibrated scanners.
Cameras and other devices without internal calibration should
be calibrated to a set of density standards, before reading
data.
Quantitative
Densitometry
Quantitative densitometry is performed by
calibrating to a set of concentration standards before
reading density values in the unit of calibration. The most
common form of quantitative densitometry is isotope
autoradiography, using radioisotope standards exposed with
each film to establish a standard curve. Attempts have also
been made to perform fully quantitative immunocytochemistry
using biochemical calibration of staining intensity (e.g.
Benno et al., 1982; Laborde et al., 1990; Reis et al., 1982),
antigen concentration standards (Nabors, Songu-Mize and Mize
1988; Huang, Chen and Tietz, 1996), or chemiluminescence
(Norman, Khosla, Klug and Thompson, 1994). However,
quantitative immunocytochemistry remains relatively rare,
because of the difficulties involved in establishing the
exact relation between tissue densities and the amount of the
target molecule.
MCID and AIS offer very flexible functions
for quantitative densitometry. The systems may be calibrated
to any standards. They also incorporate operational equations
for the conversion of calibrated density values to rates of
local cerebral glucose utilization, protein synthesis, or
blood flow.
Density
Standards
A good density calibration provides a ratio
scale (a scale with fixed 0 point and equal step intervals),
and allows the reading of density values in units of
concentration. Calibration creates a table of ROD values
paired with the concentration values of the standards. The
table should span the entire range of densities found in the
specimen (see the left side, Figure 1).
Figure 1: An AIS screen, showing a
calibration to 14C standards (Amersham Microscales) exposed
on autoradiographic film. The calibrated values of the
standards are shown at left, under "Std. Value".
The relative optical density values seen by the system are
shown under "Value Read". The graph, at right,
shows the relation between relative optical density and the
calibrated values. A smoothed cubic spline function has been
used to interpolate between the standard values.

Interpolation
or Approximation
We use interpolation or approximation to
calculate density values which lie between the steps provided
by the calibration reference. MCID and AIS offer a variety of
methods for fitting interpolation or approximation functions
to the calibration values. A graph shows how well a selected
fitting function fits the concentration values of the
reference. A numerical estimate of goodness of fit is
available from the last column in the calibration table
(under Rel. Error in the above example). With any good fit,
the error proportions will be low.
Calculating
the Density Value
In reading from a photometer, the entire
sensor area is integrated to yield a single voltage. This
voltage is compared with the calibration table to yield a
single concentration value. This is termed the integrated
optical density (IOD) of the specimen. In an imaging system,
this is equivalent to taking the mean gray level values of
all the pixels in a sample window, and then converting this
single mean gray level value to a concentration.
Gray level IOD: Calculate mean gray
level value, then convert to concentration.

In a sample window taken with an imaging
system, we have a great deal more information than is
available from a photometer window. Instead of just a single
voltage, we have discrete density values for each of the
pixels within the window. Therefore, we can calculate
discrete concentration values by comparing each pixel with
the calibration table. Only after all of the pixels have been
converted to concentrations do we calculate the mean of the
sample window.
Concentration IOD: Convert each pixel
to a concentration value, then calculate the mean.

The concentration IOD is usually
preferable, for the following reasons.
1. Use all available information
In any group of pixels, some may fall
within the non-linear portion of the calibration. For
example, we have a calibration table as follows:
Gray levels Concentration (nCi/g)
10 100
15 50
20 45
35 10
Let us create a sample window with four
pixels, one each of 10, 15, 20 and 35 gray levels. The mean
of this window is 10 + 15 + 20 + 35 / 4 = 20 gray levels. We
look up 20 gray levels in our calibration table and obtain a
concentration for the window of 45 nCi/g. Now compare what
happens when we look up each pixel in the calibration table
before taking the mean. The result is 100 + 50 + 45 + 10 / 4
= 51.25 nCi/g. The difference results from nonlinearities in
the relation between gray levels and concentration.
A simple mean of gray levels ignores what
we know about calibration linearity. Therefore, the
concentrations calculated from a mean of gray levels and from
discrete pixel concentrations will differ by increasing
amounts as the proportion of nonlinear pixels in the sample
window increases.
2. Requirement for operations using single pixel
quantities
Imaging systems offer many ways to
manipulate discrete pixel data. For example, we could work
with only those pixels representing a given range of
concentrations, or we could check for multiple receptor
populations by examining a histogram showing the distribution
of concentration values within a sample window. It is
important that the data obtained from such discrete pixel
operations be equivalent to the data obtained from the
integration of pixels. This is only possible if the IOD(c) is
used.
3. Multi-image operations using
single pixel quantities
Many multi-image procedures require that
pixel-by-pixel calculations be performed using
concentrations. Examples are creation of a specific binding
image by subtracting non-specific from total binding, or
combining pixels across a series of concentration images to
yield images of Kd or Bmax (e.g. Toga, Santori and Samaie, 1986). These are
termed derived images, as they are calculated from
other images. Imagine that we are sampling data from a
derived image. The values obtained should be exactly the same
as if we were to sample the data from the original images,
and then pass those data through the calculations used in
creating the derived image. This equivalence is only possible
if the IOD(c) is used.
The IOD(c) cannot be used when there is
extreme nonlinearity in the calibration. In measuring
cerebral blood flow, for example, gray level values are
linearly related to flow values up to a point. They then
become very nonlinear, so that a small change in gray level
can represent a very large change in flow rate. Under these
conditions, it would be possible for single pixels to have
fairly wild flow rates, and to exert an unreasonable
inlfuence on the flow rate values obtained from a sample
window. Therefore, MCID/AIS calculate a mean gray level for
the entire sample window, before doing a flow rate
calculation.
Limitations in
Densitometric Imaging
Limiting factors for densitometric accuracy
originate within the imaging system, and within the specimen.
The following discussion summarizes some of the major
limitations.
System-generated random noise
Cameras and digitizers exhibit a certain
amount of random noise, seen as changes in single pixel
density values on successive image acquisitions. This noise
is minimized by the use of high quality cameras, and by image
processing (frame and spatial averaging).
Limited digital precision
Many imaging systems offer only 8-bit/pixel
depth. That is, they represent the entire range of densities
with 256 gray levels. This yields a best possible sensitivity
(limited by the Nyquist criterion) of one part in 128. This
may not be a major problem with receptor autoradiography of
brain sections. In receptor binding analysis, ligand
concentrations and film exposures can usually be adjusted so
that specimens occupy a fairly narrow range (less than about
1 OD unit) of densities, and one part in 128 may be
sufficient within this narrow range. However, many specimens
(e.g. whole body and gel autorads, fluorescent materials)
contain a broader range of densities. This is especially true
when the imaging system is interfaced to devices such as
digital cameras, scanning densitometers and imaging plate
readers. Under these conditions, a precision of one part in
128 becomes a severe limitation, and much greater sensitivity
is required. MCID and AIS offer up to 16-bits/pixel (64K gray
levels).
Limited dynamic range
Dynamic range limitations are most evident
with film. Imaging plate readers, fluorescence imagers, and
other scanner types tend to offer a broader dynamic range.
Film is most accurate when exposed to
medium density. With overexposure, the film compresses its
response so that sensitivity (ability to discriminate
variation in concentration) becomes very low. With very light
exposures, it is common for variations in film background to
be larger than effects of interest. Therefore, reading from
over- or underexposed regions is dangerous.
Film or plate noise
There are random variations from place to
place on the specimen medium. At macro-level magnifications,
the imaging plates or fast films used for quantitative
autoradiography may exhibit variations of more than 20% from
pixel to pixel. This noise results primarily from random
variations in grain structure, and is exacerbated at high
magnifications, with high speed films, or with phosphor
plates.
Random density variations are minimized by
using film with the lowest possible grain, at the sacrifice
of exposure speed. For example, Kodak’s TL or OM film is
much finer in grain, lower in noise, and slower than SB film.
The problem is also minimized by reading from larger regions
(Ramm et al., 1984). Theoretically, noise decreases as the
square root of the number of pixels. Assuming only random
grain noise, we could read from 25 pixels and obtain film
noise of about 1/5 the single pixel value. This is termed
"spatial averaging". We recommend a combination of
frame averaging to reduce noise originating within the
imaging system, and spatial averaging to reduce noise
originating within the film or plate.
Systematic Background Variation
Non-random variations in background density
are common. Background adjacent to specimens is often
slightly different than that adjacent to the standards, and
background at the media edges may differ from background at
other points (a sign of poor processing or exposure
conditions). These types of non-random variations cannot be
corrected and, without great care in specimen preparation,
these variations tend to limit the accuracy of background
calibration to within a few gray percent. Therefore, there is
a good chance that readings of data that lie within a few
percent of background (e.g. very light non-specific binding)
will be inaccurate.
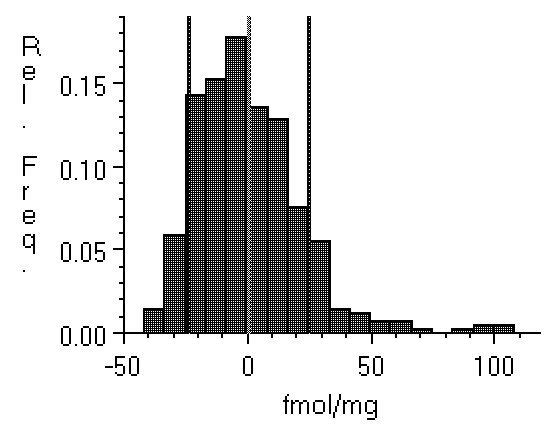
The
Clipping Problem
During calibration to the lightest
reference standard, we encounter a range of pixel values. For
example, in reading film background as a 0 concentration
reference, we might obtain values from .01 - .10 ROD,
normally distributed about a mean value of .06 ROD (Figure
2).
Figure 2: Histogram of pixel density values
in a region of film background. The mean is .058 ROD, shown
by a line at the center of the histogram. The second set of
vertical lines is at ± one standard deviation.

In calibrating to background, we use the
mean density for the pixels in the above histogram. Now,
whenever the system sees a pixel of .058 ROD, it will know
that its concentration is 0. But a sample window will contain
pixels that are lighter than .058 ROD. What do we do with
those pixels?
The simplest approach is to set pixels that
are lighter than the mean background value to the mean
background value. The same strategy could be used at the
maximum limit of the calibration. Those pixels that are
darker than the maximum calibrated ROD value are set to the
maximum. This approach to extreme values is termed
"clipping" (Figure 3).
Figure 3: Histogram of calibrated pixel
values from film background. During calibration, film
background (concentration 0 nCi/g) had a ROD value of .058.
When we then read data from film background, some of the
pixel values fall below .058 ROD, the 0 concentration
reference. These values have been adjusted upwards, or
"clipped" to 0, resulting in a large peak at 0.
Because we have adjusted the value of some pixels upwards,
our mean density value for this sample window now
overestimates its true density.

The consequence of clipping is that
readings taken from regions at the light limit will tend to
overestimate concentration. We are selectively increasing the
values of those pixels which lie below the calibration limit.
Similarly, readings taken from regions approaching the high
concentration reference will tend to underestimate the true
concentration. We are selectively decreasing those pixels
which lie above the calibration limit.
Avoid exposing specimens to the point that
regions of interest approach the minimum or maximum
calibrated density. With care, clipping-induced errors will
be minimal. However, rather large clipping errors can occur
if the pixel noise is high in our images (Figure 4) and/or if
we attempt to work with image data that lie very close to our
calibration limits. Under these conditions, a considerable
proportion of pixels will lie beyond the calibration limits.
As a consequence of clipping these pixels, the concentration
values that we obtain from the imaging system can differ
between media (different films, phosphor plates), and will
also differ from the gold standard of liquid scintillation
counting.
Figure 4: Histograms of film background
taken from a relatively low noise specimen (left, Hyperfilm
imaged with a Xillix digital camera), and (right) from a Fuji
BAS 3000 phosphor plate imager with much higher noise. Note
that the film values are distributed within about ±20 fmol
of the zero point, while the BAS range from about -45 fmol to
about 100 fmol. Clipping the BAS data will have a greater
effect than clipping the film data. This could cause density
values obtained from the two technologies to differ.

Recognizing that real-world images are
often noisy, or contain very light and very dark data, we
must implement some procedure that minimizes the effects of
clipping. The simplest approach is to warn the user, so that
any windows containing clipped data can be regarded with
caution. MCID/AIS warn (by showing the density value in red)
whenever pixel values in a sample window extend beyond the
calibration limits.
Extrapolation
Beyond simply warning that the data in a
window are suspect, there are things we can do to minimize
the effects of poor data upon densitometric accuracy. Extrapolation
is extension of the calibration function beyond the
calibration limits. Pixels that are lighter than the lower
calibration limit will be assigned a negative concentration
value. Pixels that are darker than the maximum calibration
value will be assigned values higher than the maximum
calibration value. The use of extrapolation makes the value
obtained from a poor specimen more closely approach the
concentration value that would be obtained from a liquid
scintillation counter. It also minimizes the differences
observed when the same specimen is exposed on media with
different noise properties.
MCID and AIS allow clipping, or various
forms of extrapolation. Selection of extrapolation is up to
you. If you choose to extrapolate at the low extreme, pixels
lighter than the zero concentration reference will be
assigned negative values during the calculation of the sample
window mean. If you extrapolate at the high end, pixels
darker than the maximum concentration reference will be given
higher values estimated by the extrapolation function. In our
experience, extrapolation works much better than clipping
(Table 3).
Table 3: Comparison of the effects
of clipping and extrapolation upon density values obtained
from two different imaging technologies (film and phosphor
plate). A set of calibrated Amersham 3H Microscales were
exposed to Hyperfilm (3 weeks) and to a Fuji BAS 3000
phosphor plate imager (4 days). Although the two imaging
technologies are very different (film is low noise, high
resolution, narrow dynamic range vs. plate is noisier,
low-medium resolution, broad dynamic range), we would like to
obtain similar results so that we can select an appropriate
imaging medium for specific tasks.
MCID was calibrated to images of the
concentration standards, and was then used to read from the
minimum and maximum standards. Note that the extrapolated
concentration reading is better with both the film and plate
technology. Also, the film and plate do not match each other,
unless extrapolation is used.
| |
Concentration standard (fmol/mg)
|
Clipped reading |
Extrapolated reading |
| Hyperfilm |
0 |
2.2 |
0.1 |
| |
769.2 |
768.8 |
769.3 |
| BAS3000 |
0 |
8.9 |
1.1 |
| |
769.2 |
745.32 |
769.2 |
Appendix:
Densitometric Applications
Receptor
Analysis
MCID is by far the most popular image
analyzer in receptor analysis applications, both because of
its proven densitometric accuracy and because of the many
specialized functions that it includes. For example, there
are many ways in which total and nonspecific binding sections
can be aligned with each other, and with stained sections.
Then all binding parameters can be read with a single
operation.
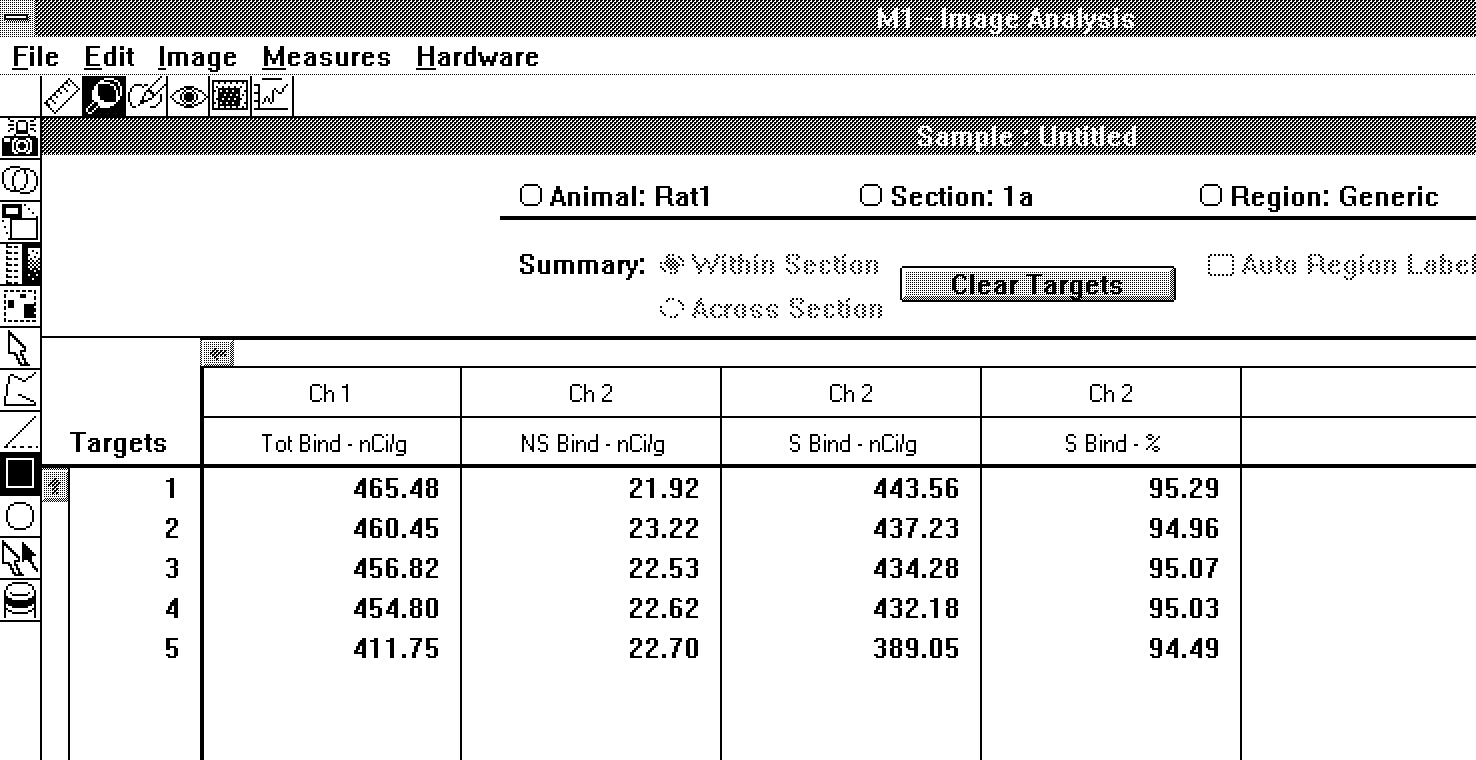
Total,
Nonspecific, and Specific Binding
To obtain specific binding, we have to
subtract nonspecific binding from total binding. MCID/AIS
offer an extensive set of image alignment functions, which
are used to register the total and nonspecific binding
images. Once the images are in register, there are two ways
to generate specific binding data.
- Image formation - The
entire nonspecific binding image can be
subtracted from the total binding image to yield
an image of specific binding.
- Numerical analysis - A
regional nonspecific binding value is subtracted
from that same region's total binding value to
yield a specific binding value.
Unless we are creating presentation images
of specific binding (slides, publication), we often prefer to
use numerical analysis. The image formation process requires
subtraction of the nonspecific binding image, and this
subtraction is subject to clipping and round-off errors. In
contrast, numerical analysis allows extrapolation to operate
during density calculation, yielding higher precision. The
data are presented as total, nonspecific, specific, and
percent specific binding for each region of interest (Figure
5).
Figure 5: Arrangement of data in the
receptor study mode.
Autoradiographic
Measurement of Rates of CGU, CPS, and CBF
In reading rates of glucose utilization,
protein synthesis, or blood flow, an initial calibrated
density value is passed through an operational equation
before being reported as a rate at which some physiological
process is occurring. Solution of an operational equation
requires that data regarding plasma LSC counts and/or other
data be entered into the system.
Cerebral
Glucose Utilization
CGU is calculated using Sokoloff's
(Sokoloff et al., 1977) original operational equation
(Equation 6), or the Savaki (Savaki et al., 1980)
modification (Equation 7). The Savaki equation should be used
when plasma glucose concentrations vary considerably during
the experiment (within a range of about 70 - 250 mg%),
especially when the animal becomes progressively
hyperglycemic. Keep in mind that the lumped constant changes,
increasing in hypoglycemia and decreasing in hyperglycemia
(Schuier et al., 1990; Suda et al., 1990).
Equation 6: Sokoloff's original operational
equation for CGU.

Equation 7: Modified operational equation
for CGU.

Ri is the rate of glucose utilization. T is
the time at the termination of the experimental period. Ci*
is the total 14C concentration in a single homogeneous tissue
of the brain. Cp* and Cp represent the concentrations of
[14C]deoxyglucose and glucose in the arterial plasma. l is the ratio
of the distribution space of deoxyglucose in the tissue to
that of glucose. f is the fraction of glucose which, once
phosphorylated, continues down the glycolytic pathway. Km*,
Vm*, and Km, Vm, represent the Michaelis-Menten kinetic
constants of hexokinase for deoxyglucose and glucose,
respectively. The six constants collectively constitute the
lumped constant. The solution is presented as follows (Figure
6).
Figure 6: A screen from the MCID program, showing a
solution for the CGU operational equation.

Changes can be made to any terms in the CGU
equation, by entering new values into any portion of the
solution screen. For example, the lumped constant is very
sensitive to the plasma glucose level and should be modified
if hypo or hyperglycemia is present. Enter any relevant
changes to the default constants, and press Calculate
to re-solve the equation. It is also possible to skip the
accessory file entirely, and type in precalculated values for
the tissue integrals.
Cerebral
Protein Synthesis
Protein synthesis is measured using the
autoradiographic [1-14C]leucine method. The procedure is
exactly as given for LCGU, above. The method has evolved
through various forms (Smith et al., 1980; Ingvar et al.,
1985; Smith, 1991). The present form of the operational
equation (Equation 8, Smith, 1991) assumes that sections have
been washed by repeated immersion in buffered formalin before
autoradiography.
Earlier forms of the equation (Ingvar et
al., 1985) did not account for reflux of labeled leucine into
the precursor pool. This reflux has been shown to occur
(Smith et al., 1988). Therefore, the earlier forms of the
equation underestimated actual rates of protein synthesis.
The most recent form of the leucine operational equation
yields values considerably higher than those obtained with
the previous equation.
Equation 8: Operational equation for
measurement of rates of cerebral protein synthesis

Ri equals the rate of reaction in tissue i.
Pi* (T) is the concentration of labeled leucine incorporated
into protein in tissue i during the experimental period (T).
This is measured from the washed autoradiographs. The factor li is composed
of rate constants and varies from tissue to tissue. Smith
(1991) has used a value of .58 for li. Cp and Cp* represent
the concentrations of free leucine and [1-14C]leucine,
respectively, in arterial plasma.
Blood
Flow
1. Capillary blood flow, indicator
fractionation
This is a variation of the method
introduced by Goldman and Sapirstein (1973). The procedure
requires calibration to nCi/g. The withdrawal rate (arterial
flow rate in your pump) and LSC counts are taken from an
accessory file.
Equation 9: Operational equation for
indicator fractionation blood flow.

The regional rate of blood flow is FB. A(T) is the amount of
indicator per unit weight of tissue at time T. WR is the
withdrawal rate of your arterial pump. CP is the plasma mean
14C value, across all the sets, calculated as below (equation
10).
Equation 10: Calculation of the mean plasma
14C value for indicator fractionation blood flow.

where n: the number of batches
mi: the number of LSC samples for the ith
batch
LSCij: the jth LSC sample for the ith
batch
bkdi: the background value for the ith
batch
2. Capillary blood flow, tissue
equilibration (Sakurada)
Calculation of cerebral blood flow by the
tissue equilibration method is shown (Equation 11, Sakurada
et al., 1978). Calibration is to nCi/g or to dpm/g. An
accessory file contains times (seconds), sample volume (ul)
or weight of filter paper, washout correction factor (/min),
and LSC counts (DPM).
Equation 11: Operational equation for
tissue equilibration blood flow.

A(T) is the amount of indicator per unit
weight of tissue at time T. l is the estimated
equilibrium tissue-blood partition coefficient of the
indicator. F is the actual rate of blood flow per unit weight
of tissue. Ca(t) is the concentration of indicator in the
arterial blood perfusing a tissue at the time t, and T is the
time at the end of the experimental period.
3. Capillary blood flow, tissue
equilibration (Modified)
This modified form of the Sakurada equation
(for details see Jay et al., J. Cereb. Blood Flow Metab. 8:p
124-125, 1988) applies a correction for the distortion of the
arterial input function in the catheter.
Equation 12: Modified operational equation
for tissue equilibration blood flow.

where Ci(T) is the tissue concentration of the tracer at a
given time, T, after its introduction into the circulation at
zero time; C'a is the measured concentration of the tracer in
the arterial blood sampled from the distal end of the
catheter; l is the tissue/blood partition coefficient for the
tracer; r is the rate constant for the monoexponential
washout of the catheter dead space; t is the variable time
after correction for the transit time through the catheter;
and K is a constant that incorporates within it the rate of
blood flow in the tissue. The constant K is defined as
follows:

where F/W equals the rate of flow per unit
mass of tissue; l is the tissue/blood partition coefficient for the
tracer; and m is a constant between 0 and 1 representing the
extent to which diffusion equilibrium between the blood and
tissue is achieved during passage from the arterial to the
venous end of the catheter. We use m = 1.
References
Baskin, D.G. and Wimpy, T.H. Calibration of
[14C] plastic standards for quantitative autoradiography of
[125I] labeled ligands with Amersham Hyperfilm B-max, Neuorscience
Letters 104:171-177, 1989.
Baumgartner, W., Atzpodien, E., Weintraut,
H. and Seibold, G. Factors influencing computer-assisted
video image analysis of immunocytochemically stained
lymphocytes and macrophages in the spleen of mice, Journal
of Immnunological Methods, 151:309-312 (1992).
Benno, R.H., Tucker, L.W., Joh, T.H. and
Reis, D.J. Quantitative immunocytochemistry of tyrosine
hydroxylase in rat brain. I. Development of a computer
assisted method using the peroxidase-antiperoxidase
technique, Brain Research 246:225-236 (1982).
Brown, A.R. and Fishman, M. Tumor necrosis
factor-a analyzed within individual macrophages by combined
immunocytochemistry and computer-aided image analysis. Cellular
Immunology 130:352-363 (1990).
Bryan, H. and Kutyna, F. The development
and evaluation of a low-cost microdensitometer for use with
the 2-deoxy-D-glucose method of functional brain mapping. Journal
of Neuroscience Methods 8:61-72 (1983).
Burke, R.E., Cadet, J.L., Kent, J.D.,
Karanas, A.L. and Jackson-Lewis, V. An assessment of the
validity of densitometric measures of striatal tyrosine
hydroxylase-positive fibers: relationship to
apomorphine-induced rotations in 6-hydroxydopamine lesioned
rats. Journal of Neuroscience Methods 35:63-73 (1990).
Garrison, C.J., Dougherty, P.M. and
Carlton, C.M. Quantitative analysis of substance P and
calcitonin gene-related peptide immunohistochemical staining
in the dorsal horn of neuropathic MK-801-treated rats. Brain
Research 607:205-214 (1993).
Goldman, H. and Sapirstein, L.A. Brain
blood flow in the conscious and anesthetized rat. American
Journal of Physiology 224:122-126 (1973).
Haas, R.A., Robertson, D.M. and Myers, N.
Microscope densitometer system for point measurement of
autoradiograms. Stain Technology 50:137-141 (1975).
Huang, X., Chen, S. and Tietz, E.I.
Immunocytochemical detection of regional protein changes in
rat brain sections using computer-assisted image analysis, The
Journal of Histochemistry and Cytochemistry 44:981-987
(1996).
Ingvar, M.C., Maeder, P., Sokoloff, L., and
Smith, C.B. Effects of ageing on local rates of cerebral
protein synthesis in Sprague-Dawley rats. Brain 108:155-17
(1985).
King, M.A., Hunter, B.E., Reep, R.L. and
Walker, D.W. Acetylcholinesterase stain intensity variation
in the rat dentate gyrus: A quantitative description based on
digital image analysis. Neuroscience 33:203-221
(1989).
Laborde, K., Bussieres, L., De Smet, A.,
Dechaux, M. and Sachs, C. Quantification of renal Na-K-ATPase
activity by image analyzing system. Cytometry
11:859-868 (1990).
Mize, R.R. and Luo, Q. Visual deprivation
fails to reduce calbindin 28kD or GABA immunoreactivity in
the Rhesus monkey superior colliculus. Visual
Neuroscience 9:157-168 (1992).
Nabors, L.B., Songu-Mize, E. and Mize, R.R.
Quantitative immunocytochemistry using an image analyzer. II.
Concentration standards for transmitter immunocytochemistry. Journal
of Neuroscience Methods 26:25-34 (1988).
Ramm, P. Kulick, J.H., Stryker, M.P. and
Frost, B.J. Video and scanning microdensitometer-based
imaging systems in autoradiographic densitometry. Journal
of Neuroscience Methods 11:89-100 (1984).
Reiss, D.J., Benno, R.H., Tucker, L.W. and
Joh., T.H. Quantitative immunocytochemistry of tyrosine
hydroxylase in brain. In: Cytochemical Methods in
Neuroanatomy, Allan R. Liss, New York, 1982, pp. 205-228.
Reivich, M., Jehle, J.W., Sokoloff, L. and
Ketz, S.S. Measurement of regional cerebral blood flow with
antipyrine in awake cats. Journal of Applied Physiology
27:296-300 (1969).
Sakurada, O., Kennedy, C., Jehle, J.,
Brown, J.D., Carbin, G.L., and Sokoloff, L. Measurement of
local cerebral blood flow with iodo-[14C]antipyrine. American Journal of Physiology,
234: H59-H66 (1978).
Savaki, H.E., Davidsen, L., Smith, C., and
Sokoloff, L. Measurement of free glucose turnover in brain. Journal
of Neurochemistry 35: 495-502 (1980).
Schuier, F., Orzi, F., Suda, S.,
Lucignani,m G., Kennedy, C. and Sokoloff, L. Influence of
plasma glucose concentration on lumped constant of the
deoxyglucose method: Effects of hyperglycemia in the rat. Journal
of Cerebral Blood Flow and Metabolism 10:765-773 (1990).
Smith, C.B. The measurement of regional
rates of cerebral protein synthesis in vivo. Neurochemical
Research 16:1037-1045 (1991).
Smith, C.B., Deibler, G.E., Eng, N.,
Schmidt, K. and Sokoloff, L. Measurement of local cerebral
protein synthesis in vivo: Influence of recycling of
amino acids derived from protein degradation. Proceedings
of the National Academy of Science USA 85:9341-9345
(1988).
Smith, C.B., Davidsen, L., Deibler, G.,
Patlak, C., Pettigrew, K. and Sokoloff, L. A method for the
determination of local rates of protein synthesis in brain. Transactions
of the American Society for Neurochemistry 11: 94 (1980).
Sokoloff, L., Reivich, M., Kennedy, C., Des
Rosiers, M.J., Patlak, C.S., Pettigrew, K.D., Sakurada, O.,
and Shinohara, M. The [14C]deoxyglucose method for the
measurement of local cerebral glucose utilization: Theory,
procedure, and normal values in the conscious and
anesthetized albino rat. Journal of Neurochemistry 28:
897-916 (1977).
Suda, S., Shinohara, M., Miyaoka, M.,
Lucignani, G., Kennedy, C. and Sokoloff, L. The lumped
constant of the deoxyglucose method in hypoglycemia: Effects
of moderate hypoglycemia on local cerebral glucose
utilization in the rat. Journal of Cerebral Blood Flow and
Metabolism 10:499-509 (1990).
Tatton, W.G. and Greenwood, C.E. Rescue of
dying neurons: A new action for deprenyl in MPTP
Parkinsonism. Journal of Neuroscience Research
30:666-672 (1991).
Toga, A.W., Santori, E.M. and Samaie, M.
Regional distribution of flunitrazepam binding constants:
Visualizing Kd and Bmax by digital image
analysis, Journal of Neuroscience 6:2747-2756 (1986).
Last Updated on August 26, 1997 by Bob
Click here to return to the Imaging
Research Home Page.
Copyright © 1997 Imaging Research Inc. All rights reserved.