Cover page
Preface
Introduction

	Context
Feminism
Feminist Research
Housing and Feminism
Self Build Housing

	Method
Sample
Process
Analysis

	Case Studies
Marion
Pam
May
Carol
Jan
K
Tashe

	Findings
Personal Background
Community
Training and Technical
Land Policies
Institutional Support
Shelter and Service
Planning and Design
Building Materials

	Conclusions
Summary
Recommendations
Research
|
K Nevertheless K's decision to build for herself was "more about getting shelter in a remote location, not a home ownership motive". K says that she had the option financially to purchase a home but that this option did not fit with her ideas about self-sufficiency and remote living.
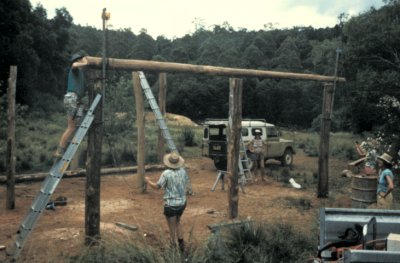
K decided to build her house in 1974 and then in February 1975 completed the setting out and commenced site excavation by hand using a spade. The original hexagon site had to be leveled by up to a twelve inch (30 cm) cut in some places. In June 1975 the first seven poles were erected. Twenty years later, by March 1995, the house was mostly complete except for the lack of architraves and a hot water service. When asked if the process took longer than she expected K said only "YES!!!". This timeline covers K's twenty years of construction on her house. 1975
c1978
1981
1983-6
1987
1988
1989
1990
1991
1992
1993
1994
1995
For K the issue of timing the construction work was influenced by several factors. K found that in the early years she would have time to build but no money, and later money but no time. Another factor was the weather, the winters being very cold and windy and the summers very, very, wet. Progress with construction was also dependant on the availability of transport . In the first years there was no proper transport, then K had the use of the communal Land Rover, and since 1986 she has had her own four wheel drive ute. K said she had some paid help from craft builders, a local women's carpentry partnership, and before 1980 a lot of group help from the collective. From 1986 K did most of the work alone but previously her partner had helped mix mortar while the fireplace was under construction. K described some of the typical jobs she performed. Stonework: Start early. Arrange rock in place. Mark with nail and check plumb and line. Remove rocks in order. MIX (1 cement, 3 mud, 3 sand, plus 'bycol') Lay prearranged rocks. (All rock local, undressed, irregular.) Lay two or three courses per day!!. Timberwork: Plumb, level, mark and measure two or three times each job, using a prepared plan of all stages in strict order. Checking continuously for future problems and best order of work. Most work done with hand tools!! Footings: "Horror show for one worker." Built the formwork using off-cuts to minimise cutting, and rocks, wedges etc., to minimise fixing; ensuring the top was level. Concrete mixed in the wheelbarrow with hoe. Pour into form and tamp corners, repeat the process till formwork full (sometimes in dusk), place bolts before concrete "goes off". "Some footings have [reinforcing] in them." Sills: First prepare 6x2 or 8x2 timbers, planning and sanding, then apply mortar to the wall top where the rods had been previously placed. Next drill the sill and drop onto the rods. Settle and level the sill. Nuts later. Glaze with timber beads and silicon. "For timber work , lots of leveling, plumbing, measure and re-measure. By aiming for no error I'd rarely get bad error. I preferred stonework, though physically demanding, it was less exacting, minor errors didn't matter the same way."
"I developed the VLR technique (Very Large Rock) for the first two rows or so. I could tow them manually around on sheets of iron and lever them on to the footings. This meant I could put up 18" (45 cm) or more of wall with little mortar, in fairly quick time. I always looked along the six mile mountain road for new fallen rocks, especially gems with a couple of faces and picked them up in transit (after I got the ute). By the last rock wall I was onto colour, texture and pattern. I found green and red rocks and really enjoyed it as a type of art work!"
"The greenhouse was designed with the help of a book. The garden surface is at ground level, with topsoil from the site put back into the pit. The pit was lined with concrete blocks to take the wall structure. Front (northern) side is vented below the glass. The top edge is vented to the open air. The wall adjoining the kitchen is also vented at the top and bottom so that glasshouse heat can be cycled into the house."
|