|
Showing Guide Index |
Braiding and Plaiting
| Contents: |
|
Plaiting the Tail
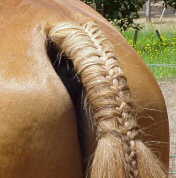
A pulled or plaited tail is required at most types of horse shows. Although not difficult to learn, a plaited tail creates a neat, sharp result. However, it is probably a good idea to have a few practise runs before the actual show, as it does take a little while to figure it out. When preparing for your show, make sure you leave 20-30 minutes for the tail plait, as you will probably have to unravel it and start again a couple of times due to mistakes - I normally do!
You will need:
- A spray bottle of water
- A mane and tail comb
- A rubber band or needle and thread
- Hair spray and/or hair gel
Once you have your horse's tail clean, comb through the top of the tail so it is untangled. Spray the top of the tail with lots of water. The spray bottle is my (not so secret) weapon! If you plait they tail when the hair is dry, you will probably get more wispy bits. I don't put any gel or hair spray on until I've finished the plait, as I find this makes plaiting very difficult, especially the top bit.
 Step One:
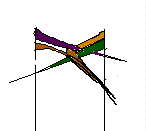
Take a small amount of hair, from the very top of this side of the dock, on either side. For the purposes of this explanation, I'm going to lay the left (purple) strands over the right (yellow) strands, but you could do it the other way if you want. The smaller the bunches of hair you use, the nicer the plait looks, in general. A bunch around 7-10mm wide is what I normally use.
 Step Two:
Now take a bunch of hair from the right side (green) and lay it over the bunch from the left (purple). You know have the three strands of the plait that you will add too as you continue down the dock.
Step Three: Take the 'yellow' strand, and lay it over the green strand. In this diagram, the plait is a bit to the right, make sure your's is centred!
Step Four
 Now take a bunch of hair around the same size as the other bunches, from the left side of the tail, and add it into the yellow bunch, by simply laying it on top. Make sure you're holding all bunches firmly while plaiting, but it is especially important that you are holding everything firm from now on.
Step Five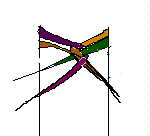 Now take the purple bunch and lay it over the newly added too yellow bunch.
Step Six Take another small bunch from the right hand side and lie it over the purple bunch.
Step Seven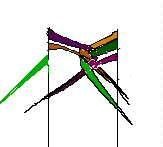 Hopefully you've seen the pattern by now. The next step is to lay the green bunch over the purple bunch, and then add in new strands from the left side of the tail to the green bunch.
Step Eight This step is really the same as the step above - lay the yellow bunch over the green bunch, then add to the yellow bunch.
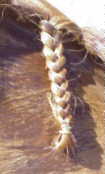
To complete the tail, continue to plait down, adding in strands from either side, until you have plaited down far enough to suit your hors (see photo at beginning of instructions for how I do Tisca's). To finish off the tail, there are a number of methods. You can either normally plait down (not adding in extra bunches) until you reach the end of the long strands you are left with when you have finished the braid, and then secure with a rubber band and leave it hanging amongst the tail. A neater result is to then carefully push the long plait up inside the braid, or doubling it over and stitching together. You could also plait down hardly at all, and just secure the end of the plait with a rubber band and leave the long end bits free to blend in with the tail. To keep the plait neat, generously spray it with hairspray, and use gel to stick down any stray hairs.
Forelocks:Use the same method as for plaiting a tail, but push the end of the plait up into the braid so it is neat.
Good luck!
Instructions and graphics by Leah Clapton. Please do not remove either from this page, although of course you are welcome to print them out!.
American Style Hunter Braids
We don't have this style of braid in Australia, so thankyou very much to Caitlin for writing these instructions out. She also told me that she doesn't wash Holly's mane before a show, as she finds that this creates neater braids.
By Cait
You will need:
- 20 to 30 strands of tough yarn (More or less, it varies from neck to neck.)
- A fine tooth comb with one tooth broken about 2 cm or 1 inch from the tip
- A small spray bottle filled with water
- 1 pull-through (Take a piece of 10 inch wire and fold it in half. Then twist it leaving a loop at the fold. Then secure the two end with tape. I've found electrical tape works the best. Or you can just buy one.)
- 1 hair clip for humans (optional)
Step Two: Take your comb and measure out the amount of mane using the broken tooth as a guide as to how thick the braid should be. Separate the mane you are about to braid from the rest. You can use the comb to hold back the rest of the mane, but I find it easier to use the hair clip. Separate the mane you are about to braid into three even pieces. Braid tightly down about four or five loops from the top and lay yarn on the braid and begin to braid the yarn in. Braid down until you start to lose hairs. It looks neater if the braids are all the same length so I tend to use my index finger as another measuring tool to make them all the same length. When you get to the end of the braid take the yarn together and knot it very tightly around the ends of the hairs. From there you have two choices: keep going to step 3 or start the next braid. Through experience I find it easier to move on to the next braid so I don't have to think too much. Braid the entire mane in this fashion, even the thin hairs on the withers.
Step 3: Take the pull-through and insert in in at the absolute top of the braid in the middle and push it down, but not all the way through. Take the two ends of the yarn and stick them through the loop in the pull-through. Then holding the tip of the pull-through pull the yarn back through the top of the braid. When you let it go it should fall onto the wrong side of the neck. This is the important part. Now bring the yarn back and make a surgical knot UNDERNEATH the braid. Then make another surgical knot ON TOP of the braid about one-third of the way down and pull tight making only a slight fold on the top. Then make a regular knot on top of that. This next tip is optional. Make another regular knot underneith the braid. Cut the yarn a bit less than 1 cm from the knot. The reason for the last knot underneigh the braid is purely for looks. It looks neater and strengthens the other knots a little bit. However, it is harder to get out at the end of the show. I like to do the last underneith knot, or "A" Braids, just at large, multiple day, horse shows. Do the forelock the same as the neck. In the end it should look somewhat like this:
__________________ <- top of neck
8 8 8 8 8 8 8 8 8 <- braids
Keeping the Braids In
You will find that you will absolutely dread the moment you enter your horse's stall to check his/her braids. Images of all the braids caked in mud and or shavings and all of them only half rubbed out will flash through your mind. Your stomach may become unsettled at the thought of all that tireless work you put in the day before ruined and you have to do it... again. Rubbers (also commonly known as other names) are a braider's worst nightmare, so protect your braids. I use a mane tamer to save my work (art). Loop it around the top piece of a leather halter that you'll leave on at night and at the other end pin to his light blanket. I pin it with a diper pin and rubber bands, so the horse can still eat from the ground.
Taking the Braids Out
Use a (seam)ripper and pointing it away from you and up away from the horse rip out the top knots. Then the bottom. When you have the braid completely unfolded point the ripper down and rip out the securing braid at the bottom of the braid. Be extremely careful not to catch any hairs. Also, don't be too violent. Rippers break. Make your rip quick and swift.
NOTE: This style of braiding isn't very hard to learn but takes time and effort to master. I strongly suggest that if you are new, to make a practice braiding job one or two times before the show. It would also be wise to practice your first braiding jobs on a horse that just sleeps on the cross ties. A wiggley horse is hard to braid, especially in the beginning. I usually take about an hour and a half to do a good braiding job. However, my trainer can do a braiding job in 40 minutes and I know another experienced trainer who can do it in 20. Speed comes with experience. Also, be patient! It can be infuriating when you have to redo a braid several times, but keep your cool anyway.
Tips to make Braiding (sort of) more fun
This refers to all types of braids - not just hunter braids ;-)
Braiding can be mind bogglingly boring. I highly recommend having a friend braid his/her horse with you. Though, don't expect much conversation the first time around because you both will be concentrating too hard to talk. Once you don't have to think too much, I suggest some of your favorite music playing. You know you're getting good when you can sing, dance, and braid at the same time. (Yes, it can be done, and it is quite a sight to see.) I also prefer to braid in a busy place. It seems to make the time go by faster. Braiding can also be a rather tiresome job, so I recommend doing it earlier on in your day of preparing for the show. I also suggest having food and drink with you. With a rather large job ahead of you, you are bound to get hungry. I find salted crackers and water are the best.
HAVE FUN! :-D
Instructions by Cait Jenkins. Please do not remove them from this site. (Although all instructions on this site are written with the intent to be printed out).
Step One:
Step Two:
Step Three:
Spray *heaps* of hair spray over the plaits to hold them. I normally do step one the night before (covering them in hair spray, putting on a skinny hood (lycra neck cover) and neck rug), and then step two and three the morning of the show. Once you have finished the plaits I've found it isn't a good idea to cover them with a neck rug as this tends to rub them out, although these plaits tend to hold a lot better than Australian rosettes.
Instructions by Leah Clapton. Please don't remove them
Step One:
First you need a well pulled, or at least thinned and short
(approx 10-12cm - that's maybe 4 -5 inches I think) mane. Wash it
at least 3-4 days(maybe more) before the show so some of the oil
has come back into it - otherwise it is too slippery to plait neatly.
Divide the mane up into an odd number (that's the tradition over
here - plus the forelock equals an even number). Tisca seems to
have a never ending neck, so I do around 25 or so braids. Each
section of mane should be around 1-1.5 inches long - less if your
horse has a really thick mane. When you divide it up hold each
section with those special plaiting rubber bands. Taking one section
at a time
thoroughly wet it with the sprayer bottle. Make sure the
roots are really wet so you don't have all those horrible frizzy bits
sticking out while you plait. Plait down normally, making sure you
do it really tightly. About 3/4 of the way down add about 25cm of thread. To add the yarn you just lay it across two sections of the
plait you are in the process of doing and continue plaiting like the
thread is part of your horse's mane. When you get to the end tie off
the plait tightly with the thread.
Step Two:
Step Three:
After removing the pull through, hold the little knob against the neck and wrap the plait as tight as you can as close to the neck
as you can, around the knob. The diagram on the right
If you are doing a turnout class you can't use rubber bands, so you would have to tie the thread off to secure the plaits.
English Style Plaits
For a long time the most popular style of mane plaiting in Australia was the Australian rosettes, instructions for which are given further down this page.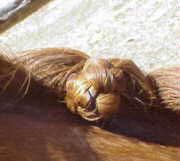 However, over the past two seasons or so, the softer looking 'english' style plaits have become very fashionable. Although for Australian rosettes the mane has to be quite thin, for english plaits the mane is still short (around 10cm long) but thicker. Before you plait, the mane has to be clean and freshly brushed. The following instructions are the way I have adapted many other peoples methods to the way that suits me. Thankyou to Heather Bryce for initially telling me how to do them.
You will need:
One of the great things about english plaits is that you don't do very many! Divide the mane up into approx 9 or 11 (make sure it is an odd number) of even sized bunches, and secure with a rubber band. I work from the withers to the poll, (make sure you have clipped a bridle path behind your horses ears of around 7 cm)and do step one to all bunches before then doing step two and three to each plait.
 Wet each section thoroughly (add gel if you want) and plait down securely each bunch. The very top should be not quite as tight as the rest. When you reach the end and secure it with a rubber band, with the last twist double over the end of the plait, so that the end of the plait is round, and not bristly with hairs. (see photo). This becomes important later. If you are doing a turnout class you should secure the end with thread. Thread your needle with approximately 20-25cm of thread and poke it through the rubber band three times, so that you end up with the needle hanging down underneath the plait. By poking it through the rubber band you are making the thread much more secure then if you just wrapped it around the end. BTW, you always plait on the right side of the neck, although it looks like I have done the left side as Tisca's neck is down as he was eating.
 Now that you have the thread hanging beneath the plait, take the needle and poke it through the top of the plait, right at the base of the mane, from underneath. This will have the effect of doubling the plait over. Secure this folded over plait together by stitching down the plait, making sure you end up with the needle once again underneath the plait, hanging out the end. (see diagram - I've used blue thread so hopefully you can see it). If you haven't folded the end of the plait over earlier, bristly bits will stick out the top - which is *not* a good look ;-).
If you want dressage style plaits, this is the stage when you wrap the white electrical tape around the doubled over plait, and that's it. I've never done dressage plaits before, but I'm pretty sure that that's how you do it.
Take the needle and poke it through the top of the plait as you did before, so you are doubling the plait once again. Secure this by stitching through the plait a number of times. You don't have to tie it off, just cut off the end of the thread if necessary. You should end up with a plait looking similar to the photo of the finished plait at the beginning of these instructions. If not, then the mane probably isn't short enough.
Australian Rosettes
It was only recently that I learnt that there was a way to plait a horse's mane, other then the method given below.  Although Australian rosettes look great if done well, as I'm not a particularly brilliant horse hair stylist(!), I've found it easier to acheive neat results with the english plaits. However, I have adapted the way I was taught to do Australian rosettes to a method I find much easier.
You will need:
This is when the wonderful US invention, the pull through, comes
in. I only heard of these a couple of months ago, and have made one
out of a bit of wire that I taped into a needle shape with the end
covered it tape so it won't scratch Tisca. I think just using a
large plastic needle would be easier! You stick the pull through
straight through the base of the plait. (see diagram)  Take the ends of the thread around the end
of the plait and loop them through the eye of the pull through. Then
'pull through' the needle so the plait is now laying the other way up
against the neck (the same side), with a little 'knob' being formed at the top where
the plait was pulled through.
Take the ends of the thread around the end
of the plait and loop them through the eye of the pull through. Then
'pull through' the needle so the plait is now laying the other way up
against the neck (the same side), with a little 'knob' being formed at the top where
the plait was pulled through.  is supposed to show this. The darker line is where the edges of the plait are touching. This forms the
'rosette'. To make the plait as close as possible to the knob, wrap
the remaining ends of the thread (there should still be quite a bit)
tightly around the plait and when you come to the end of the thread,
secure the whole thing with a rubber band. This should be close to
the neck and you shouldn't be able to see it at all.
is supposed to show this. The darker line is where the edges of the plait are touching. This forms the
'rosette'. To make the plait as close as possible to the knob, wrap
the remaining ends of the thread (there should still be quite a bit)
tightly around the plait and when you come to the end of the thread,
secure the whole thing with a rubber band. This should be close to
the neck and you shouldn't be able to see it at all.
Do the entire neck this way (see graphic below of a finished mane)and spray with heaps of hair spray. Do
the forelock like a mini tail plait - just a french braid, rather
than a 'rosette'.

Plaiting and Braiding
Preparing Your Tack and Clothing
At The Show