|

The Basic Steps
The first step is to determine the amount you wish to chop. The '53-'56 F-100's look great with anything from a 2 1/2" to a 4" chop, although I have HEARD of as much as 5 1/2" being removed(I also heard that the gentleman who
did that chop also liked to peek through keyholes...TETO).
These are the cuts that you'll need to make on the door window frames and the cab's A-pillars...The back corners of the cab are nearly square cuts. There, you'll need to align the cut so that there is minimal problems in aligning the rear window opening and
the door jamb. Use lots of butcher paper and/or tape until everthing looks like it should...then check it again.

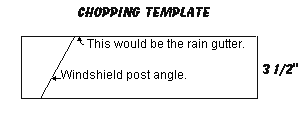
I did a 3 1/2" chop, so I built a template (a piece of sheet metal) that was exactly 3 1/2" wide, with the A-pillar angle drawn on the front of the template to determine the correct amount
to remove from that area. You can get the angle by laying a combination square on the raingutter and adjust the rule to the windshield post. Then transfer that angle to the template you are making.
KEEP your cuts square, then file down to the finish line prior to tack welding. Measure everything several times to make sure that you have everything aligned. TAKE YOUR TIME!!!
I tack welded the doors first, then started setting up the four pieces of the roof, using the door window frames as references. I used flat stock to clamp the roof pieces together with (ALIGNMENT) and checked everything again before I started tack welding the cab corners, A-pillars and cutting out the filler pieces I needed to tie
the roof together. When welding on the roof, use lots of tack welds and skip around to avoid warping the metal.
(NOTE: As a side benefit, chopping the top also gave me the opportunity to patch a BADLY done frenched antenna....)
 |
It looked like someone jabbed a piece of pipe into the cab and called it a frenched antenna. No drainage, so lots of rust and a ton of body filler means this mess has got to go. If you look closely, you can see the relief cuts I made to match the cab's contours during the top chop. |
| I used a piece of 16 gauge sheetmetal; tack welding and the use of a hammer and dolly formed the patch panel to the curve of the B-pillar. |
 |
 |
Isn't it amazing what a grinder, file, sandpaper and a few gentle taps of a body hammer can do? This entire repair took about 30 minutes. |
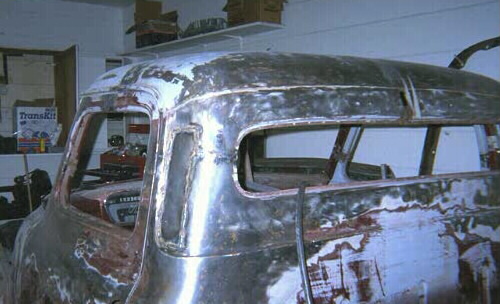
Here's a full-on back view of the completed top chop....Surprisingly, if you sit inside the cab and look out that slit that was once a back window, there's still a lot of room to see....COOL!

As you can see, there's still a lot of old body filler all over. Dipping wasn't an available option and sandblasting is too rough on the sheetmetal...that means chemical stripper and elbow-grease..
(Keep that stuff off your skin and make SURE you wash before using the bathroom unless you're into inventing a DANCE! [P.S. A loud SCREAM would be appropriate here.])
These are cool looking side and frontal views which will both be replaced by better shots in the near future.
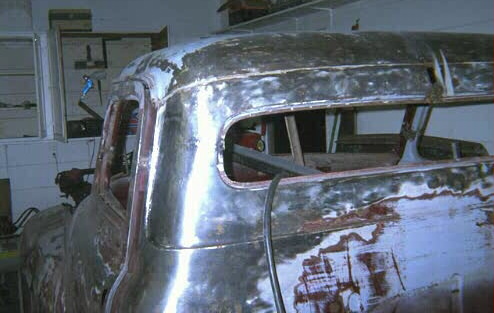
| Just stepping into the garage reveals a great side shot of a 3 1/2" top chop...Just a couple of days after this picture was taken, we enjoyed 10" of new snow, which gave me the opportunity to remove all that old paint and body filler. |  |
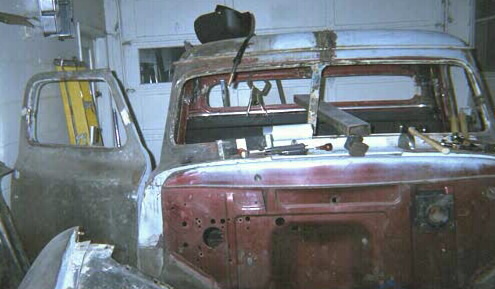 | Wrapping it up, here's a full-on front shot, complete with a hole riddled firewall. Filler pieces for the top of the door frames, and the filler pieces for the roof (which I quartered to avoid having to heat and bend the A-pillars) came from another cab that had more bullet holes than sheet metal. A hacksaw and a plasma cutter quickly created the pieces I needed to finish weld the doors and roof....Just add filler, sand and it's done! |
I hope you've enjoyed these pictures, there are more details on the way so check back...Jack