Chain Mail Intro
So you think that you want to make chain mail.
Before you go into spending a bunch of money on tools and material to make chain mail, and then find out that this is something that you don't have the time or patience to do it, lets tray a few things first.
You will need a few things some of which you should be able to find around the house. A pare of pliers (needle nose would be best) 2 pares would be better, and some rings. You could buy some jump rings from a craft store if you want, just to learn with (I would not use this supply of rings for a large project as it would cost way to much). To make some rings, the easiest way is to find a rod of some kind (I would go down to the hardware store and by one), and a pare of cutters. Now what size do you need well that depends on what size wire you have to work with. As for wire well you can use a lot of different kinds. If you are using a small wire like your basic baling wire (18 gage), you find in a lot of junk boxes in the house, you will need a small rod about ¼ in diameter. A larger wire like electric fence wire (14 gage) a 5/16 or 3/8 inch rod is good. The wire that coat hangers are made of is about 14 gage but sometimes 12 gage. I recommend that you use what you have around the house to learn on before going out and buying a lot of some kind of wire.
If you decide that this is something you want to do, you can buy wire to make rings at any hardware store that has electric fencing materials. Almost all wire (except stainless) will oxidize in one way or the other, and you will have to keep that in mind when chousing your wire. Myself I use the wire that is used to in baling round bales of hay. This wire comes in a 100-LB box of 14 gage about a mile long (I make a lot of chain mail). This wire is the closes you can get to the wire used by medieval armors. The problem with baling wire is that it has a coating of oil on it that keeps it from rusting and this oil will turn everything it touches black until it wears off, then the wire starts to rust.
Ok now you have the wire and a rod, now what? Ok, you will need to rap the wire around the rod making a coil that looks like a spring. You could make a winder but I would hold off on this until you know weather or not you want to do this. Try using a pare of vise grips pliers to hold the end of the wire on the rod and just wrap the wire on the rod. After you have wrapped the wire, remove it from the rod and use the cutters to cut the coil into rings.
Now you have some rings and you can get started learning how to make chain mail. I suggest you take the time to learn the basic of making chain mail before starting a project. One square foot of chain mail, made of 14gage 3/8 in I. D. will take about 2,300 rings. Use this as an idea on how much work it will be to make enough chain for your project. A coif uses about 2.25 square feet, which is about 5000 rings, a vest about 20,000 rings.
The examples I show and try to teach hear are based on many years of reading. I base most of my illustrations on digs done in northern Europe showing chain mail that rusted into the sculls and bone parts found in these digs.
Unlike popular belief most chain mail was not rebated together. The reason that most chain mail found in museums is rebated is because the mail was that used by Royalty and was not used in combat. This type of chain mail took much to long to make for the average person to be given for battle.
Chain mail used by common fighters was made from a low carbon steal wire that was 14 to 14.5 gages. The rings were from 5/16 to 3/8 I. D. After the rings were made they were woven with the ends butted together not rebated. Appetites made the mail used by fighters, and many fighters learned to make mail so that they could repair and often make more. Often parts of chain mail were taken from the dead and spliced into the armor that the fighter had. It was not uncommon the rank of a fighter was based on how much armor he had.
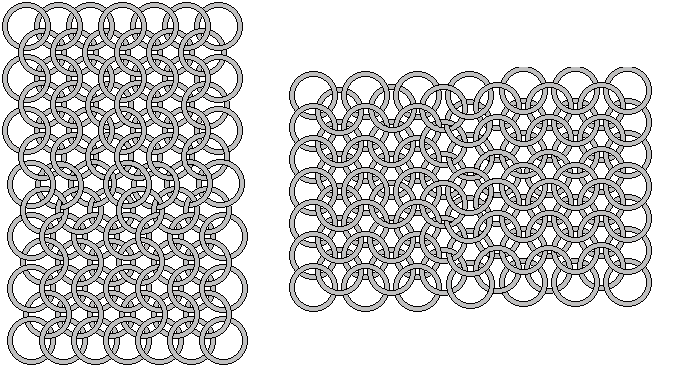
I have often seen chain mail made by people that were made in the wrong direction. By this I mean that the way the rings laid was incorrect. Note the illustration I give hear:

Note in Fig.2 that the rings have a lip that can catch the tip of a sword in a downward stroke allowing the attacker to shove the sword into the fighter. This is not something that I would what to happen to me, how about you?
Good luck
Tyrail Goodman
| Armor | Intro | Winder | 101 | 102 | 201 | 301 | 401 |
|---|---|---|---|---|---|---|---|
 |

|

|

|

|
 |
 |
 |