macramé on line
The On-line Magazine Exclusively Dedicated to Macramé
by Stephen Harmon

1 Flower Pot- 9" or less. (A flower pot with a bottom plate attached to water the plant is highly recommended. This way the water will not bleed onto the yarn, and ultimately rot the yarn.)
Knitting Yarn
8 ea. Light Blue @ 9 yards
176 ea. Light Blue @ 3 yards
92 ea. Dark Blue @ 3 yards
1 ea. Dark Blue @ 1 yard
Rings
1 ea. @ 2 3/4" (Does not need to be exact- this is the top ring)
2 ea. @ 3"
2 ea. @ 6"
2 ea. @ 9"
Beads
52 Naturally Colored 10mm Wooden Beads
42 Dark Brown 10mm Wooden Beads
Scissors
Large Swivel
Large Sewing Needle w/ Large Eyes
Fishing Line
Hard Bristled Brush

Tie on an anchor line, with the swivel incorporated somewhere into the line, to either a hook in the ceiling, or over a door frame. This line should be long enough to reach the level at which the working area will be. Attach this line to the 2 ¾" ring. On this ring, tie on, with side half hitches (one each to each side of the larks head tie on knot) the eight 7 yard light blue lines- thus generating 16 lines at ~3 ½ yards.

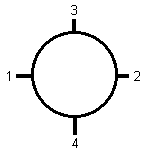
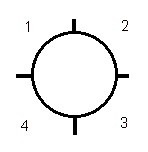
Measure out 5 1/4" from ring 1 along the light blue lines, and then tie on one of the 6" rings: Line 1and 2, from the graphic above, are tied to location 1 in the graphic to the left, engaging a clove hitch knot, and lines 3-8 are then tied to their respective locations. The ring is then leveled as usual ( See: Macrame Tip of the Month: Basic 3d Techniques). These 4 sets of 4 lines each will be the anchor for the entire project. They will be referred to as the main anchor lines.


Ring 2 has 4 distinct sections, divided by the 4 locations as outline above of the 16 lines at ~3 ½ yards, 4 each to each section. Tie on, with out side half hitches, 72 lines of light blue at 3 yards, and 40 lines of dark blue at 3 yards, in the following order for each sections, moving from left to right: 1 light blue; 4 sets of : 2 dark blue, 4 light blue; 2 dark blue; 1 light blue. This produces, within each section, the following order of lines: 4 light blue lines @ ~ 3 ½ yards; 2 light blue @ ~1 ½ yards; 4 dark blue @ ~ 1 ½ yards; 16 light blue @ ~ 1 ½ yards; 4 dark blue @ ~1 ½ yards; 16 light blue @ ~ 1 ½ yards; 4 dark blue @ ~ 1 ½ yards; 16 light blue @ ~ 1 ½ yards; 4 dark blue @ ~ 1 ½ yards; 16 light blue @ ~ 1 ½ yards; 4 dark blue @ ~ 1 ½ yards; 2 light blue @ ~ 1 ½ yards.

This will produce 5 sets of dark blue within each section. As can be seen, the center dark blue section will be tied on the exterior of the project, while the other 4 sections will be tied internally.

Carefully drape all the light blue lines over ring 1, insuring that ring 2 stays level. Tie on one of the 3" rings by taking the first dark blue section in each of the four sections of the ring, measuring out 3 ½" per line. Level as usual. Once the third ring is level, tie on the second, fourth, and fifth dark blue section from the four sections of ring 2. This will produce 16 lines per section, or a total of 64 dark blue lines on ring 3.

Starting anywhere, tie on ~6" of an alternating square knot fill.

Tie on the remaining 3" ring to the last row of the dark blue interior section. After tying on the ring, leave lines loose, as you will be coming back to them later.

Carefully undrape the light blue lines from ring 1. Starting at one of the main anchor lines, tie a square knot with the 4 lines. Square knot the next 4 light blue lines over the interspersed dark blue section. Continue to square knot around ring 2, tying over the dark blue sections as they are encountered. Leave the 3rd dark blue section from each ring section on the interior of the square knots. It will be tied later. Tie on ~ 4 ½" of an alternating square knot fill.

Tie on the remaining 6" ring. Leave the lines loose, as they will be tied later.
Visit our sister sites at: