


 Speaker
Surround Replacement
Page
is best viewed with "Marque Engraved" font.
The
first image is of the speaker that was in a recent acquisition, which actually
did work, and has only had tubes and power cord replaced since 1929.
Considering the dates on the original capacitors, of various days in early
October of 1929, this radio may actually have been a Christmas gift in
someone's family: And a grand gift it was, I am sure.
At 70 years of age, the radio is still working with the only items changed over the years
being the dial cord, most of the tubes, light bulb on the dial, and the power cord.
Speaker
Surround Replacement
Page
is best viewed with "Marque Engraved" font.
The
first image is of the speaker that was in a recent acquisition, which actually
did work, and has only had tubes and power cord replaced since 1929.
Considering the dates on the original capacitors, of various days in early
October of 1929, this radio may actually have been a Christmas gift in
someone's family: And a grand gift it was, I am sure.
At 70 years of age, the radio is still working with the only items changed over the years
being the dial cord, most of the tubes, light bulb on the dial, and the power cord.
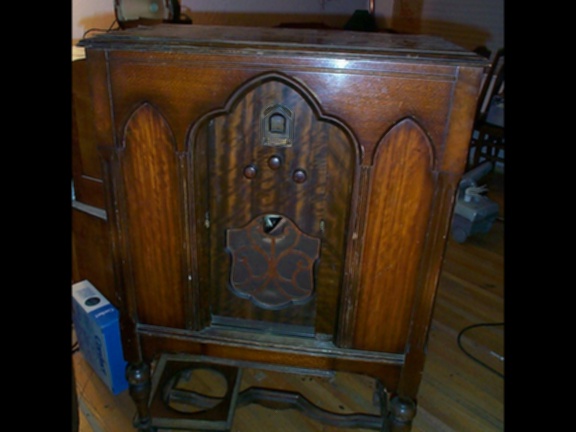 1929
Kellogg
Console.
Model
Number unknown.
Once
I had the speaker removed from it's mounting location, the speaker looked
like this first speaker image.
1929
Kellogg
Console.
Model
Number unknown.
Once
I had the speaker removed from it's mounting location, the speaker looked
like this first speaker image. 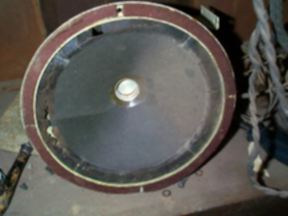 The leather surround was completely rotted away.
Careful
removal of the old material was tedious, as I scraped it off with my fingernails,
while backing up the back side of the speaker cone with my thumb.
The
cement that had been used, was crystalized and brittle, so once you had
a clear crisp edge to hook your fingernail, the material crumbled away.
This
picture shows the speaker ready to accept the new surround.
The leather surround was completely rotted away.
Careful
removal of the old material was tedious, as I scraped it off with my fingernails,
while backing up the back side of the speaker cone with my thumb.
The
cement that had been used, was crystalized and brittle, so once you had
a clear crisp edge to hook your fingernail, the material crumbled away.
This
picture shows the speaker ready to accept the new surround.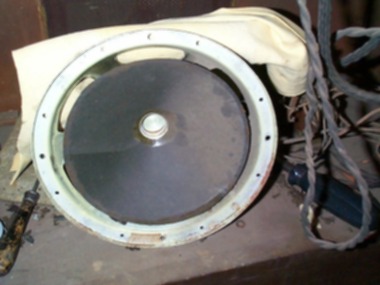 The
speaker's "spider", the part attached right along the top of the voice
coil, which holds that part of the speaker suspended in the "basket", or
frame, of the speaker; was in excellent shape, so the surround was all
that was needed to be replaced.
Your's
may not come apart quite so easy. Or if you happen to be working
on a repair of a newer speaker, like rewinding and re-forming the voice
coil, there are products used by picture framers which are adhesive releasing
agents, which do work slowly, but quite well. If your speaker was
glued with a "spruce gum" adhesive, these may not work, as that has been
the only compound that is not affected by the adhesive releasing agents.
I
did not have any leather of the same thin thickness, or softness as the
original had been, BUT I had an idea- a "Chamois" of REAL chamois.
This is a suitably soft leather product, that was readily available (local
auto parts store), cheap (less than 10 bucks for a 2 square foot "hide".
The
speaker's "spider", the part attached right along the top of the voice
coil, which holds that part of the speaker suspended in the "basket", or
frame, of the speaker; was in excellent shape, so the surround was all
that was needed to be replaced.
Your's
may not come apart quite so easy. Or if you happen to be working
on a repair of a newer speaker, like rewinding and re-forming the voice
coil, there are products used by picture framers which are adhesive releasing
agents, which do work slowly, but quite well. If your speaker was
glued with a "spruce gum" adhesive, these may not work, as that has been
the only compound that is not affected by the adhesive releasing agents.
I
did not have any leather of the same thin thickness, or softness as the
original had been, BUT I had an idea- a "Chamois" of REAL chamois.
This is a suitably soft leather product, that was readily available (local
auto parts store), cheap (less than 10 bucks for a 2 square foot "hide".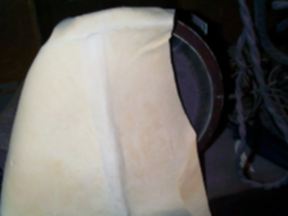 I did not have a nice dark background, so I simply draped it over the Kellogg
speaker for this picture.
What
also ended up being the item that sent me searching for the Chamois, was
this Magnavox reproducer. (This unit has it's own power supply for
the field coil, so it not an amp, nor is it just a speaker.)
I did not have a nice dark background, so I simply draped it over the Kellogg
speaker for this picture.
What
also ended up being the item that sent me searching for the Chamois, was
this Magnavox reproducer. (This unit has it's own power supply for
the field coil, so it not an amp, nor is it just a speaker.) 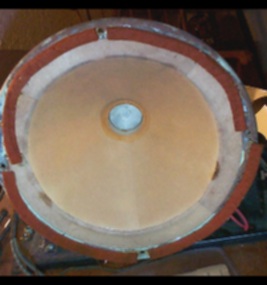 This
Magnavox reproducer has a surround that feels exactly like the Chamois
I used. Amazingly, the Magnavox surround is about 73 years old, and
still in excellent condition.
I
used the old cardboard gasket; that was in poor shape itself; as a guide
for my outline of the outer circle of the surround. For the inner
diameter, I wound up using a soup bowl as it happened to be the correct
diameter to "catch" the edge of the speaker cone, which was in decent condition
still, even with a few small tears at the edge.
This
picture shows the new surround trimmed, and "punched", and ready to be
glued in.
This
Magnavox reproducer has a surround that feels exactly like the Chamois
I used. Amazingly, the Magnavox surround is about 73 years old, and
still in excellent condition.
I
used the old cardboard gasket; that was in poor shape itself; as a guide
for my outline of the outer circle of the surround. For the inner
diameter, I wound up using a soup bowl as it happened to be the correct
diameter to "catch" the edge of the speaker cone, which was in decent condition
still, even with a few small tears at the edge.
This
picture shows the new surround trimmed, and "punched", and ready to be
glued in.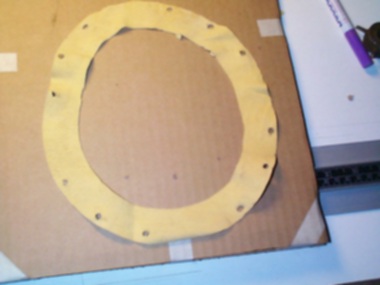 The
speaker also has an attaching ring that simplifies, and speeds assembly,
as it is retained by screws to hold the surround in place.
The
cement I chose was "Ambroid", available at almost all hobby shops.
Ambroid
has a good track record with many of the RC airplane enthusiast's I have
known, plus it proved itself on reassembling the first ever attempt I had
made at reforming and rewinding a speaker voice coil- which worked out
just fine.
Ambroid
also happened to have approximately the same characteristics as the old
adhesive.
The
outer edge was glued in place first, and then secured with screws.
If yours is not secured with a metal ring, placing the speaker face down
on a very flat surface, with the outer seal gaskets in position will work
best.
If
that is not an option, you should follow the procedure for attaching the
inner edge of the surround to the cone itself.
You
spread out the adhesive about 1/8 inch wide around edge of the cone,(or
the full width of the basket for the alternate method of gluing the outer
edge), press the gasket into the adhesive, and pull it up. Let it
dry for close to minute, then apply a second coat in the same manner as
the first, and press the surround into place evenly. You should not
have any wrinkles, as the chamois is soft enough to accomodate the excess
of the wrinkle.
You
may need to tend the surround for a little while as the glue takes a final
set, pressing the surround down gently where needed, and "squeezing" in
a little more glue in areas that absorbed the glue.
The
speaker also has an attaching ring that simplifies, and speeds assembly,
as it is retained by screws to hold the surround in place.
The
cement I chose was "Ambroid", available at almost all hobby shops.
Ambroid
has a good track record with many of the RC airplane enthusiast's I have
known, plus it proved itself on reassembling the first ever attempt I had
made at reforming and rewinding a speaker voice coil- which worked out
just fine.
Ambroid
also happened to have approximately the same characteristics as the old
adhesive.
The
outer edge was glued in place first, and then secured with screws.
If yours is not secured with a metal ring, placing the speaker face down
on a very flat surface, with the outer seal gaskets in position will work
best.
If
that is not an option, you should follow the procedure for attaching the
inner edge of the surround to the cone itself.
You
spread out the adhesive about 1/8 inch wide around edge of the cone,(or
the full width of the basket for the alternate method of gluing the outer
edge), press the gasket into the adhesive, and pull it up. Let it
dry for close to minute, then apply a second coat in the same manner as
the first, and press the surround into place evenly. You should not
have any wrinkles, as the chamois is soft enough to accomodate the excess
of the wrinkle.
You
may need to tend the surround for a little while as the glue takes a final
set, pressing the surround down gently where needed, and "squeezing" in
a little more glue in areas that absorbed the glue.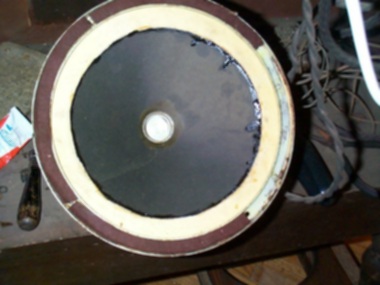 As
a final step(s)
run
a slight fillet of glue along the edge of the chamois, and repair any tears
that have formed along the edge, as can be seen in the photo.
Once
dry, your speaker is ready to be placed back into service.
-UPDATE-
With a very long wire antenna attached, there were stations found every 10KHz.
Many were interfered with to the point that they were not even discernable.
On the North sloped antenna, Philadelphia came in loud and clear. as did Detroit.
New York was listenable but weak. KFAB out of Omaha was weak and distorted.
Many of the Minnesota stations west of Minneapolis filled in the gaps that
otherwise would have pulled in from states out west.
As it was, only one station in Utah on 1540KHZ, was heard.
E-mail me if you have a question.
As
a final step(s)
run
a slight fillet of glue along the edge of the chamois, and repair any tears
that have formed along the edge, as can be seen in the photo.
Once
dry, your speaker is ready to be placed back into service.
-UPDATE-
With a very long wire antenna attached, there were stations found every 10KHz.
Many were interfered with to the point that they were not even discernable.
On the North sloped antenna, Philadelphia came in loud and clear. as did Detroit.
New York was listenable but weak. KFAB out of Omaha was weak and distorted.
Many of the Minnesota stations west of Minneapolis filled in the gaps that
otherwise would have pulled in from states out west.
As it was, only one station in Utah on 1540KHZ, was heard.
E-mail me if you have a question.
This Antique Radio Webring site owned by
John McPherson.
Random Site [
Previous 5 Sites
|
Previous
|
Next
|
Next 5 Sites
|
Random Site
|
List Sites
]
[
Previous 5 Sites
|
Previous
|
Next
|
Next 5 Sites
|
Random Site
|
List Sites
]